Embroidery guide
Embroidery on Jeans and Denim Jackets: A Machine Guide
Embroidery on jeans and denim jackets by machine: where designs go, how to hoop a narrow jean leg, and the stabilizer, needle and sizes that work.
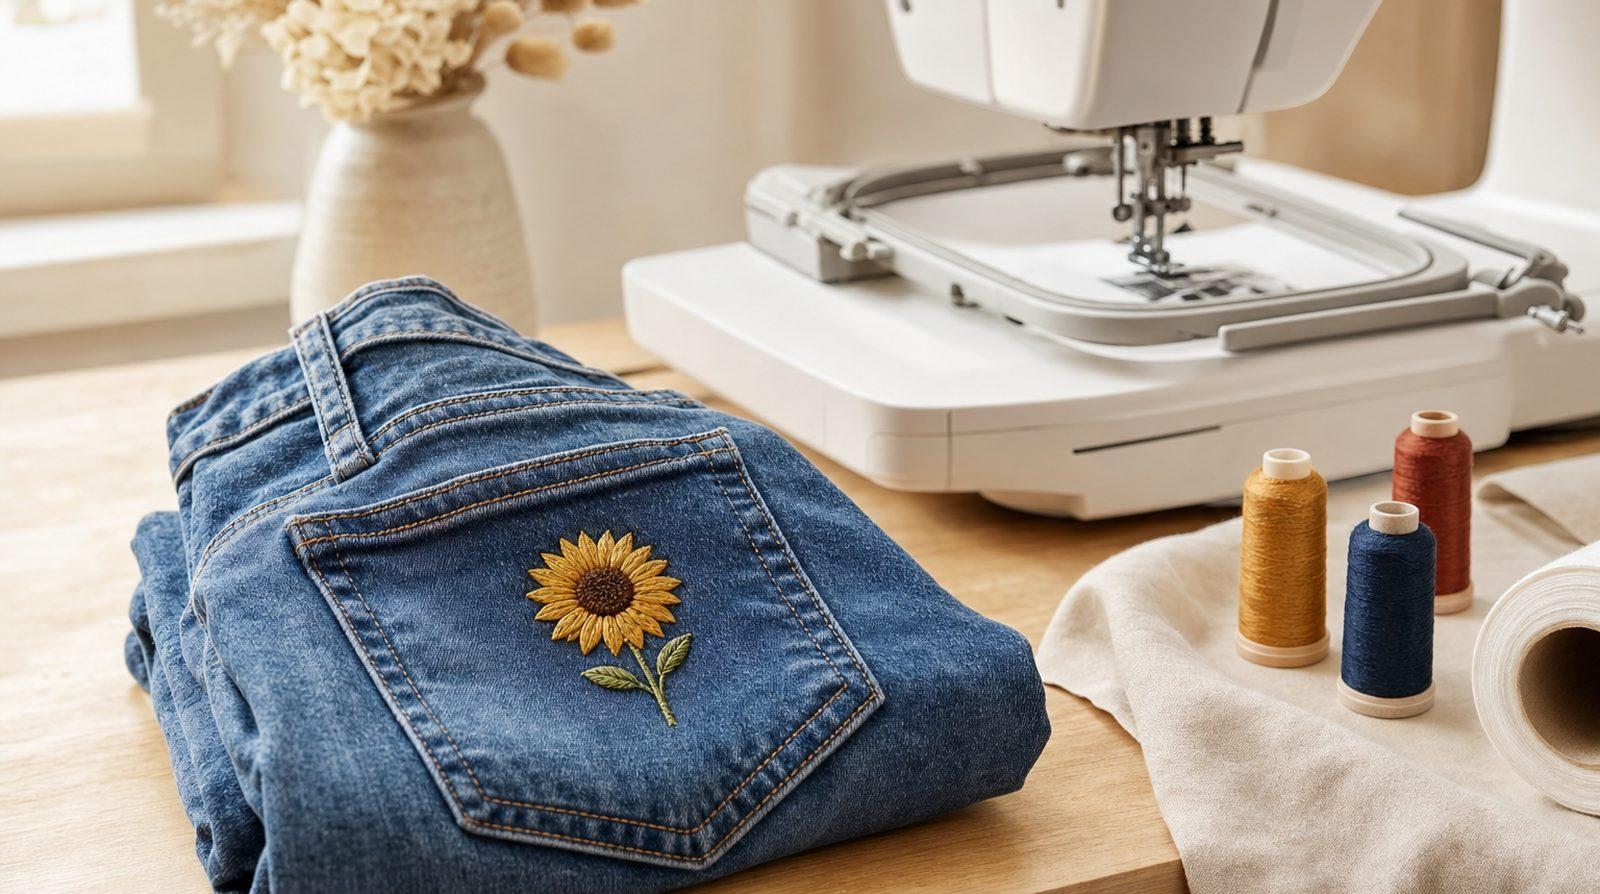
Quick answer: Machine embroidery on jeans is mostly a hooping problem, not a stitching problem.
- Back pocket: unpick the pocket, embroider it flat (60–90 mm is typical) and sew it back on.
- Leg: open a side seam so the leg lies flat, or slide the leg over a free arm. Never hoop a closed leg on a flatbed machine: you'll sew the leg shut.
- Jacket back: unbutton it and hoop the back flat. Full-back designs run 200–250 mm and need a large hoop.
- Setup: pre-wash, heavy tear-away on rigid denim (cut-away on stretch denim), a 90/14 sharp needle, and stay about 1/2 in clear of rivets and thick seams.
Denim is one of the friendliest fabrics to stitch on. It is a firm cotton twill that holds dense stitching without puckering, and bright thread pops against indigo. Embroidery on jeans is still harder than it looks, because jeans are narrow tubes full of heavy seams, rivets and bar tacks, and your hoop needs flat access to a single layer.
This guide covers embroidery on jeans and denim jackets with a single-needle home machine or a multi-needle machine: placements and sizes, how to handle a narrow jean leg, how to unpick and re-sew a back pocket, and the stabilizer, needle and thread that suit denim. If you're new to your machine, read machine embroidery for beginners first, and try your first pair on thrift-store jeans.
Embroidery on jeans: where designs go and how big
The spot decides the size, the hooping method and how much unpicking you'll do, so choose it before you choose the design.
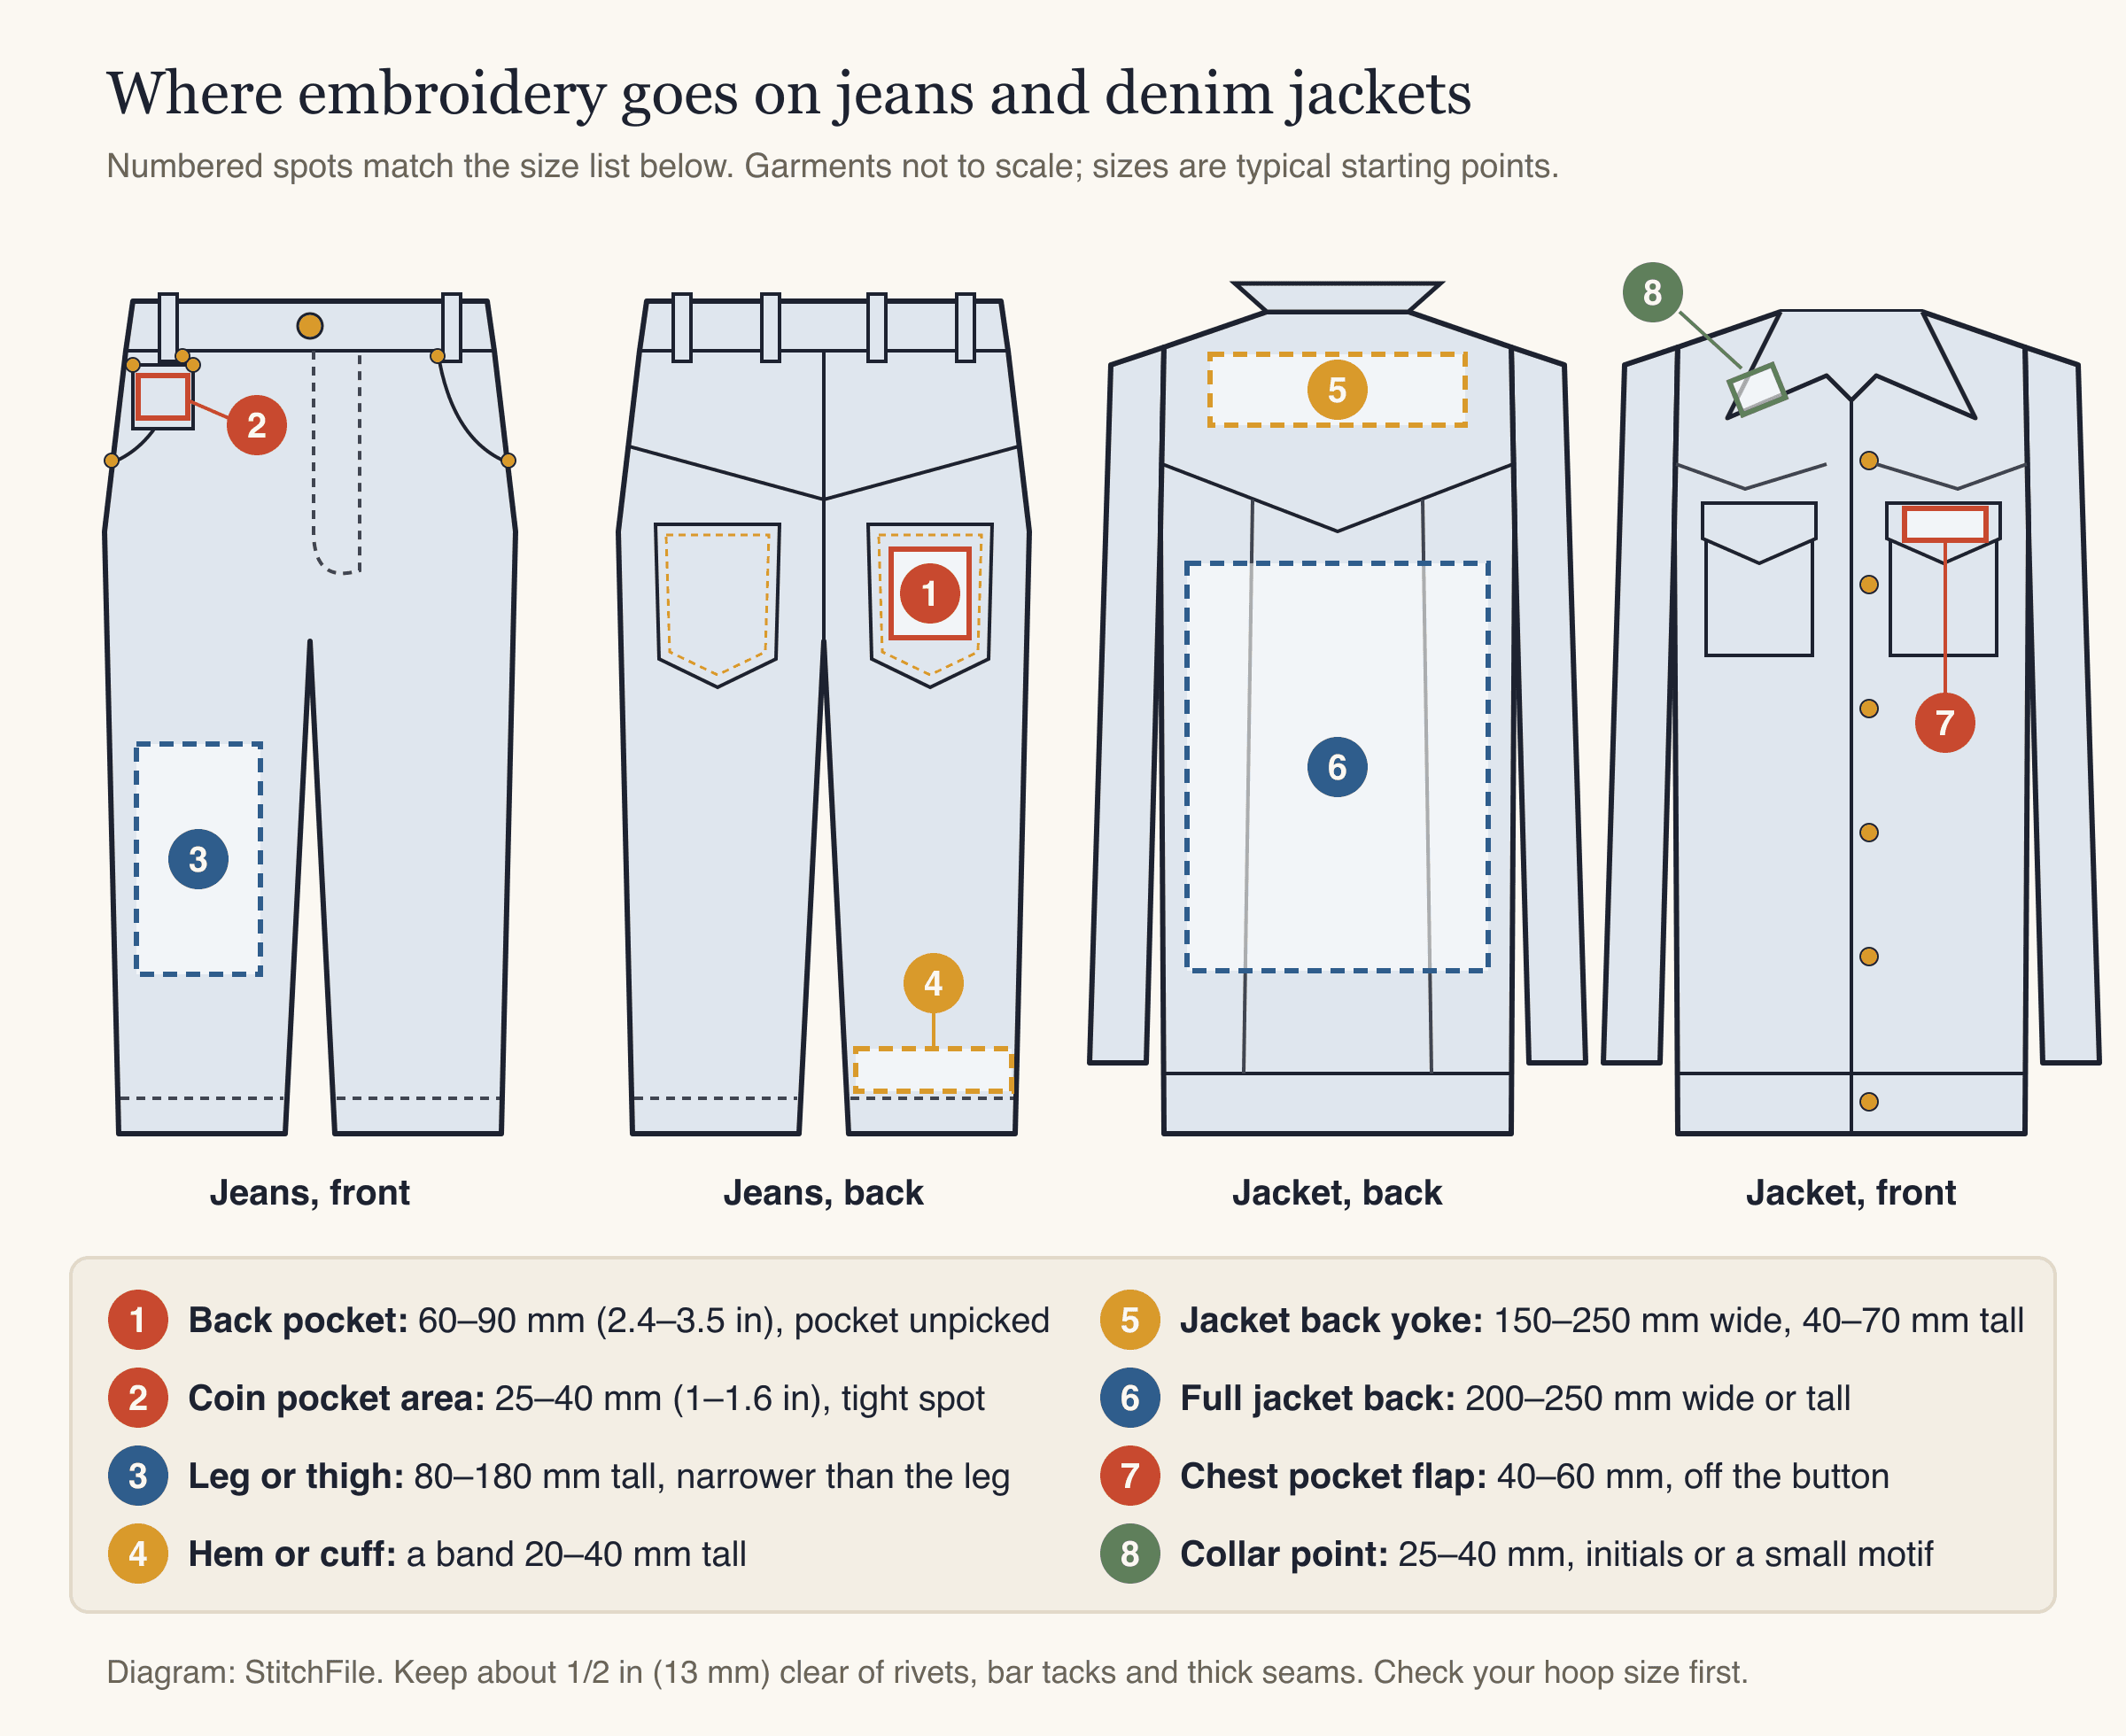
Typical placements on jeans and a trucker-style denim jacket. The sizes are starting points; measure your own garment.
| Placement | Typical size (longest side) | How you get at it |
|---|---|---|
| Back pocket | 60–90 mm (2.4–3.5 in) | Unpick the pocket, embroider it, sew it back |
| Front coin pocket area | 25–40 mm (1–1.6 in) | Hard: rivets, and the front pocket sits behind it |
| Leg or thigh | 80–180 mm tall, narrower than the flat leg | Open a side seam, or use a free arm |
| Hem or cuff | A band 20–40 mm tall | Same as the leg |
| Jacket back yoke | 150–250 mm wide, 40–70 mm tall | Unbutton the jacket and hoop the back flat |
| Full jacket back | 200–250 mm (8–10 in) | Same; needs a large hoop |
| Jacket chest pocket flap | 40–60 mm | Float the flap, clear of the button |
| Collar point | 25–40 mm | Float the open collar |
Three rules apply everywhere on denim:
- Stay clear of hardware. Keep the design about 1/2 in (13 mm) from rivets, buttons and snaps. A needle that hits metal breaks and can knock the machine's timing out.
- Avoid the thickest seams. Flat-felled seams, the waistband, belt loops, the yoke seam and the folded hem can be four or more layers of twill. If a design must cross one, keep that part light.
- Check lettering and hoop size. Letters need to be at least about 5 mm tall on denim, or they blur into the twill. A back-pocket design fits a 4×4 in hoop; a full jacket back needs an 8×12 in hoop or similar. The embroidery hoop sizes chart lists the sewing fields.
What you need for embroidery on denim
| Item | Rigid denim (most jeans and jackets) | Stretch denim |
|---|---|---|
| Stabilizer | Heavy tear-away | Medium cut-away, fused or sprayed |
| Needle | 90/14 sharp, denim or embroidery | 80/12 to 90/14 sharp |
| Thread | 40 wt polyester or rayon embroidery thread | Same |
| Extras | Sticky stabilizer for floating, seam ripper, chalk, clips; a sewing machine and topstitching thread to re-sew | Same |
Stabilizer is the backing hooped under the fabric so the stitches have a firm base. Tear-away tears off after sewing; cut-away stays in and is trimmed. Rigid denim is stable on its own, so heavy tear-away is enough for most designs. Stretch denim (elastane in the label) behaves partly like a knit and needs cut-away to keep the design flat through washing. The embroidery stabilizer guide covers each type.
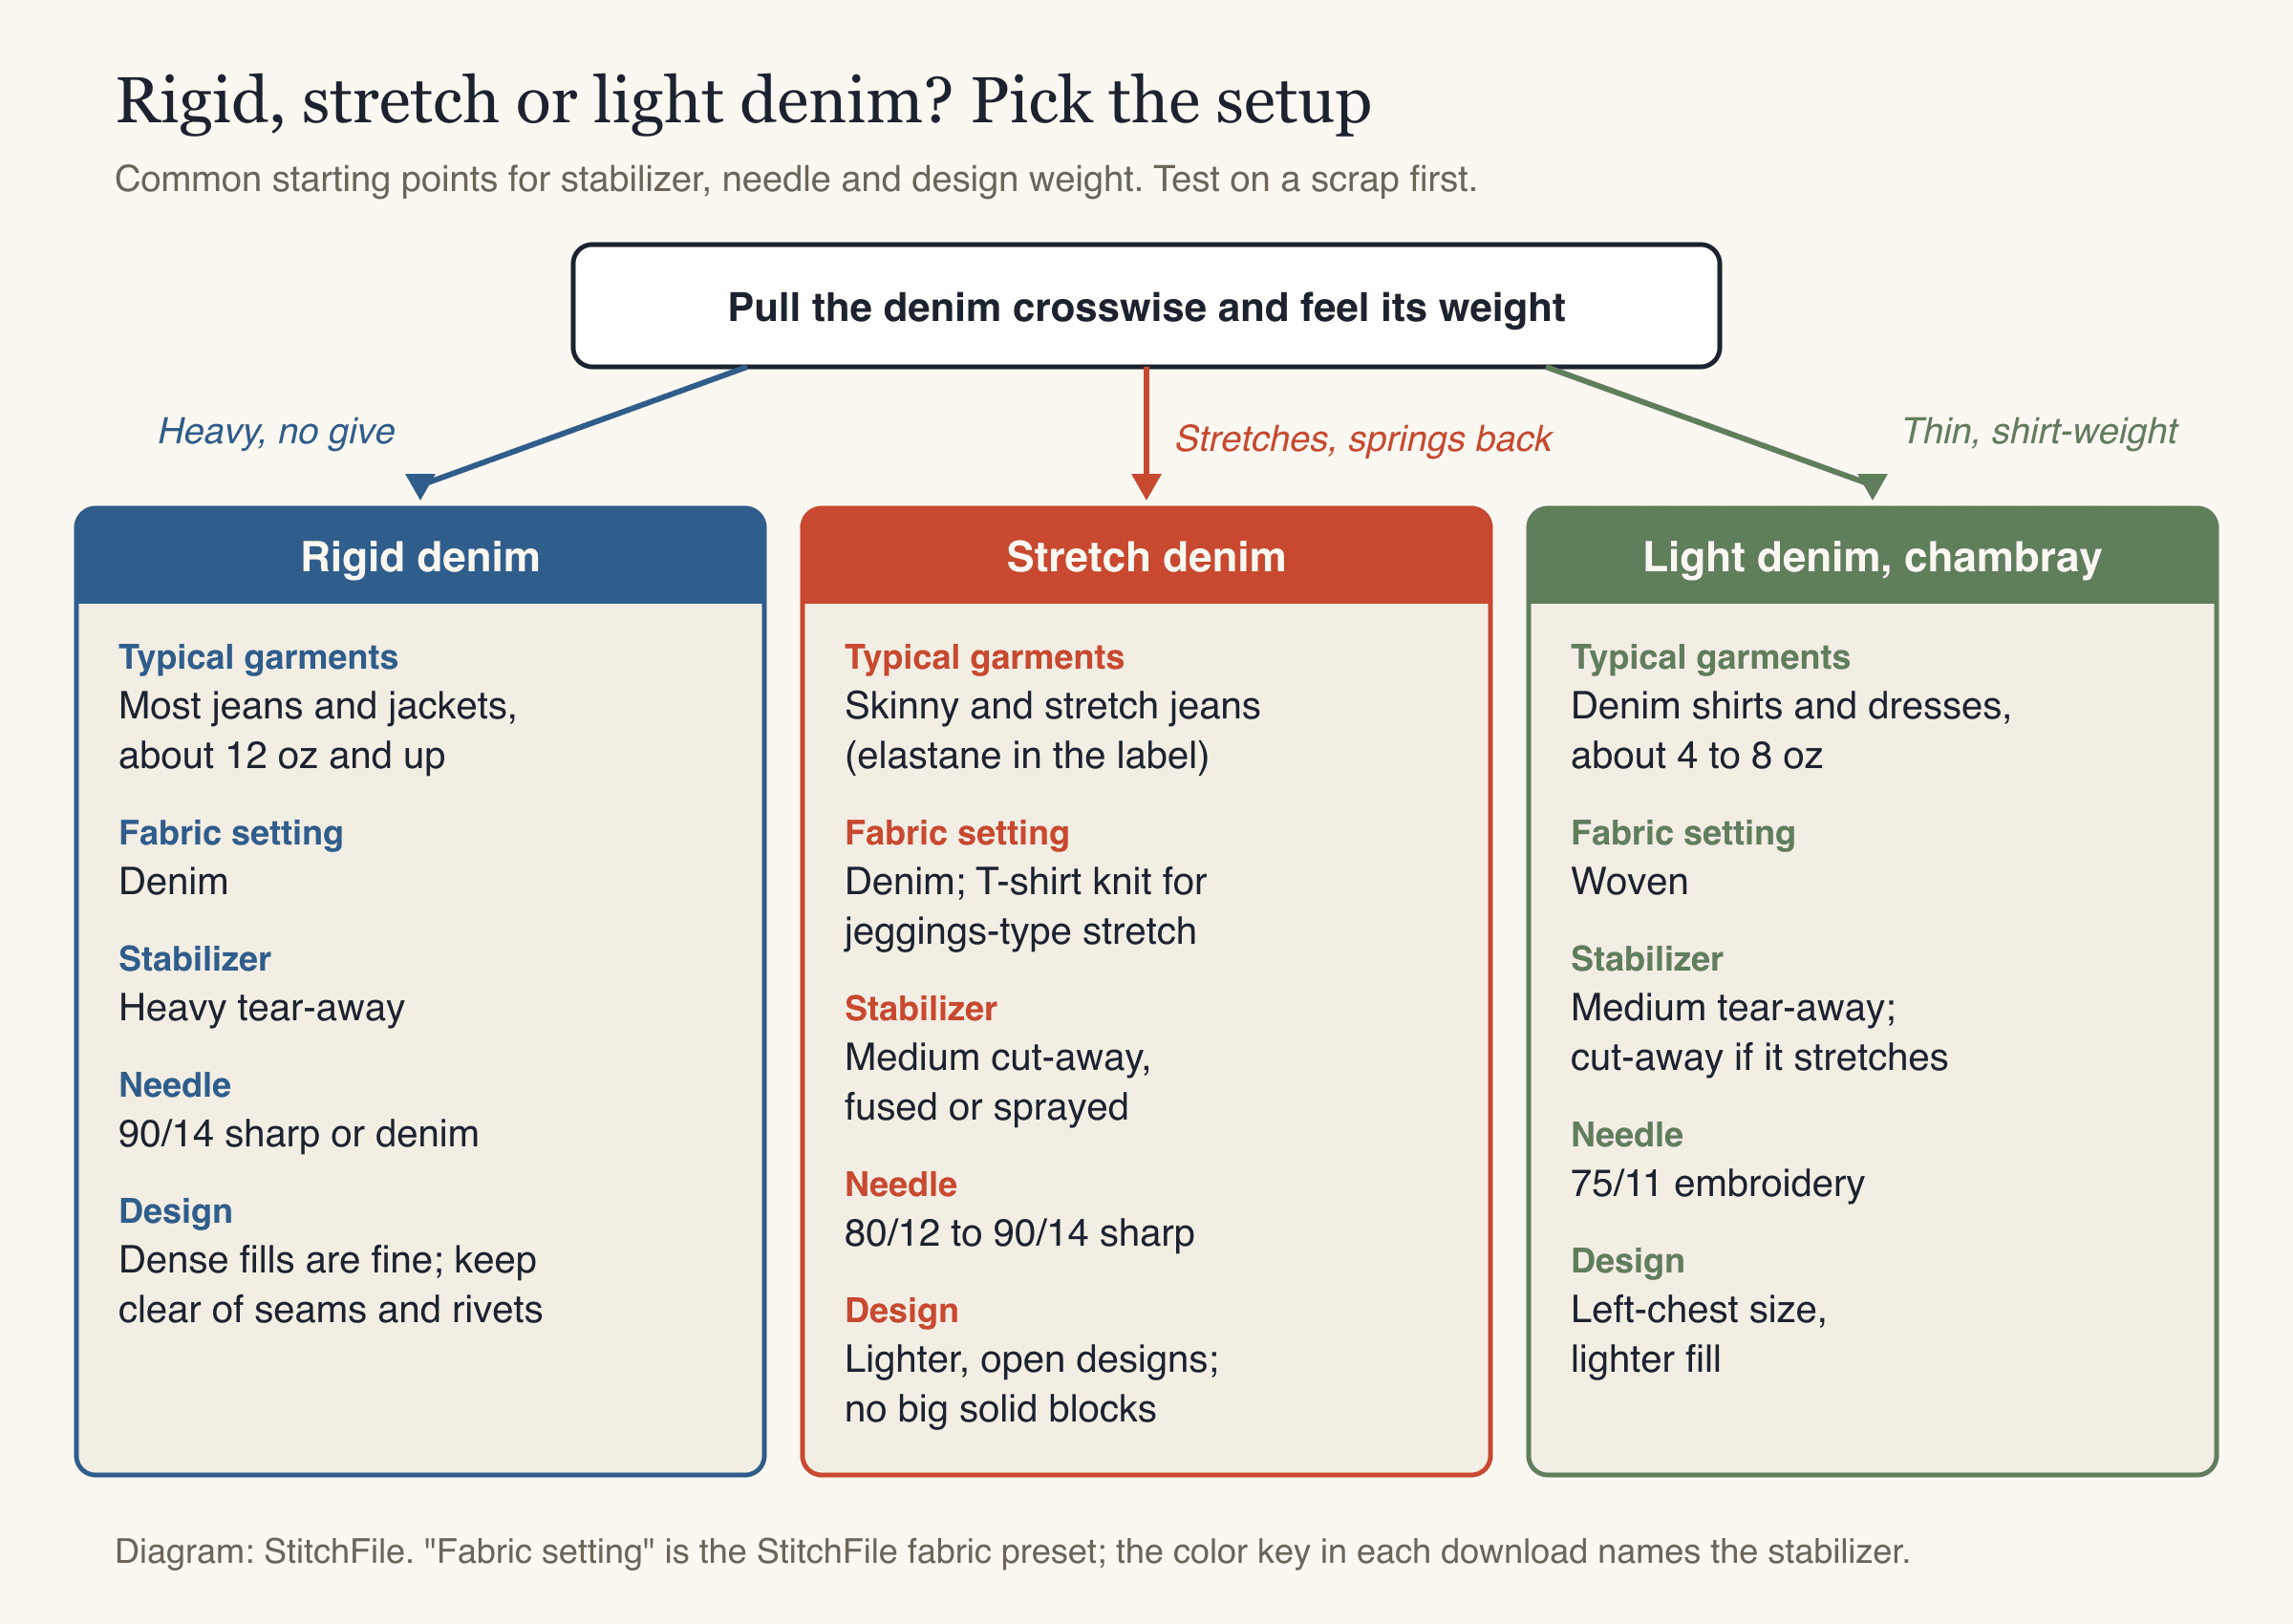
Pull the denim crosswise. If it gives and springs back, treat it as stretch denim.
A sharp needle has a fine point that pierces tight twill cleanly. A 90/14 is a common starting point for jeans weight; a 75/11 suits light chambray. Start each garment with a fresh needle, since denim dulls points quickly. More in our embroidery machine needles guide.
Pre-wash first. Wash and dry the garment the way it will be washed in normal use. Shrinkage then happens before the stitching instead of puckering the finished design, the stiff sizing comes out, and loose indigo washes away instead of rubbing onto pale thread. Raw denim can shrink a lot, so never skip this on it.
How to embroider jeans: the leg
A jean leg is a closed tube, and that's the core problem. A hoop clamps one flat layer. If you slide a hoop into a closed leg, the other side of the leg has to go somewhere, and on most home machines it ends up under the hoop, right where the needle goes.
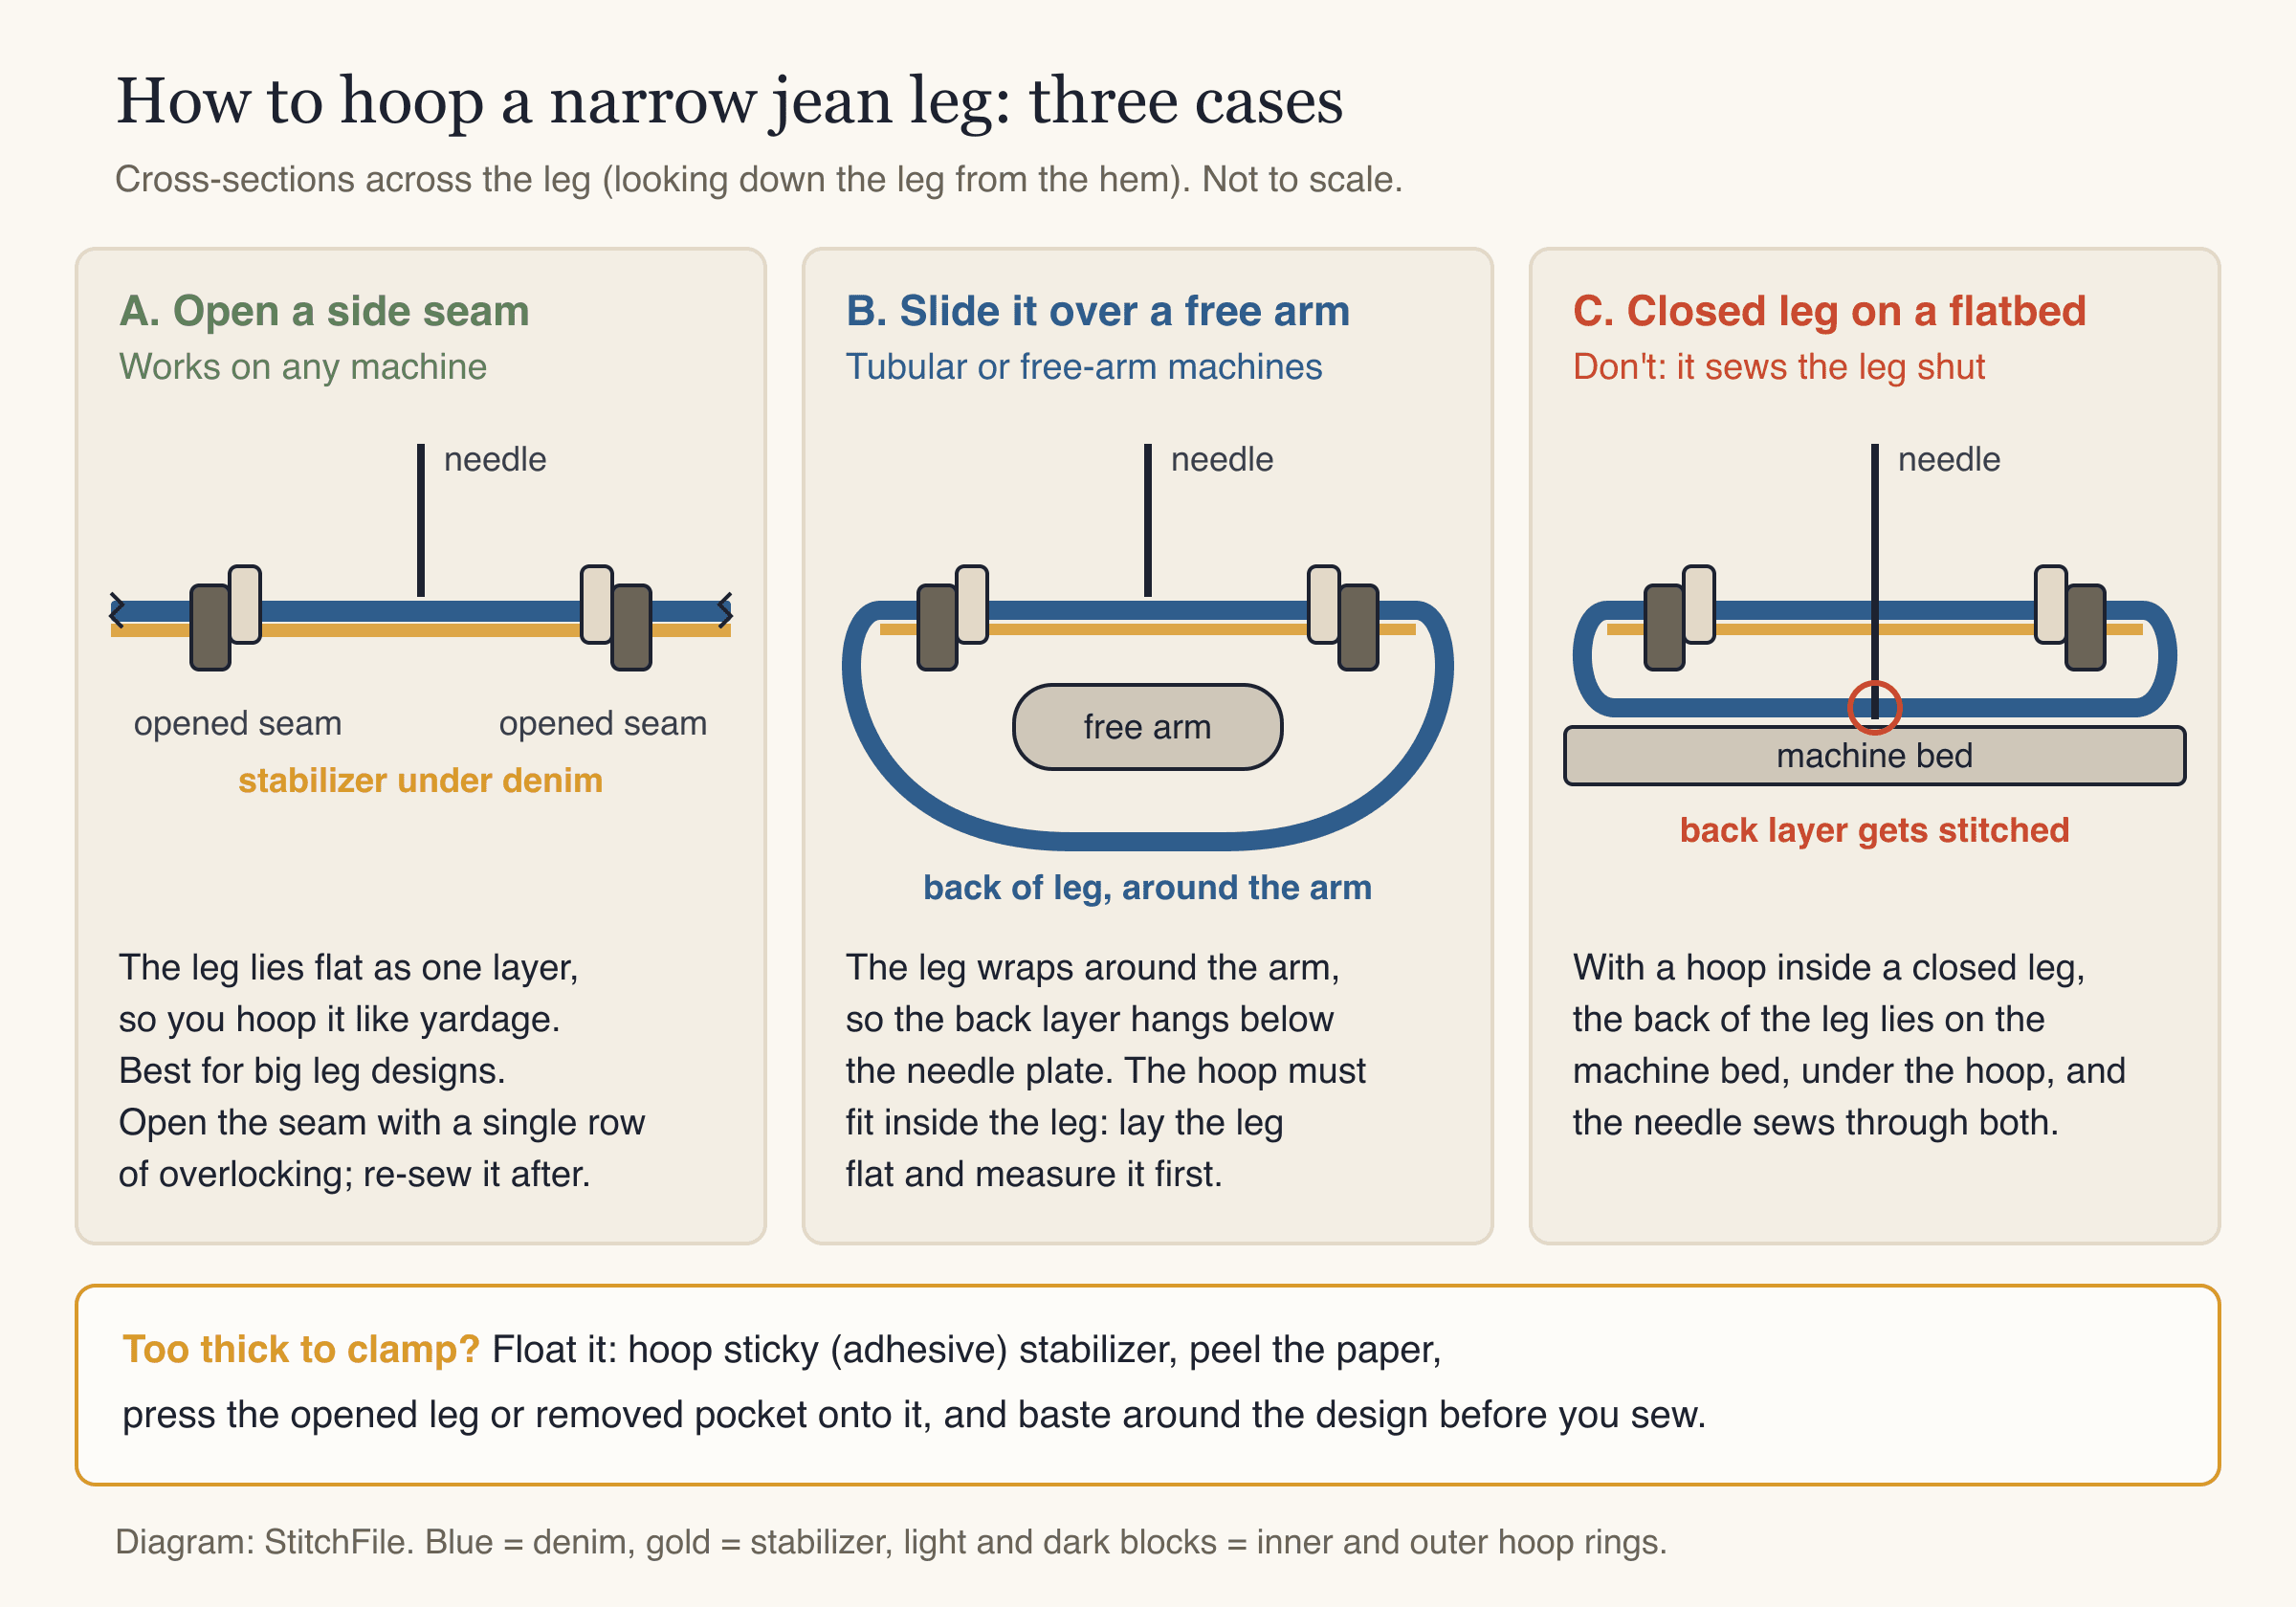
A and B work; C stitches the front and back of the leg together.
On a flatbed machine (most single-needle home embroidery machines), there's no way around this: the back of the leg always passes under the hoop somewhere. So you have two real options.
Option A: open a side seam (any machine)
On many five-pocket jeans, the inseam is flat-felled: the raw edges are folded into each other and held by two rows of stitching. It is slow to unpick and hard to rebuild neatly. The outseam is often a plain seam with overlocked edges, much easier to open and re-sew. Check your pair and open the simpler one.
- Mark the design. Try the jeans on, chalk the center of the design, then lay the leg flat to check the width between seams. Keep the design at least 1/2 in inside each seam.
- Open the seam from a little above the design to a little below it, far enough that the leg lies flat across your whole hoop. Near the hem, unpick the hem a few inches either side of the seam too.
- Hoop or float the single layer with heavy tear-away. Clip the rest of the leg clear of the hoop.
- Trace, then sew. Use the machine's trace or "check size" function so the needle stays off the open seam allowance.
- Re-sew the seam along the original stitch line with a denim needle on your sewing machine, finish the edges with zigzag or serging, and redo any topstitching and the hem.
Option B: slide the leg over a free arm
On a multi-needle machine with a tubular arm, or a home machine that embroiders on a free arm, the leg wraps around the arm, so the back layer hangs below the needle plate. Lay the leg flat and measure across it first: the hoop has to slide inside with room to spare. On slim jeans, a small hoop may be the only one that fits the lower leg. Push the rest of the leg back toward the waist so it can't creep under the needle.
Floating thick denim
Clamping heavy denim between hoop rings is hard and can leave a shiny ring mark (hoop burn). Floating avoids it: hoop sticky (adhesive) tear-away paper side up, score and peel the paper, press the denim on, and run a basting stitch (a loose outline many machines can add) around the design area. This is also how you embroider a removed back pocket, which is too small to hoop on its own.
How to embroider a jean back pocket
Embroidering a pocket in place sews it shut, so take it off, embroider it flat and put it back.
- Record the position. Photograph the pocket and chalk its four corners on the jeans. Note the topstitching color and number of rows.
- Unpick the bar tacks, the short, dense zigzag bars at the top corners. Cut them in small sections with a seam ripper; this is where it's easiest to nick the denim.
- Unpick the topstitching. Cut every few stitches, pull the threads out and pick off the fuzz. The jeans will show a darker outline where the pocket sat, which is your guide later.
- Embroider the pocket. Press it, then float it on hooped sticky tear-away; a 5×7 in hoop leaves room around an adult pocket. Keep the design inside the topstitching lines with a margin.
- Sew it back. Pin it over the outline and topstitch along the old holes with a 90/14 or 100/16 denim needle and topstitching thread. A stitch length around 3–3.5 mm looks like factory stitching.
- Re-tack the corners with a short, narrow, very tight zigzag where the bar tacks were.
If a back pocket has rivets at the corners instead of bar tacks, leave it on: rivets can't be refitted on a home sewing machine.
The front coin pocket is harder still. Its corners are usually riveted, and it sits on the front pocket facing, so stitching through it closes the front pocket. The practical route there is a small embroidered patch, about 25–40 mm across, sewn on by hand.
How to embroider a denim jacket
Jean jacket embroidery is easier in one way: the jacket opens down the front, so the back lies flat without unpicking anything. The challenges are size and weight.
- Empty the pockets, unbutton the jacket and lay it face down.
- Mark the center line down the back. For a full-back design, a common starting point is about 1 in (25 mm) below the yoke seam, the seam across the shoulders. Yoke lettering is centered in the band above it.
- Back it. Two layers of heavy tear-away support a large, dense design; one is enough for yoke lettering.
- Hoop or float only the back. Roll the fronts and sleeves toward the center and clip them clear, then check underneath that only one layer is in the sewing area.
- Support the weight on the table so the jacket doesn't drag the hoop and shift the design.
- Trace, then sew slowly. The yoke seam and the vertical back seams are often flat-felled and thick.
Hoop fit: a 250 mm design fits an 8×12 in (200×300 mm) hoop only if its other side is 200 mm or less. With a 6×10 in (160×260 mm) hoop, keep the design inside 160×260 mm. Check your machine's maximum embroidery area first.
Linings, chest and collar: on a lined jacket, stitches go through the lining unless you open it at the hem. Pocket flaps and collars are two layers with stiff interfacing: float them, keep small designs off the button and buttonhole, and trace carefully.
Dense or light designs on heavy twill
Rigid denim carries dense fills without puckering, which is why jacket backs look so crisp. That doesn't mean every denim design should be dense:
- On a leg, lighter is better. The leg bends at the knee and hip, and a block of dense fill turns stiff and uncomfortable. Outlines, satin details and open designs wear better.
- On a jacket back, dense works, but a 250 mm solid fill is heavy and slow. Leaving some fabric showing helps.
- Bold beats thin. The diagonal twill ribs can swallow a single fine running stitch. Bolder lines and satin borders read better.
- Light thread on dark indigo needs good coverage and underlay (stitches sewn first to anchor the fabric), or blue shows between the rows.
For thread, 40 wt polyester is a good default: it holds its color through many washes. Classic choices are the gold and copper of jeans topstitching, white, red and pale blue. Our machine embroidery thread guide covers weights and fibers.
Getting a design file sized for denim
A design made for a thin tee looks weak on heavy twill, and one made for a jacket back won't shrink well onto a pocket. The file needs to match both the fabric and the size.
StitchFile turns a logo or artwork (SVG, PNG or JPG) into machine embroidery files in about 20 seconds. Choose the Denim fabric setting, made for jeans, jackets and heavy canvas: it sets stitch density and pull compensation for the fabric and puts heavy tear-away on the color key. Type any size from 20 to 300 mm, or pick a preset such as Full back (250 mm) for a jacket. The upload asks for your garment color, so thread choices suit dark denim. The free preview shows the stitch count, sew time, the smallest hoop the design fits, and a warning if lettering is under the 5 mm minimum for denim. Every purchase includes PES, DST, JEF, EXP and VP3.
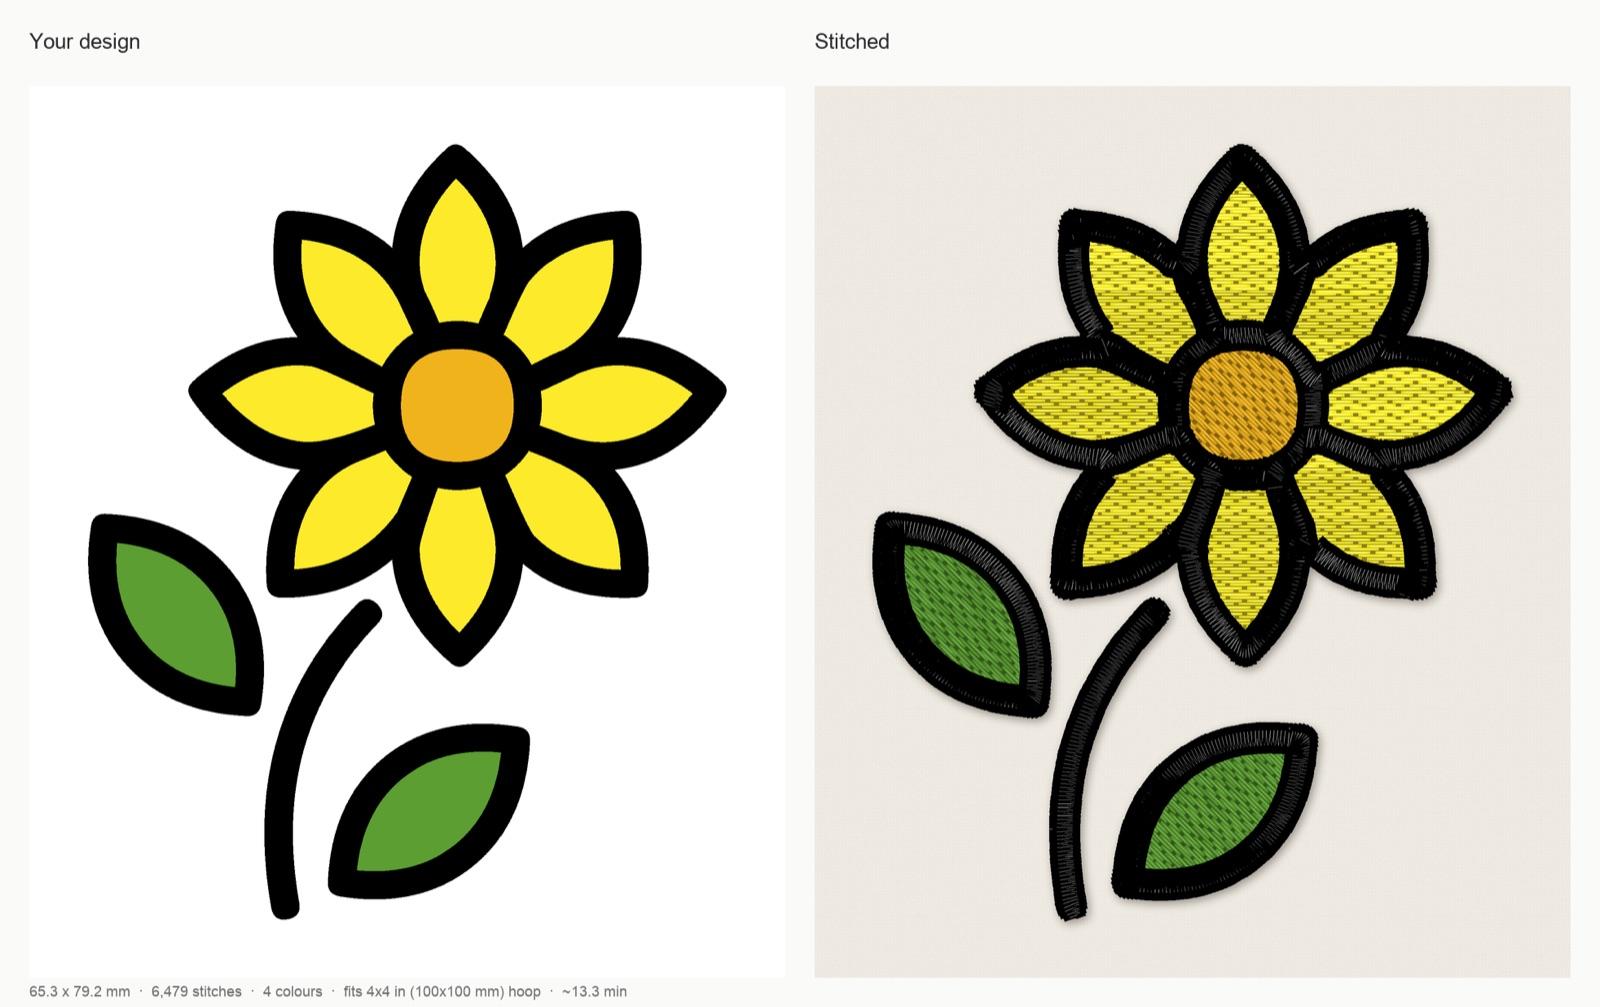
StitchFile stitch preview at 80 mm with the Denim fabric setting, a back-pocket size: 65.3 × 79.2 mm, 6,479 stitches, 4 colors, 25 trims, fits a 4×4 in hoop, about 13.3 minutes at 700 stitches per minute. The color key recommends heavy tear-away stabilizer.
Artwork: OpenMoji sunflower, CC BY-SA 4.0. StitchFile converted the artwork into the stitch preview shown here; these adaptations are shared under the same license.
The black outlines are satin borders, bold enough to hold up against the twill. If pale petals let indigo show through, the Density → Fuller edit sews the rows closer together.
Care for embroidered jeans
- Finish neatly. Tear stabilizer away close to the stitching (trim cut-away to about 1/4 in) and clip jump threads.
- Wash inside out in cool or warm water, and skip chlorine bleach.
- Dry low or hang dry, and press from the back on a folded towel so the stitches aren't flattened.
Denim fades with wear and the thread usually stays brighter than the fabric around it, which is part of the look.
Common mistakes
- Hooping a closed leg on a flatbed. The needle sews the front and back together.
- Embroidering a pocket in place. It sews the pocket shut.
- Stitching near rivets. Broken needles and possible machine damage.
- Skipping the pre-wash. The jeans shrink later and the design puckers.
- Tear-away on stretch denim. It needs cut-away to stay flat after washing.
- A design too big for the hoop. A 250 mm jacket design won't fit a 5×7 in machine.
- Heavy fills on a leg. Stiff, uncomfortable and slow to sew.
For other stitch-out problems, see the machine embroidery troubleshooting guide.
FAQ
Can you embroider jeans with a regular home embroidery machine?
Yes. Back pockets, jacket backs and opened leg seams all work on a single-needle home machine. What a flatbed home machine can't do is embroider a closed jean leg; for that, open a side seam or use a machine with a free arm.
How do you embroider jeans without opening the seam?
Use a machine with a tubular or free arm and slide the leg over it, so the back of the leg hangs below the needle plate. The hoop has to fit inside the leg, so measure the leg flat first. On a flatbed machine, open the seam or embroider the back pocket instead.
What stabilizer is best for embroidery on denim?
Heavy tear-away is the usual choice for rigid denim, with two layers under a large jacket-back design. Stretch denim needs a medium cut-away, fused or sprayed, so the design keeps its shape after washing. Sticky tear-away lets you float pockets and thick areas instead of clamping them.
What needle should I use to embroider denim?
A sharp, denim or embroidery needle in size 90/14 is a common starting point for jeans and jackets. Light chambray sews well with a 75/11. Use a fresh needle for each garment, because heavy twill dulls the point quickly.
How big should jean jacket embroidery be?
A full-back design is usually 200–250 mm (8–10 in) on its longest side, and yoke lettering runs 150–250 mm wide and 40–70 mm tall. Chest and collar designs are small, about 25–60 mm. A 250 mm design needs an 8×12 in hoop with its other side at 200 mm or less.
How do you wash embroidered jeans?
Turn them inside out, wash in cool or warm water, skip chlorine bleach, and dry on low or hang them up. Press from the back on a towel if needed. Pre-washing before you embroider prevents most shrinkage problems.
Make your denim design
Pick the spot, check your hoop, and decide how you'll get flat access: unpick the pocket, open a seam or unbutton the jacket. Then get a file made for heavy twill. Upload your artwork to StitchFile, choose the Denim fabric and your size, and check the free stitch preview before you sew.