Embroidery guide
Embroidery Stabilizer Guide: Cut-Away, Tear-Away, Water-Soluble
Embroidery stabilizer explained: when to use cut-away, tear-away or water-soluble, which backing suits each fabric, and how to hoop it to stop puckering.
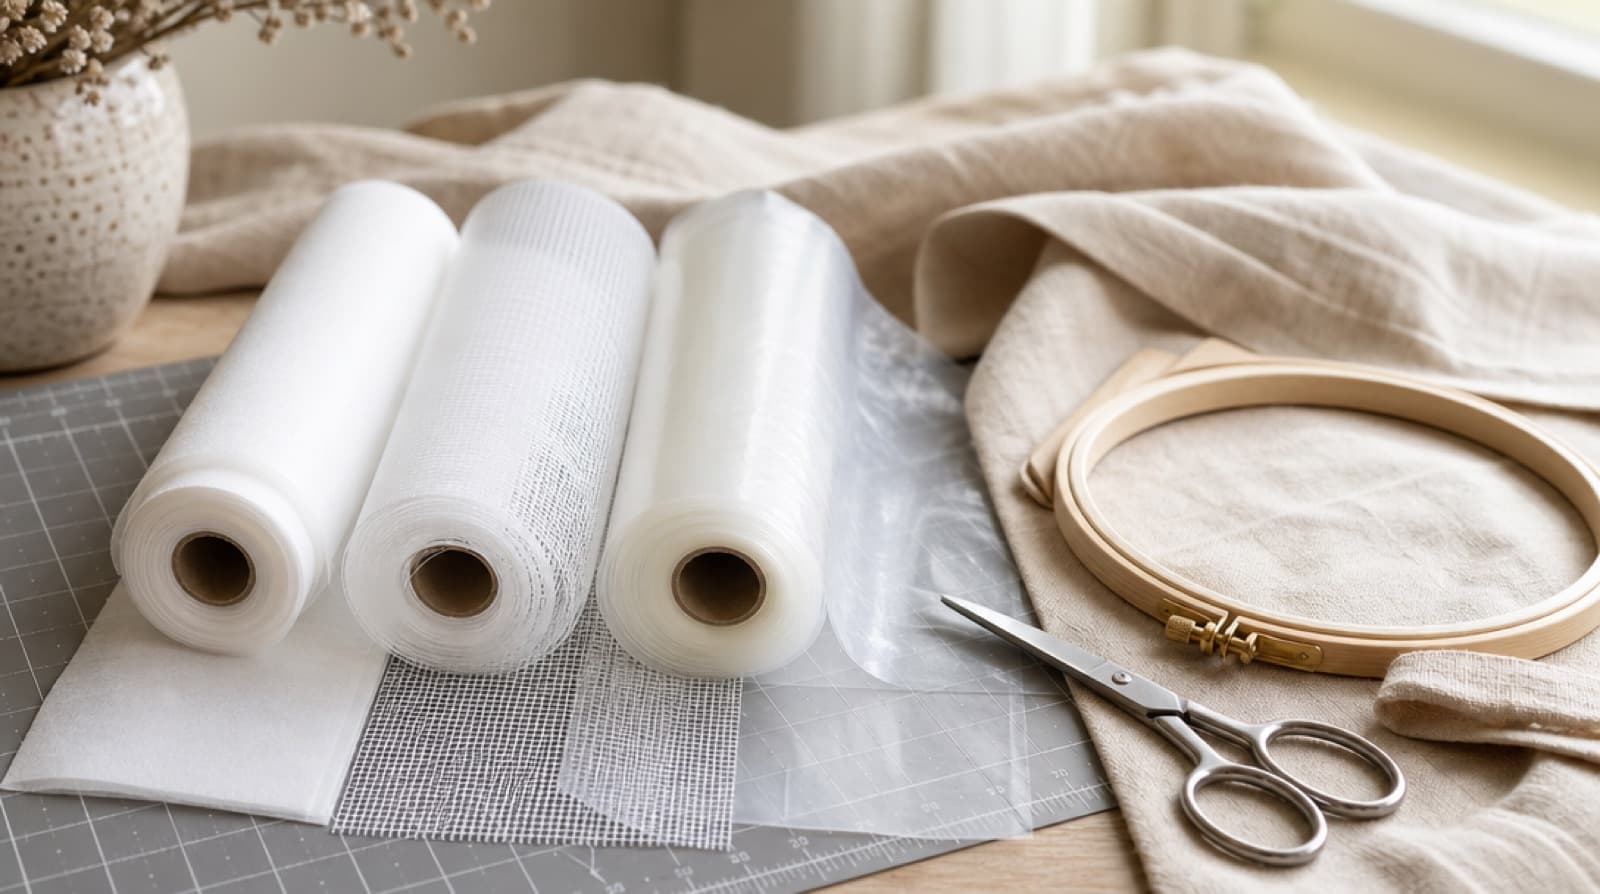
Quick answer: An embroidery stabilizer is the backing you hoop under the fabric so it doesn't stretch or pucker while the machine stitches.
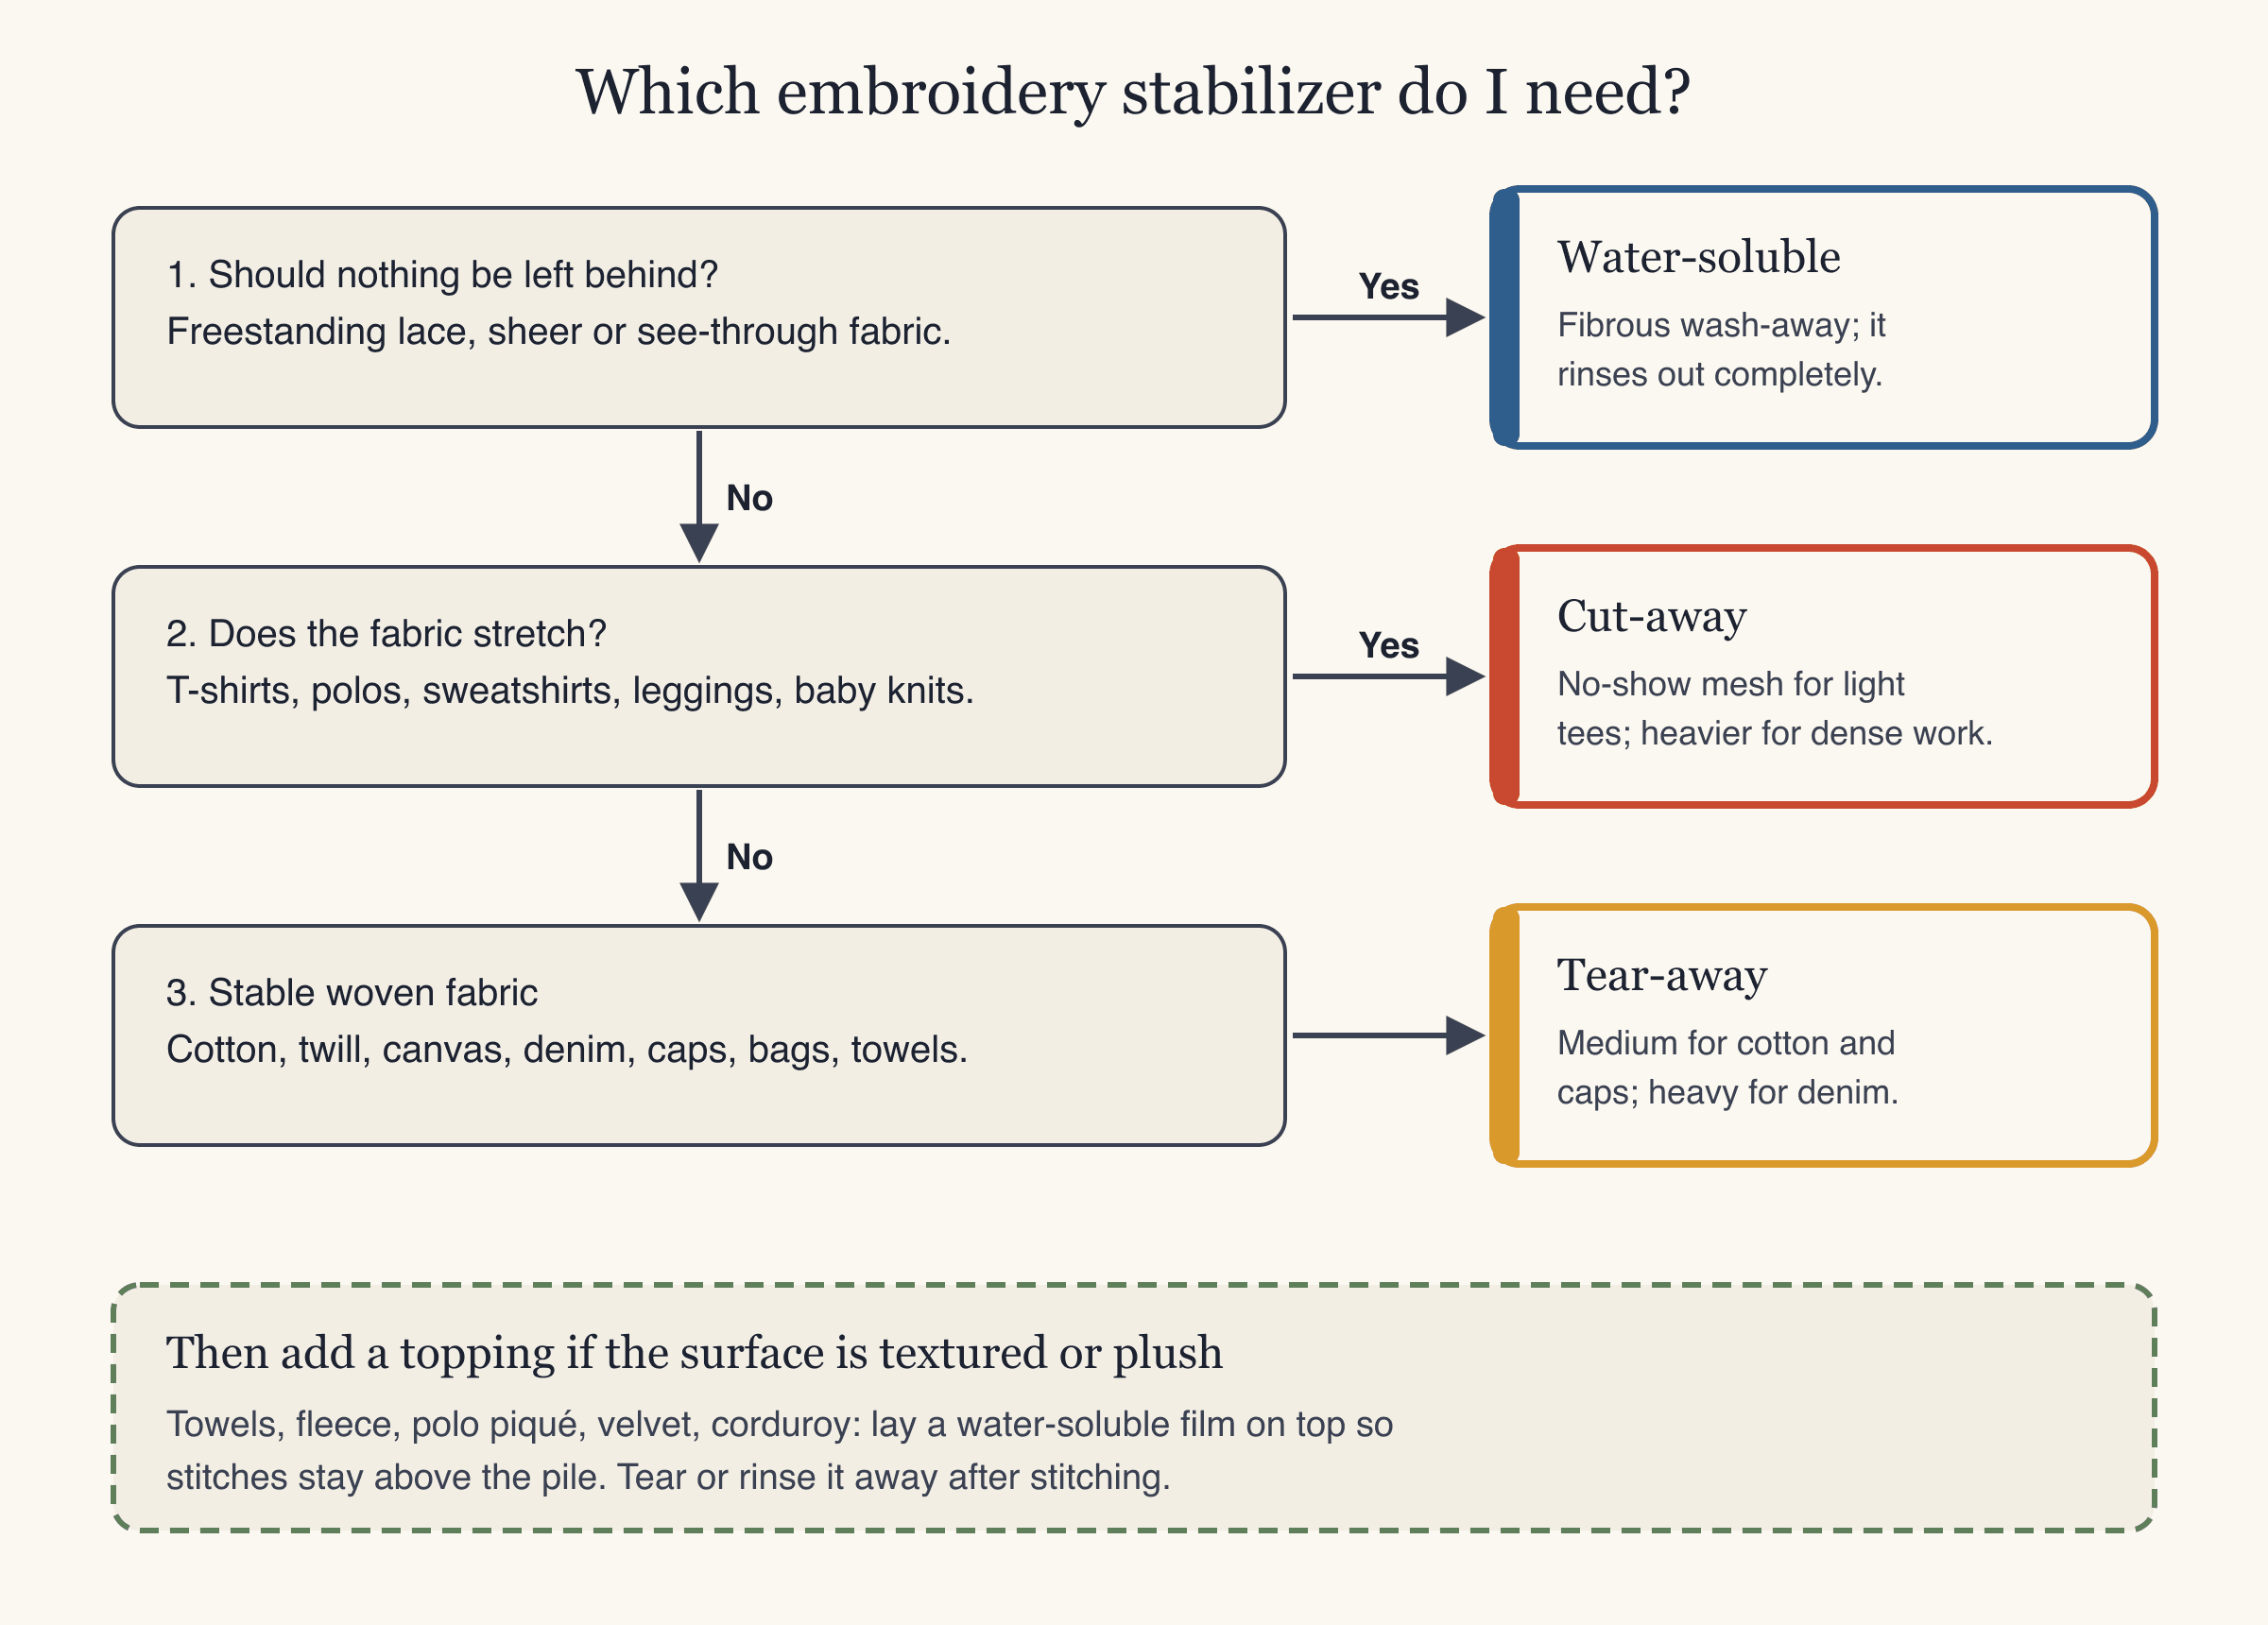
- Stretchy fabric (T-shirts, polos, sweatshirts): cut-away. No-show mesh for light tees.
- Stable woven fabric (cotton, twill, denim, caps, towels): tear-away.
- Nothing should be left behind (freestanding lace, sheer fabric): water-soluble wash-away.
- Plush or textured surface (towels, fleece, piqué): add a water-soluble topping on top.
Most machine embroidery problems that look like a bad file, such as puckering, wavy fabric, or outlines that don't line up, come from the stabilizer and the hooping. A dense logo puts thousands of needle holes and a lot of thread tension into a small patch of fabric. The stabilizer is what holds that patch still.
This guide explains the three main types of embroidery stabilizer, which one to use on each fabric, how to hoop it, and the mistakes that cause most failed stitch-outs.
What is an embroidery stabilizer?
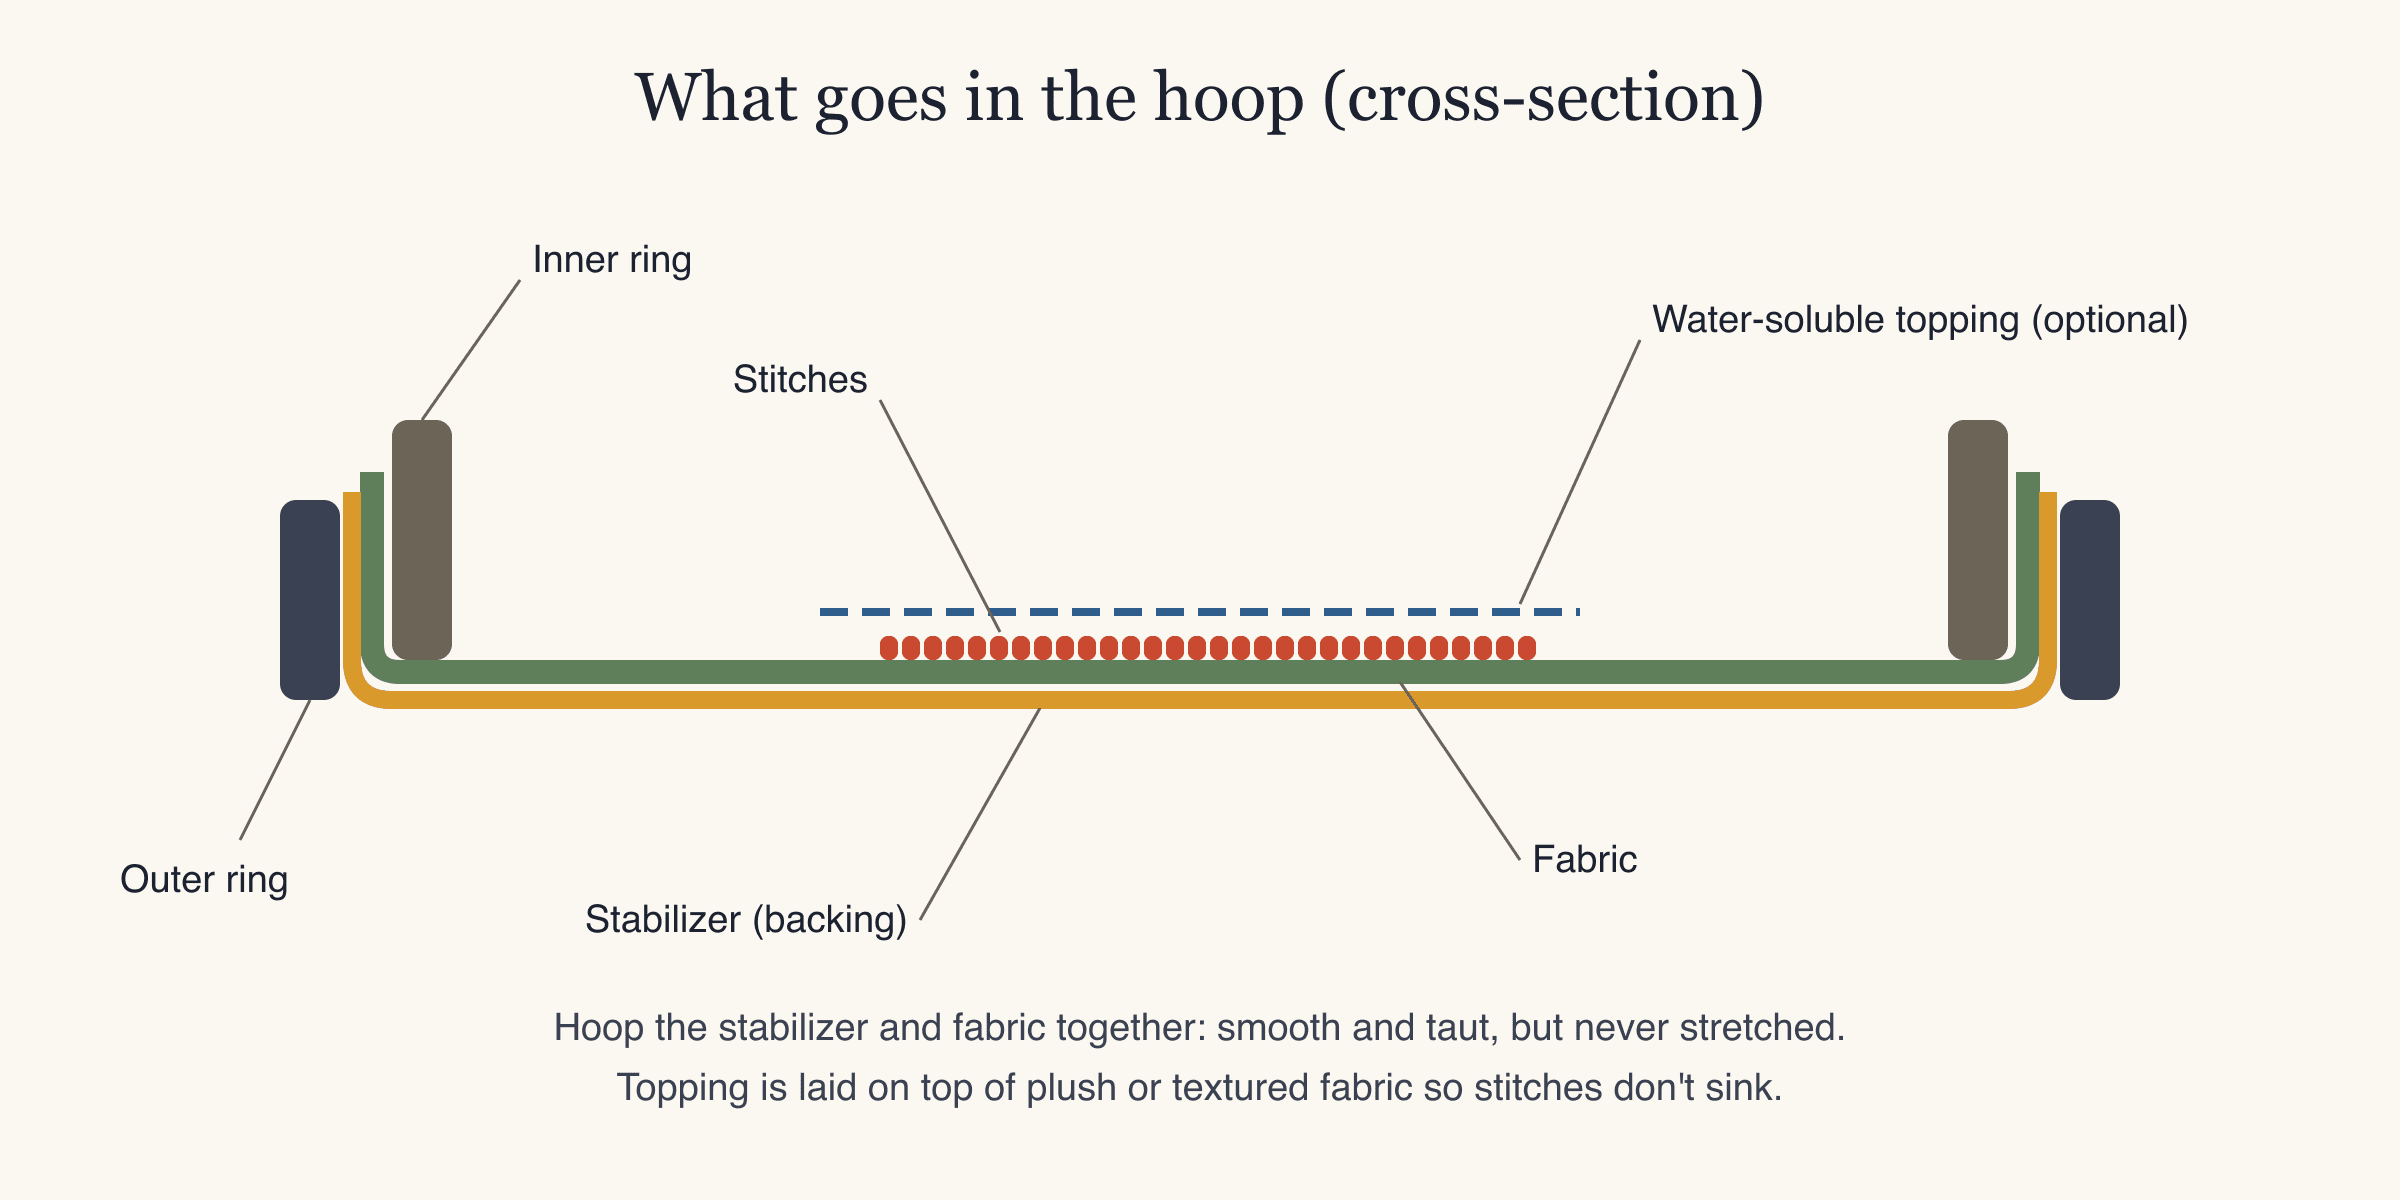
A machine embroidery stabilizer is a non-woven material (or a film, for water-soluble types) that supports the fabric during stitching. It comes in two roles:
- Backing: hooped under the fabric. This is what people usually mean by "stabilizer". It carries the weight of the stitches and stops the fabric from stretching or being pulled in.
- Topping: a thin layer laid on top of the fabric. It keeps stitches from sinking into pile or texture, like the loops of a towel.
Stabilizers are named by how they are removed after stitching: cut-away, tear-away and water-soluble. Each type is sold in light, medium and heavy weights, and in versions that are plain, fusible (iron-on) or adhesive (sticky).
Cut-away vs tear-away vs water-soluble: comparison
| Cut-away | Tear-away | Water-soluble | |
|---|---|---|---|
| How it's removed | Trimmed with scissors; the rest stays | Torn away from the stitching | Rinsed or soaked away in water |
| Stays in the garment? | Yes, permanently, behind the design | Small amounts under the stitches | No |
| Best for | Knits and stretchy fabric, dense designs | Stable wovens: cotton, twill, denim, canvas, caps, towels | Freestanding lace, sheer fabric; topping on plush fabric |
| Support through washing and wear | Most | Less: support is gone once torn | None after rinsing |
| Feel on the back | Soft (mesh) to firm (heavy) | Clean back, little left | Nothing left |
| Typical mistake | Using it on sheer fabric where it shows through | Using it on T-shirts: knit stretches, design distorts | Letting it get damp in storage |
The short rule: if the fabric stretches, the design needs permanent support, so use cut-away. If the fabric is stable, tear-away is enough. Use water-soluble when nothing can be left behind.
Cut-away stabilizer
A cut-away stabilizer stays in the garment for good. After stitching, you trim the excess around the design and leave the rest behind the embroidery. Because it never comes out, it keeps supporting the stitches every time the garment is washed, stretched and worn.
Use cut-away for:
- T-shirts, polo shirts, sweatshirts, hoodies and other knits
- Performance and athletic fabrics
- Stretch denim and other fabrics with spandex
- Dense designs with lots of fill, on almost any fabric
Weights: a lighter cut-away for light, simple designs; medium or heavy for denser designs or heavier knits. If you're unsure, a medium cut-away is a safe middle.
No-show mesh stabilizer
No-show mesh is a lightweight, soft cut-away made from a fine mesh. It's the usual choice for light-colored and thin T-shirts because it doesn't show through the fabric as a visible square behind the design, and it stays soft against the skin. It's also sold in a fusible version, which you iron onto the back of the shirt before hooping so the knit can't shift.
No-show mesh is best for small to medium designs like a left-chest logo. For a large, dense design on a heavy sweatshirt, step up to a heavier cut-away.
Tear-away stabilizer
A tear-away stabilizer supports the fabric while you stitch, then tears off cleanly afterward. It works because the fabric itself is stable: once the stitching is done, a woven cotton or twill doesn't need extra support.
Use tear-away for:
- Woven cotton, twill, canvas and other non-stretch fabrics
- Caps and bags
- Denim (heavy weight)
- Towels (with a water-soluble topping on top)
Tips:
- Tear gently, one layer at a time, holding the stitches with your other hand so you don't pull them out of shape.
- Two light layers are often better than one heavy layer: each tears away more cleanly.
- Adhesive (sticky) tear-away is useful for floating: you hoop just the stabilizer and stick the item on top. More on that below.
Don't use tear-away on knits. Once it's torn off, nothing stops the knit from stretching around the stitches, and the design ripples after the first wash.
Water-soluble stabilizer for embroidery
A water soluble stabilizer for embroidery dissolves when you rinse or soak it, leaving nothing behind. It comes in two main forms:
- Film (topping): a thin, clear film. Laid on top of towels, fleece, polo piqué, velvet or corduroy, it keeps stitches on the surface instead of sinking into the pile. Tear off the excess after stitching and dab or rinse away the rest.
- Fibrous wash-away (backing): a heavier material that looks like fabric. Use it for freestanding lace, where the stitches must hold together on their own, and for sheer fabrics such as organza or tulle, where any other stabilizer would show through.
Tips:
- Rinse thoroughly. Leftover residue dries stiff.
- Store it in a sealed bag. Humidity makes it sticky or brittle.
- Don't use it as a backing on fabrics you can't get wet.
Embroidery stabilizer by fabric (chart)
Use this chart to choose a machine embroidery stabilizer for the most common projects. Always test-sew on a scrap of the same fabric first.
| Fabric or item | Backing | Topping | Notes |
|---|---|---|---|
| T-shirt, jersey | Cut-away (no-show mesh) | — | Fusible mesh stops shifting |
| Polo shirt (piqué) | Cut-away | Water-soluble | Topping smooths the textured knit |
| Sweatshirt, hoodie | Cut-away, medium to heavy | Water-soluble on fleecy surfaces | Sweatshirt fleece is a knit |
| Woven shirt, cotton, twill | Tear-away, medium | — | Cut-away for very dense designs |
| Denim, canvas | Tear-away, heavy | — | Stretch denim: cut-away |
| Caps | Tear-away, medium to heavy | — | Sew from the center outward |
| Towels | Tear-away | Water-soluble | Floating works for thick towels |
| Bags, tote bags | Tear-away | — | Floating if hard to hoop |
| Freestanding lace | Fibrous water-soluble, 1–2 layers | — | Nothing left behind |
| Sheer fabric (organza, tulle) | Water-soluble | — | Other stabilizers show through |
Embroidery stabilizer for T-shirts
T-shirts are where the wrong stabilizer causes the most trouble. Jersey knit stretches in every direction, so even hooping can stretch it, and the stitches then pull it into waves.
- Use cut-away. No-show mesh for light and thin shirts, a medium cut-away for heavier tees or denser designs.
- Fuse or spray it. A fusible mesh, or a light mist of temporary spray adhesive on the stabilizer, bonds the knit so it can't shift.
- Hoop without stretching. Lay the shirt smooth, keep the rib lines straight, and press the inner ring in. Don't tug the fabric tighter after hooping.
- Use a design made for knits. Stretchy fabric needs slightly more open stitching and more pull compensation than a woven. Very dense, stiff fills look and feel bad on a T-shirt.
- Trim, don't tear. Cut the stabilizer about 1/4 in from the stitching, rounding the corners so they don't poke.
We cover placement, sizes and shirt hooping in more depth in machine embroidery on T-shirts.
How the fabric setting changes the file
Stabilizer and digitizing work together. A file digitized for stable twill can pucker on jersey even with the right backing, because a knit pulls in more as it's stitched.
When you make a design with StitchFile, you choose the fabric (woven, T-shirt knit, polo piqué, denim, or towel & fleece) before the file is made. That choice sets the stitch density and pull compensation, and the thread color key in your download names the stabilizer to use, so the file and the backing match. Here's a real example, an open-source rocket emoji made at 90 mm on the T-shirt knit setting:
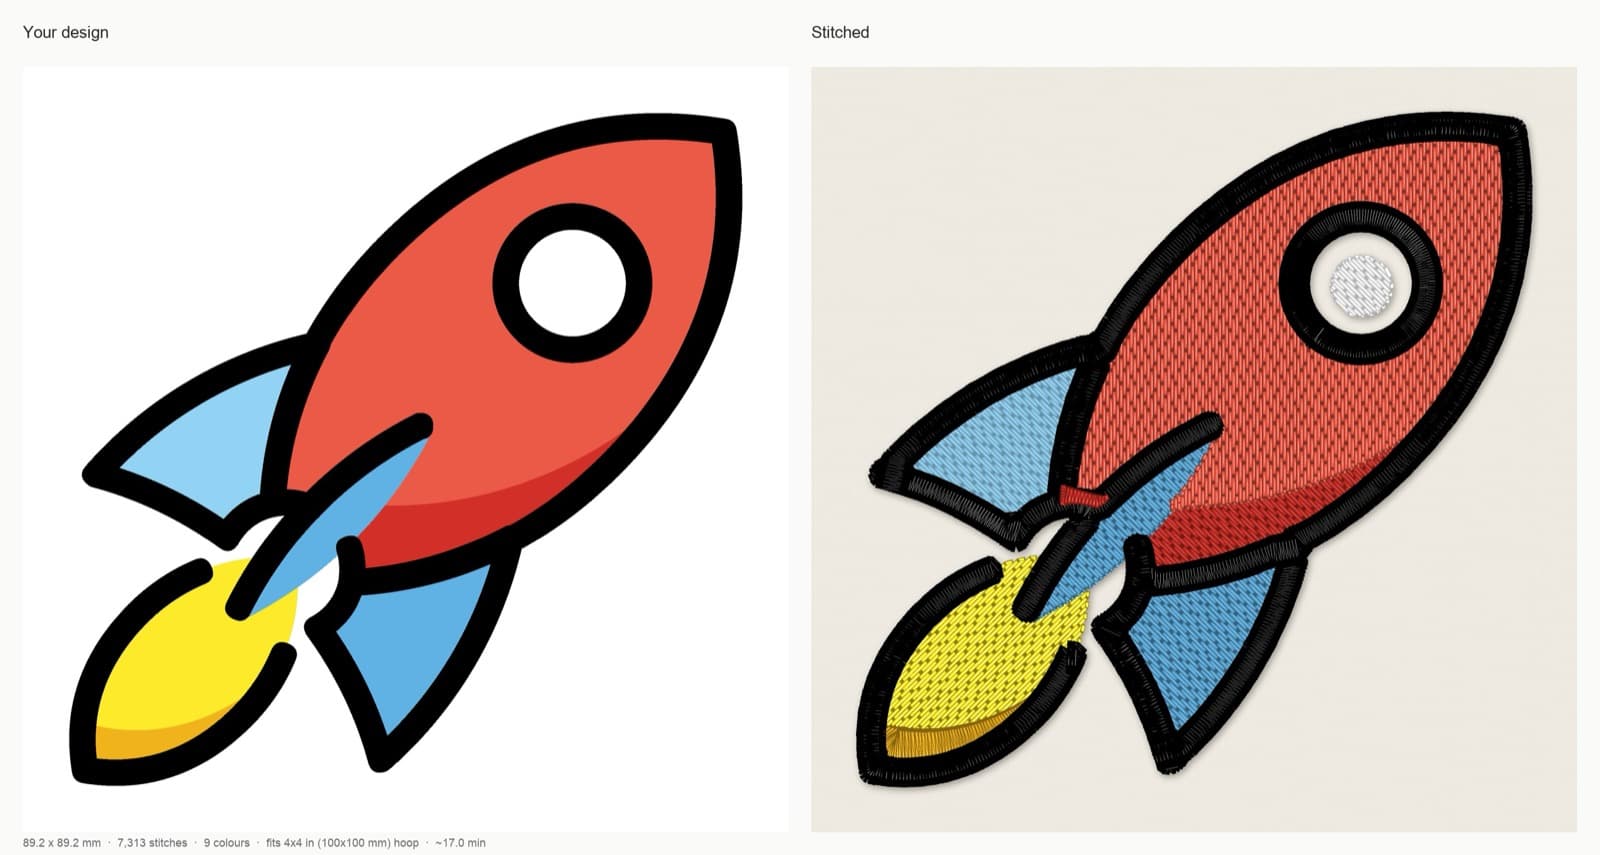
StitchFile stitch preview: the artwork (left) and the stitch simulation drawn from the machine file (right), made with the T-shirt knit setting.
Artwork: OpenMoji rocket, CC BY-SA 4.0. StitchFile converted the artwork into the stitch preview shown here; these adaptations are shared under the same license.
The report for this design: 89.2 × 89.2 mm, 7,313 stitches, 9 color stops, 26 trims, fits a 4×4 in (100×100 mm) hoop, about 17 minutes at 700 stitches per minute. Recommended stabilizer: cut-away (no-show mesh). For knit, the engine set fill rows 0.45 mm apart with 0.4 mm of pull compensation, For comparison, a 90 mm design on the woven setting got 0.4 mm rows and 0.25 mm compensation.
Here's what we recommend with each fabric setting:
| StitchFile fabric setting | Stabilizer we recommend |
|---|---|
| Woven (cotton, twill, canvas, caps) | Tear-away, medium |
| T-shirt knit | Cut-away (no-show mesh) |
| Polo piqué | Cut-away + water-soluble topping |
| Denim | Tear-away, heavy |
| Towel & fleece | Tear-away + topping |
How to hoop fabric with stabilizer
- Cut the stabilizer larger than the hoop, with at least an inch spare on every side, so the rings grip it all the way round.
- Loosen the outer ring and lay it on a flat, firm surface.
- Lay the stabilizer, then the fabric on top, smooth and straight. For knits, bond them first with fusible stabilizer or temporary spray adhesive.
- Press the inner ring in and tighten the screw. The fabric should be smooth and taut, like a drum, but not stretched. Tap it: it should sound firm.
- Add a topping on plush or textured fabric. Lay it over the design area; some people hold it with a basting stitch.
- Check the back before you start: no folds of fabric caught under the hoop.
Floating is the alternative when an item is hard to hoop: thick towels, collars, bags or small pieces. Hoop only the stabilizer (often an adhesive tear-away), then stick or pin the item on top. Many machines can sew a basting box, a long-stitch outline around the design, to hold the item in place.
How to remove each type of stabilizer
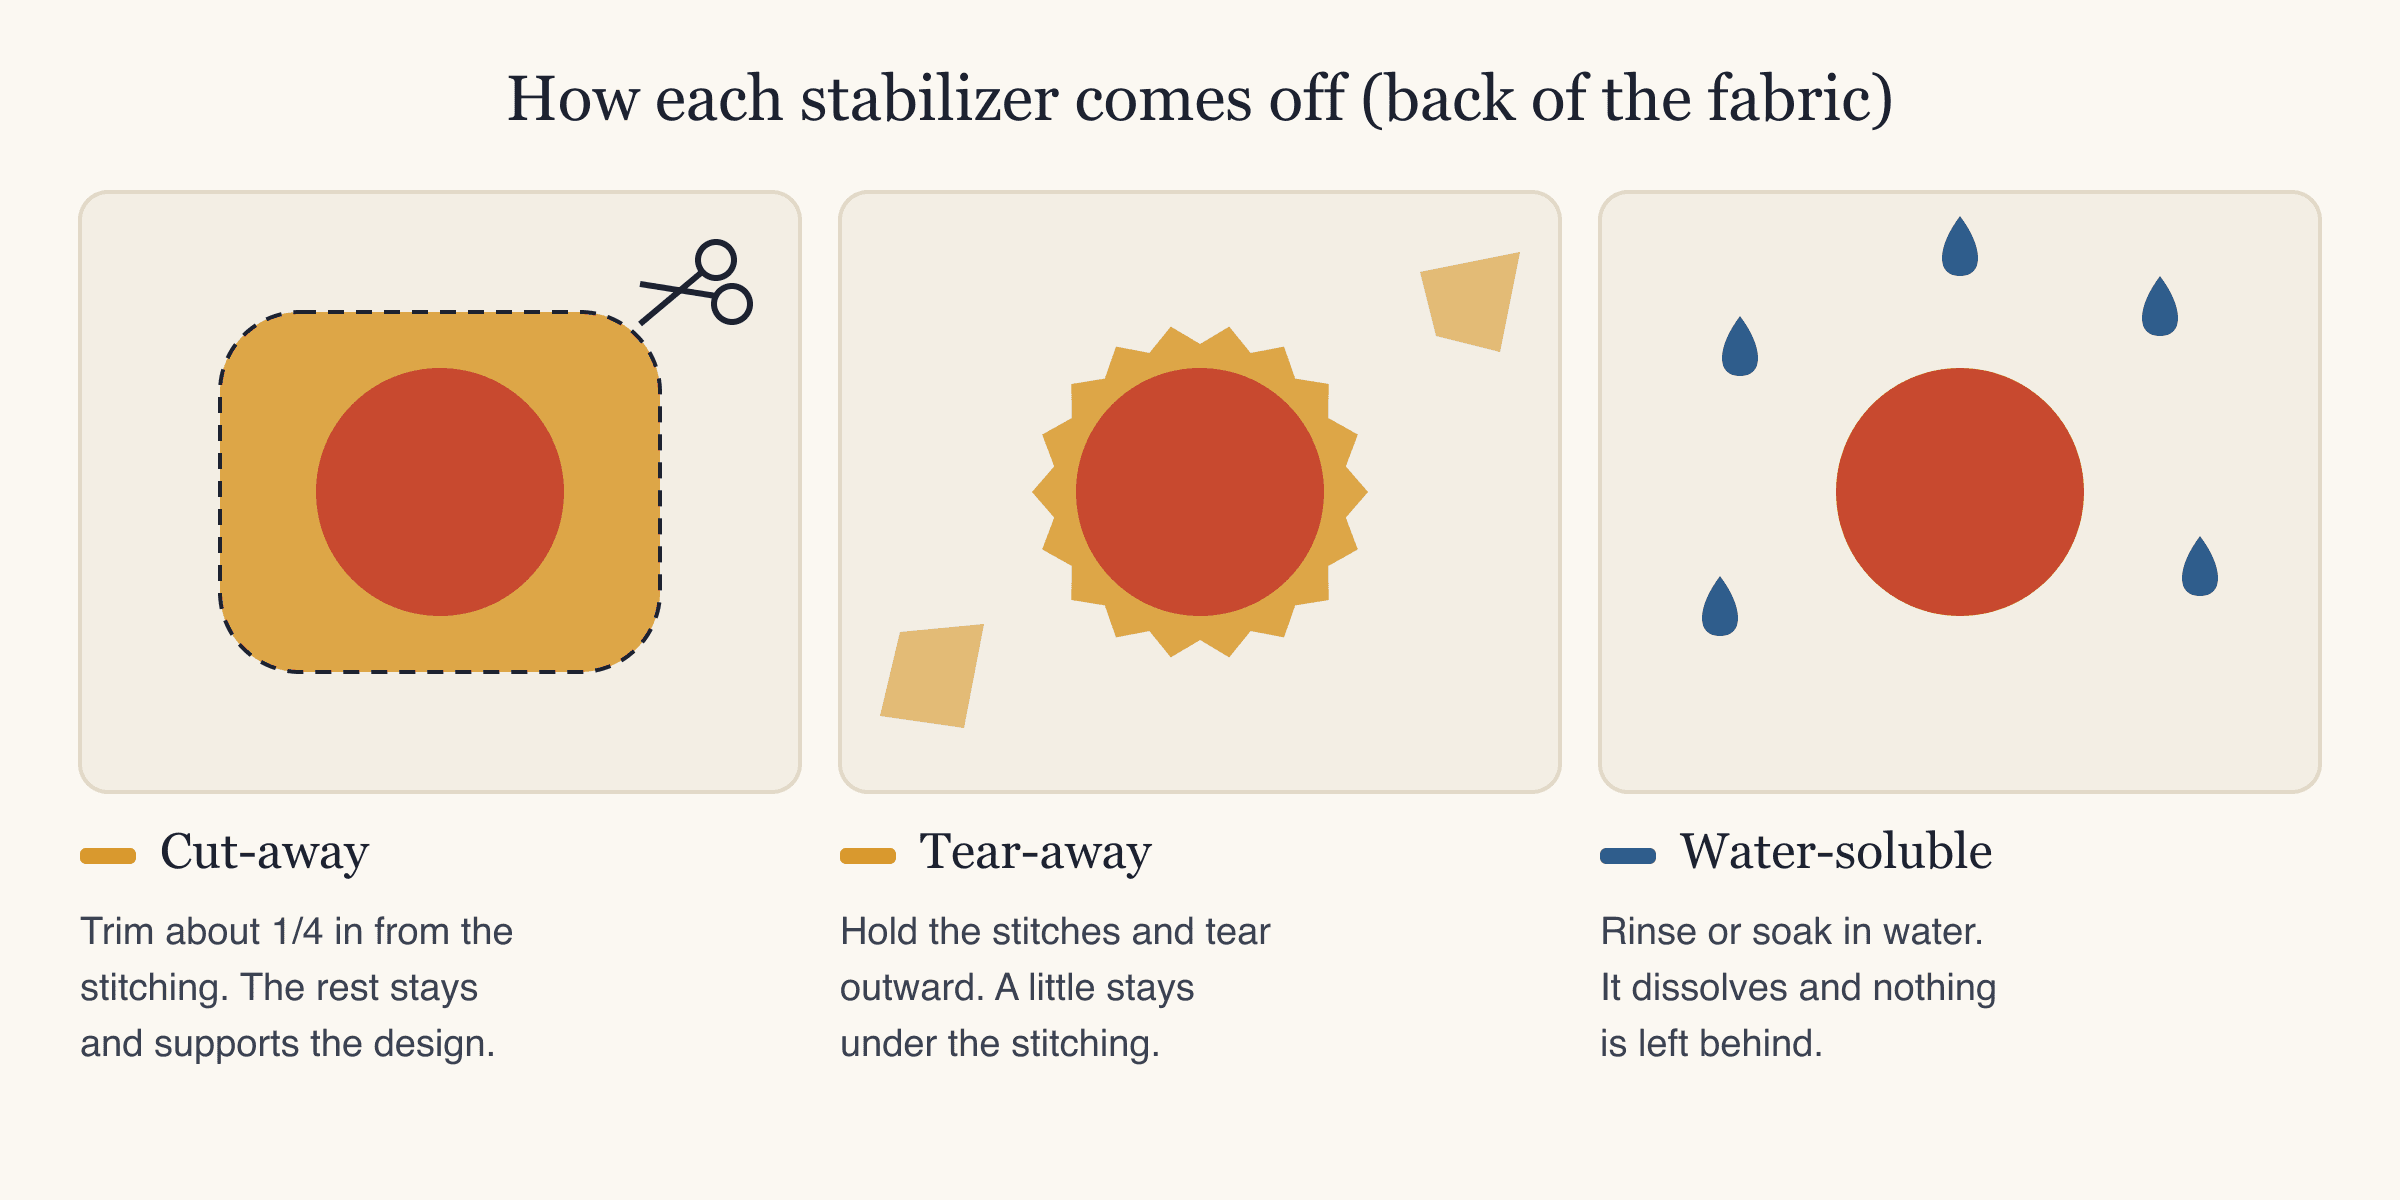
- Cut-away: trim about 1/4 in from the stitching with sharp scissors, rounding corners. Don't cut too close, or the edge of the design loses support.
- Tear-away: support the stitches with one hand and tear outward, away from the design, a little at a time. Pick out small bits from tight spots with tweezers.
- Water-soluble: tear off the excess, then rinse or soak until it's gone. Let the item dry flat.
Common stabilizer mistakes
| Mistake | What you see | Fix |
|---|---|---|
| Tear-away on a T-shirt | Rippled, distorted design after washing | Cut-away on all knits |
| Stabilizer too light for the design | Puckering around dense fills | Heavier weight or a second layer |
| Stretching the fabric in the hoop | Puckers once unhooped | Hoop taut but relaxed; bond knits instead of pulling |
| Hoop too loose | Gaps between colors, outlines out of line | Tighten; use adhesive or fusible backing |
| No topping on towels or fleece | Stitches sink and disappear into the pile | Water-soluble topping on top |
| Cut-away on sheer fabric | Visible block behind the design | Water-soluble backing |
| Trimming cut-away too close | Design edges pucker later | Leave about 1/4 in |
| Skipping a test sew | Problems found on the real garment | Test on scrap with the same stabilizer |
Still seeing puckers or gaps with the right stabilizer? Our machine embroidery troubleshooting guide goes through needles, tension and other causes. For terry cloth specifically, see machine embroidery on towels.
FAQ
What is the best embroidery stabilizer for beginners?
A medium tear-away and a medium cut-away cover most projects. Use the tear-away on woven fabrics like cotton, twill and caps, and the cut-away on anything that stretches. Add a pack of water-soluble topping for towels and fleece.
Can I use tear-away stabilizer on T-shirts?
It's not recommended. T-shirt knit stretches, and once tear-away is removed nothing supports the stitches, so the design tends to pucker or ripple, especially after washing. Use a cut-away such as no-show mesh instead.
What is no-show mesh stabilizer?
No-show mesh is a soft, lightweight cut-away stabilizer made of fine mesh. It doesn't show through light or thin T-shirts and stays comfortable against the skin. It's ideal for left-chest logos and other small to medium designs on knits.
When should I use water-soluble stabilizer?
Use water-soluble film as a topping on towels, fleece, polo piqué and other textured fabrics so stitches don't sink. Use the heavier fibrous wash-away as a backing for freestanding lace and sheer fabrics, where nothing can be left behind.
Do I need a stabilizer for every machine embroidery project?
Almost always. Even stable fabrics need support against the pull of thousands of stitches. Very heavy, stiff materials may need less, but a test sew on scrap is the only way to know.
How many layers of stabilizer should I use?
One layer of the right weight is enough for most designs. For dense designs, use a heavier stabilizer or add a second layer; two light tear-away layers often remove more cleanly than one heavy one.
Match the stabilizer to the file
Pick the stabilizer by how the fabric behaves: cut-away for stretch, tear-away for stable wovens, water-soluble when nothing can stay behind, and a topping for anything plush. Hoop it smooth and taut, and test-sew first.
The other half is a file made for the same fabric. Upload your artwork to StitchFile, choose your fabric, and the free preview shows the stitched result. The color key in the download tells you which stabilizer to hoop.