Embroidery guide
Embroidery Hoop Sizes: Chart for Every Machine and Design
Embroidery hoop sizes explained: a to-scale chart of 4x4, 5x7, 6x10, 8x8 and 8x12 hoops, their real stitch fields in mm, and how to pick the right one.
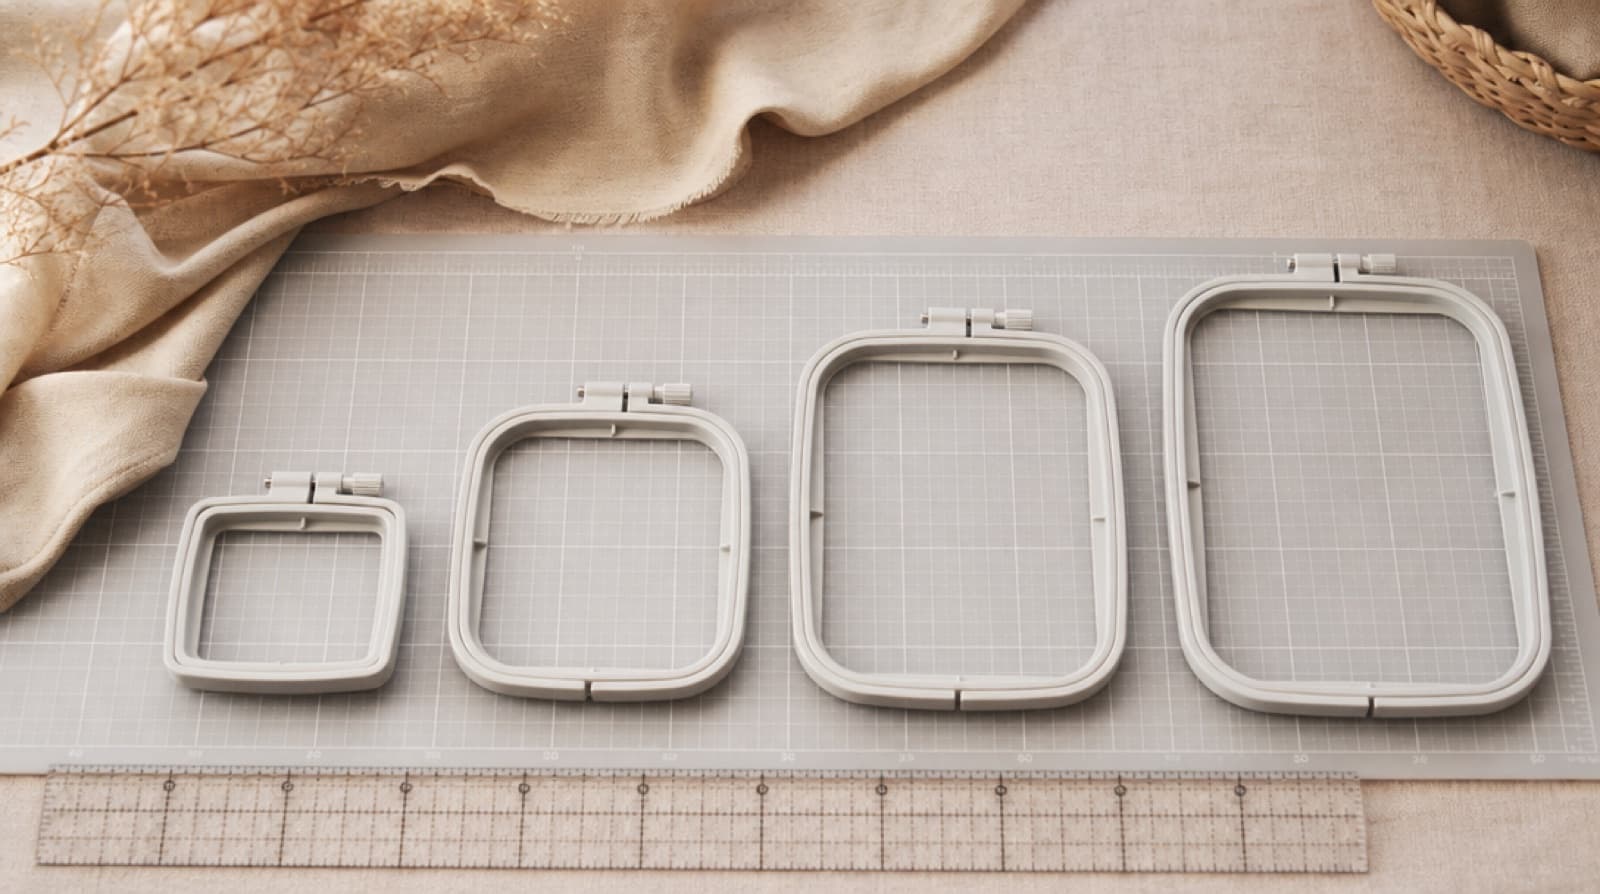
Quick answer: The common embroidery hoop sizes for home machines are 4x4, 5x7, 6x10, 8x8 and 8x12 in. The name is a rounded label; what matters is the embroidery field, the area the needle can actually reach: 100 × 100 mm, 130 × 180 mm, 160 × 260 mm, 200 × 200 mm and 200 × 300 mm. A design fits when both its width and height fit inside the field. Your machine's maximum embroidery area decides the largest hoop you can use.
Embroidery hoop sizes cause more confusion than they should. A "4x4" hoop doesn't stitch a full 4 × 4 inches, two hoops with the same name can come from different machine brands and not be interchangeable, and a design file that's 1 mm too big simply won't load. This guide gives you a to-scale embroidery hoop size chart, explains the difference between a hoop's name and its stitchable field, and shows how to choose the right hoop for a design.
This is about machine embroidery hoops. Hand embroidery hoops are round rings sold by diameter and work differently.
Embroidery hoop size chart
| Hoop name | Embroidery field (mm) | Field (inches) | Good for |
|---|---|---|---|
| 4x4 in | 100 × 100 | 3.9 × 3.9 | Left-chest logos, sleeves, small patches, baby clothes |
| 5x7 in | 130 × 180 | 5.1 × 7.1 | Larger chest designs, tote bags, towels, most patches |
| 6x10 in | 160 × 260 | 6.3 × 10.2 | Tall designs, cushion fronts, larger bag panels |
| 8x8 in | 200 × 200 | 7.9 × 7.9 | Square and round designs, quilt blocks |
| 8x12 in | 200 × 300 | 7.9 × 11.8 | Jacket and sweatshirt backs, large artwork |
These are the field sizes StitchFile uses when it tells you which hoop a design fits. Machines and hoops vary by a few millimeters between brands and models, so treat your machine manual as the final word.
Here are the same five fields drawn to scale and nested from one corner, so you can see how much more room each step up gives you:
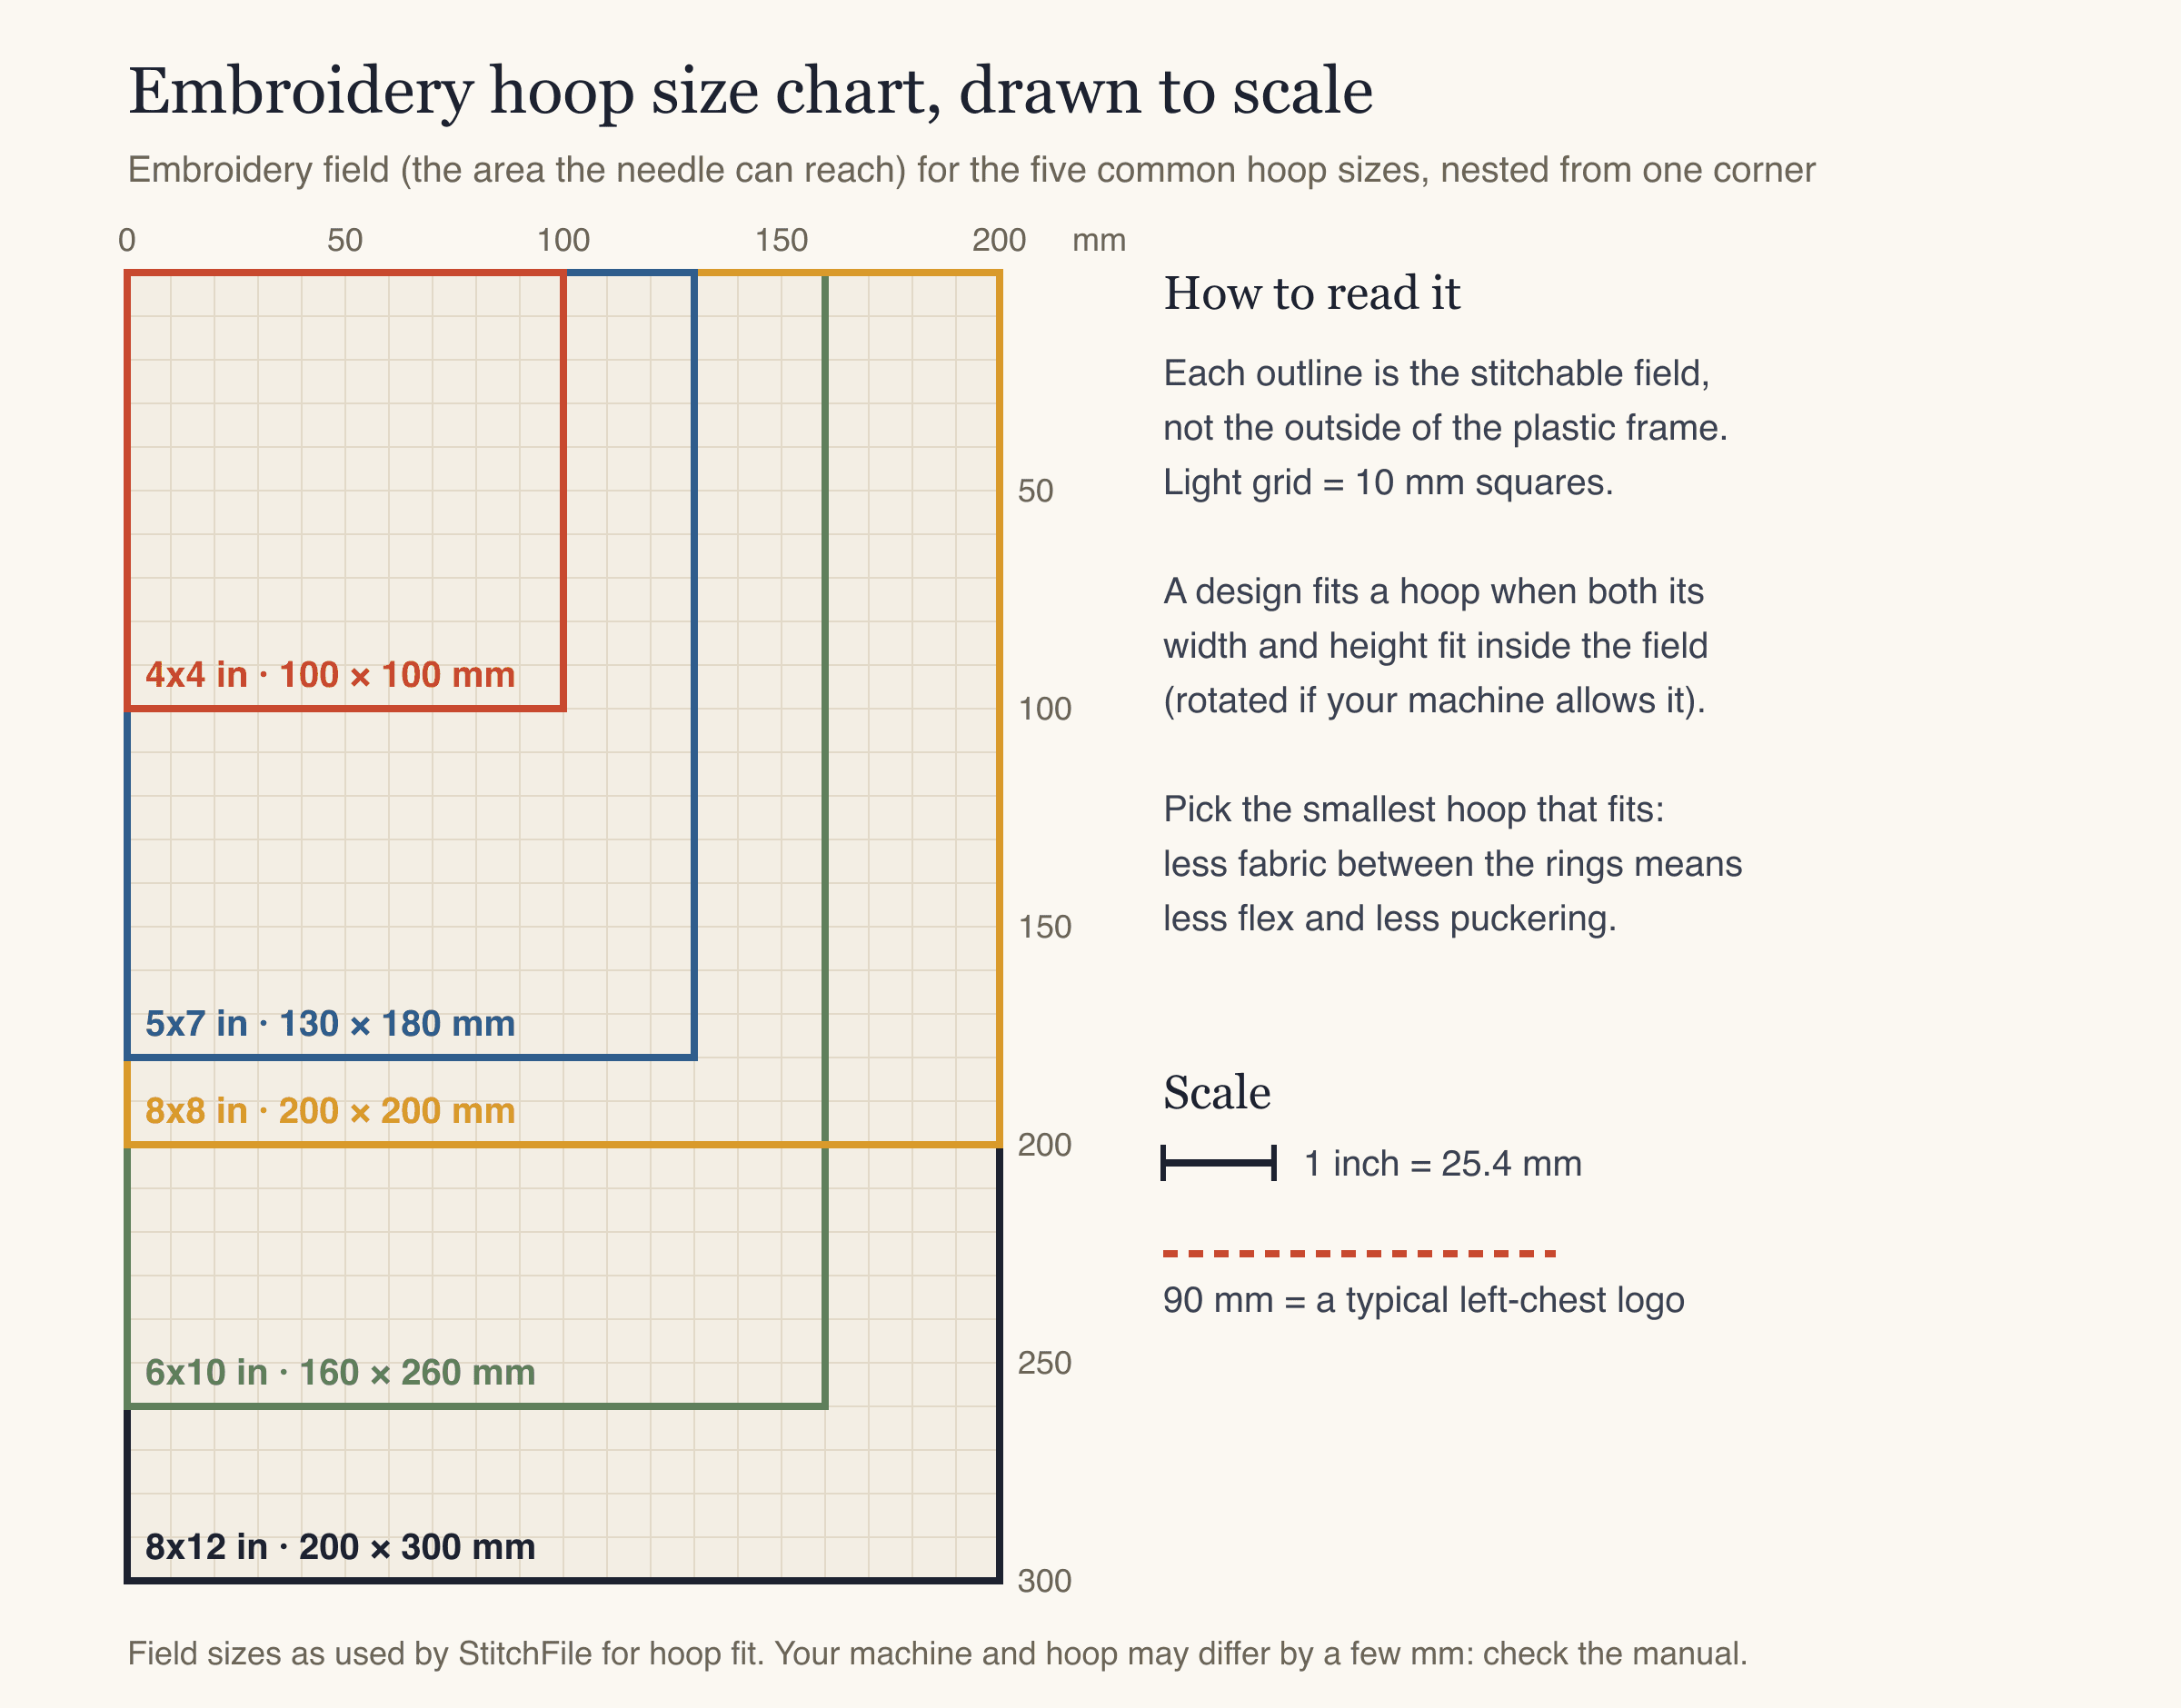
A few things stand out once they're drawn to scale:
- A 5x7 field is more than twice the area of a 4x4 (23,400 mm² against 10,000 mm²).
- 8x8 and 6x10 are close in area but different in shape. 8x8 is wider (200 mm), 6x10 is taller (260 mm). A 190 × 190 mm design fits 8x8 but not 6x10; a 150 × 250 mm design fits 6x10 but not 8x8.
- 8x12 is the largest of the common home hoops and covers a full sweatshirt or jacket back design.
Nominal hoop size vs. the embroidery field
The size printed on a hoop or in a machine brochure is a nominal size: a rounded name in inches. It is not the size of the plastic frame, and it's often not exactly the size of the area you can stitch either.
- The outside of the frame is much larger than the name, because of the rings, the clamp screw and the bracket that clips onto the embroidery arm.
- The inside of the frame is also larger than the stitchable area. The machine needs room around the edges for the presser foot.
- The embroidery field (also called the sewing field or embroidery area) is the rectangle the needle can reach. This is the only number to check your design against.
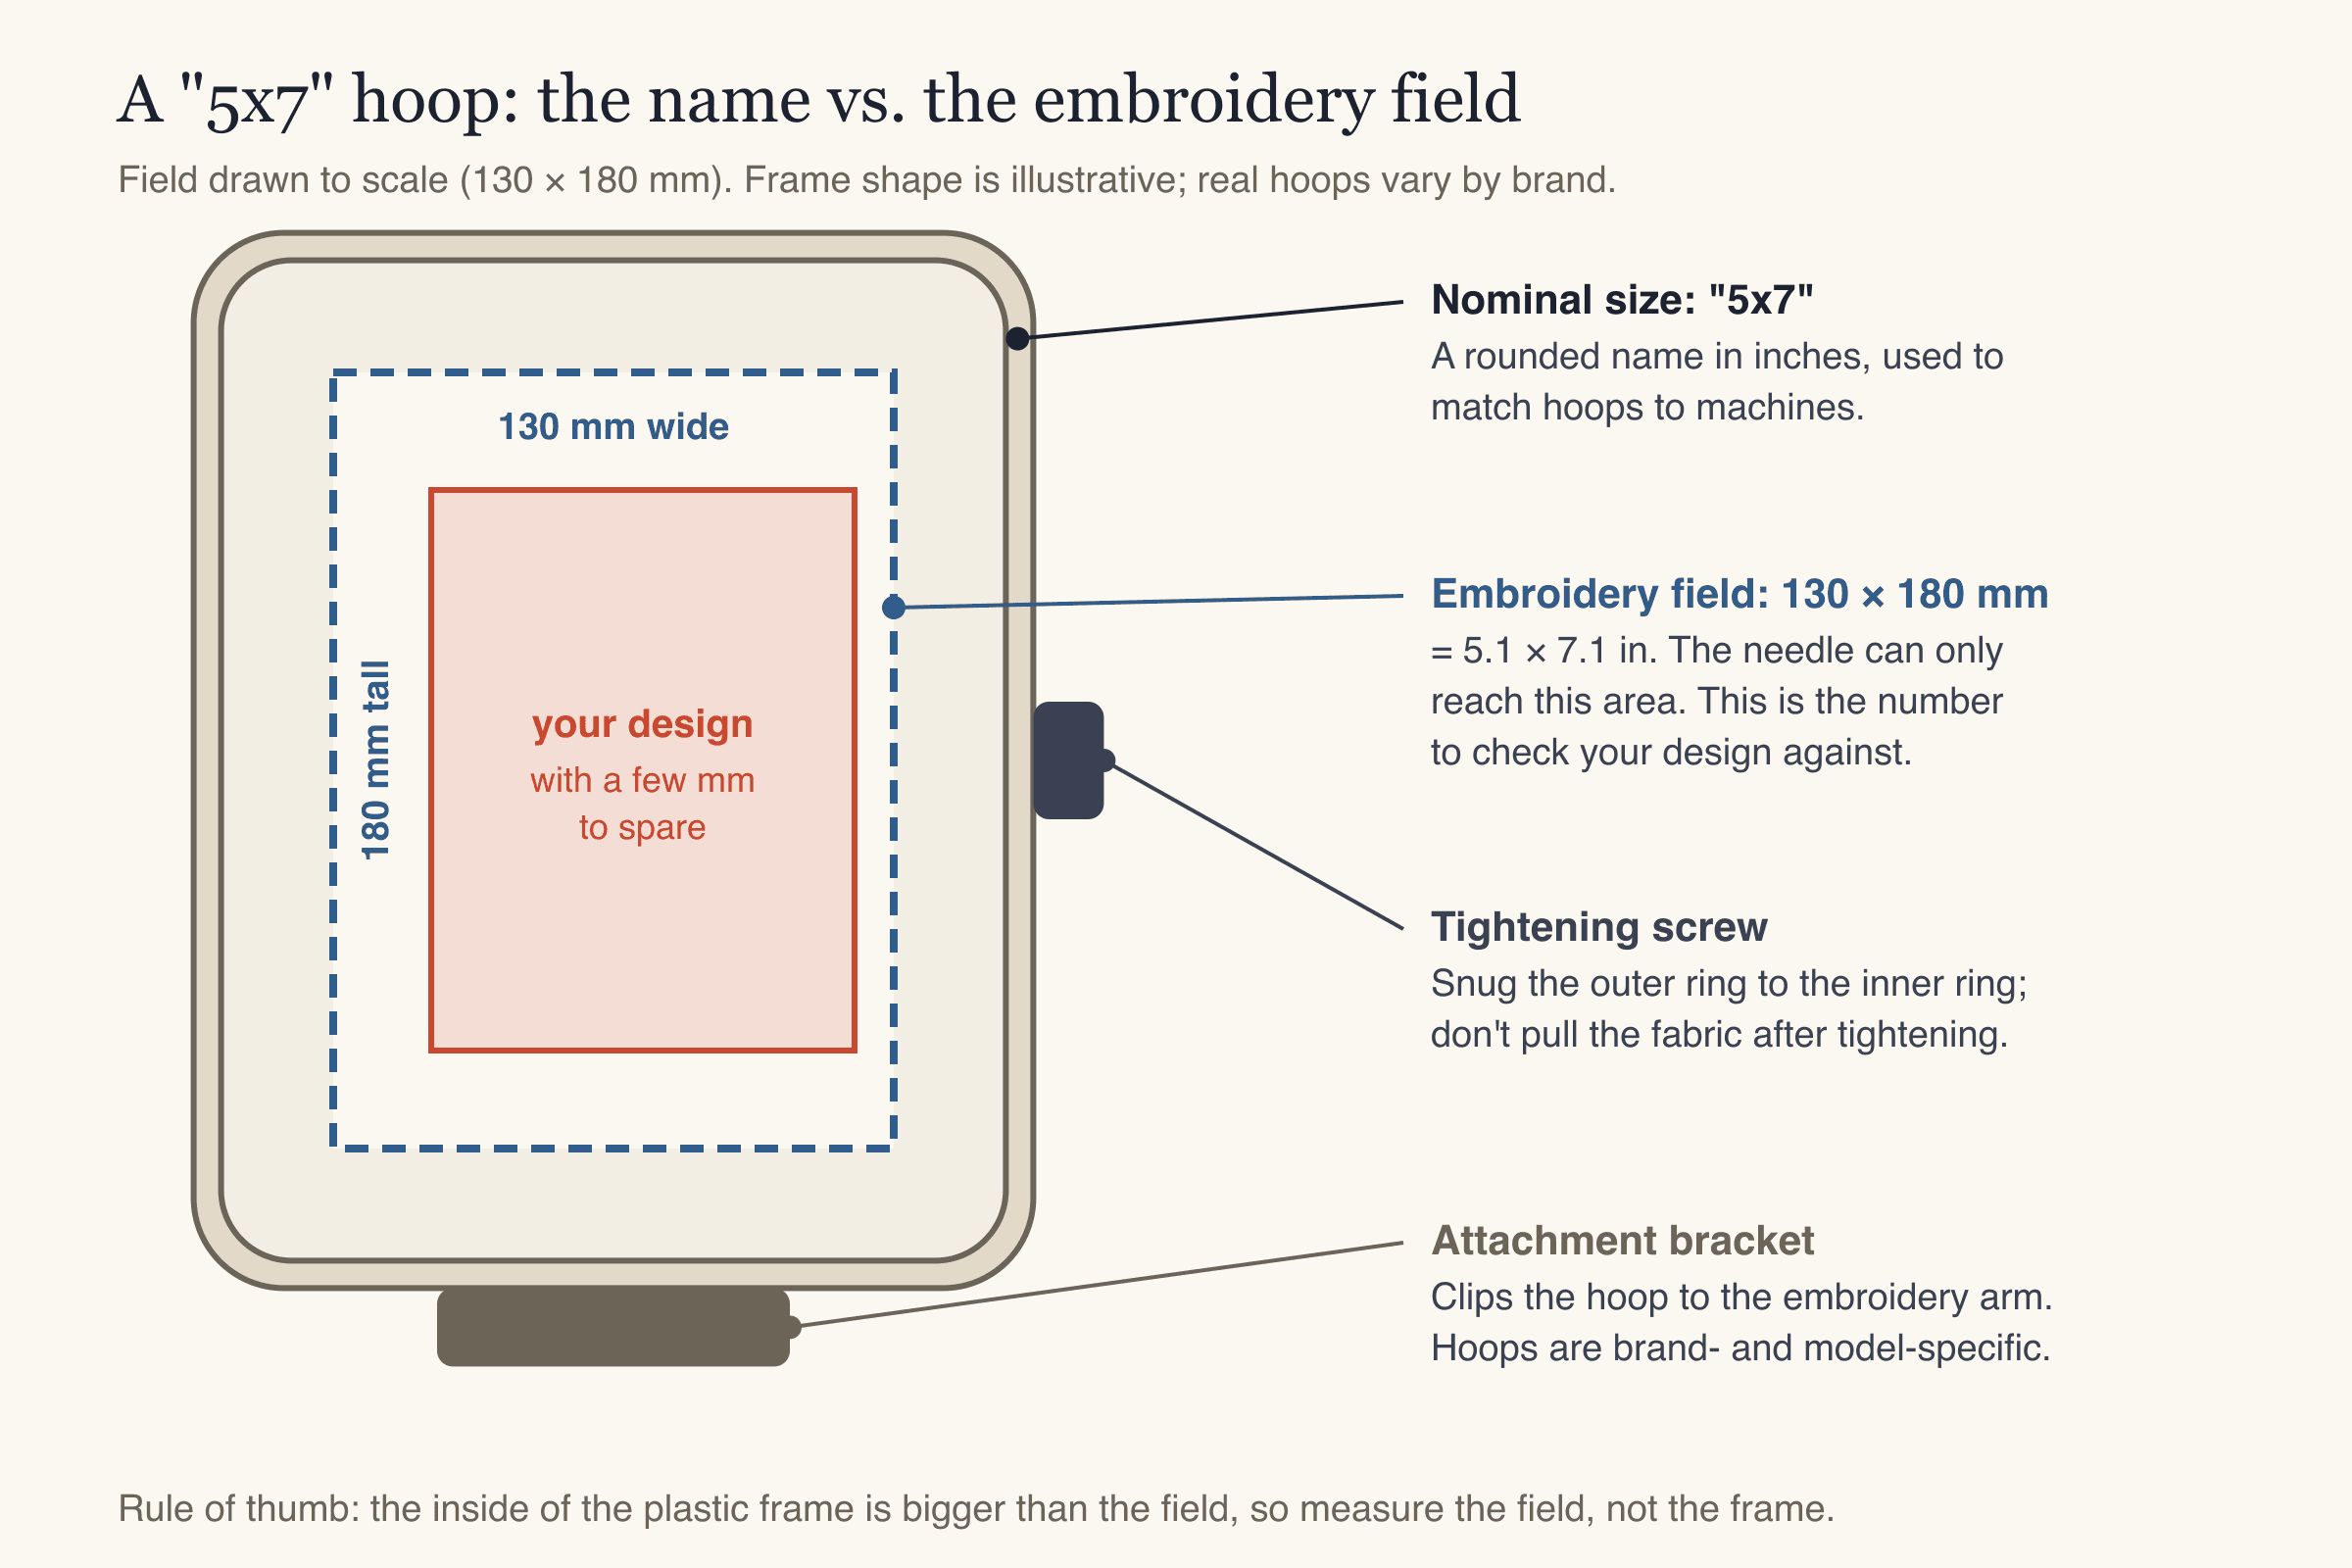
The 4x4 is the best example. Its field is 100 × 100 mm, which is 3.94 in, not 4 in. A design exported at exactly 4 × 4 in (101.6 mm) is too big for it. That's why StitchFile's 4x4 hoop preset makes designs 95 mm on the longest side: it leaves a few millimeters to spare.
Many hoops come with a clear plastic template (a grid sheet that sits in the hoop) for lining up the design, and the template shows the field. If you're ever unsure of a hoop's real field, the template or the manual is the place to check.
The 4x4 embroidery hoop
The 4x4 embroidery hoop (100 × 100 mm field) is the standard hoop on many entry-level embroidery machines and the one most people use most often, even on bigger machines. It's the right size for:
- Left-chest logos, usually 75–90 mm on the longest side.
- Sleeve designs, around 60–80 mm.
- Patches, usually 60–90 mm.
- Small motifs on baby clothes, napkins and towels.
A smaller hoop also holds fabric more firmly than a big one, so even if your machine has a 5x7 or larger hoop, a small design often stitches cleaner in the 4x4.
The 5x7 embroidery hoop
The 5x7 embroidery hoop (130 × 180 mm field) is a common maximum size on home embroidery machines and the next step up from 4x4. It fits larger chest designs, most tote bag and towel designs, and anything up to about 7 in tall.
Remember that 5x7 is a rectangle. A design that's 170 mm wide and 125 mm tall doesn't fit 130 mm across, but it does fit if it's turned 90 degrees so the long side runs along the 180 mm direction. Most machines can rotate a design on screen, or you can rotate it before you make the file.
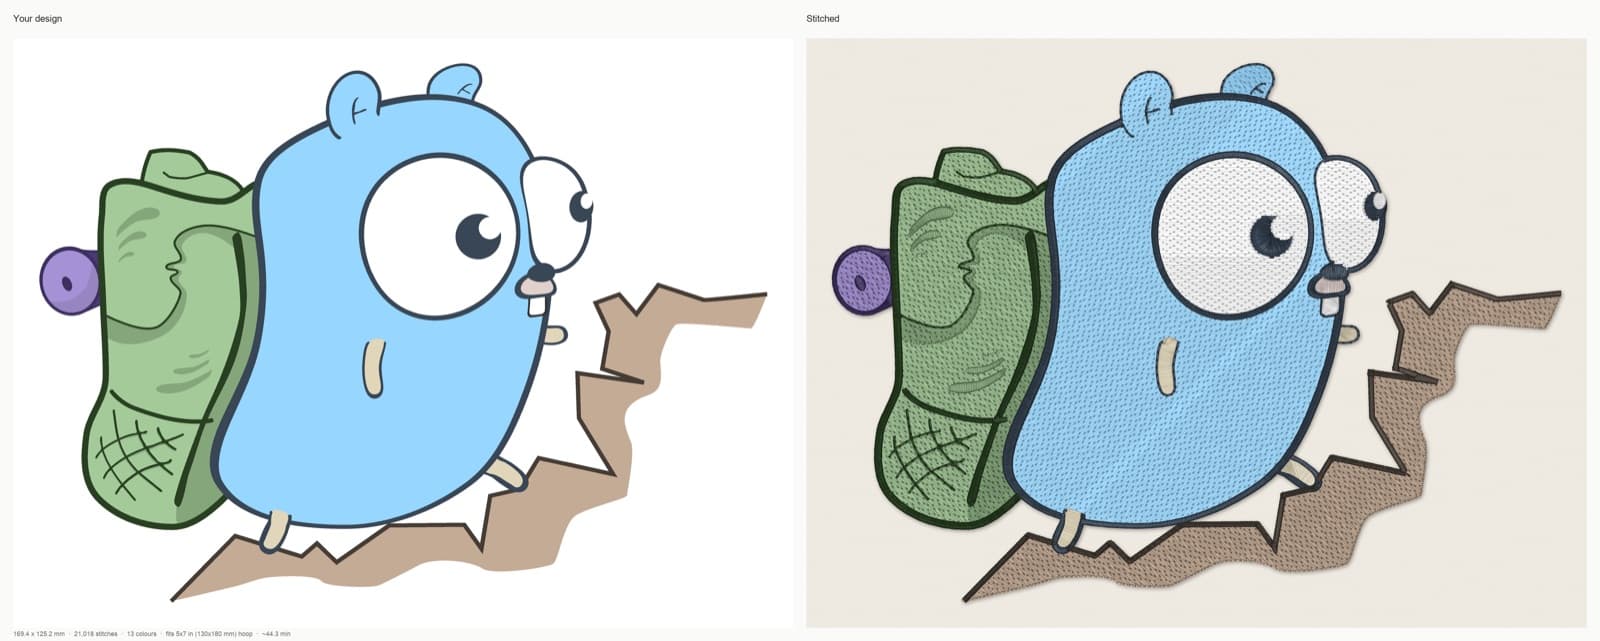
StitchFile stitch preview at 170 mm: 169.4 × 125.2 mm, 21,018 stitches, 83 trims and about 44 minutes at 700 stitches per minute. The smallest hoop it fits is 5x7 in (130 × 180 mm), turned so the long side runs along the 180 mm direction.
Hiking gopher artwork by Egon Elbre, CC0. The Go gopher was designed by Renée French. Stitch preview generated by StitchFile from the artwork.
6x10, 8x8 and 8x12 hoops
These larger hoops come with bigger embroidery machines and multi-needle machines.
- 6x10 (160 × 260 mm): for tall designs, such as a large name down a bag or a design on a cushion front.
- 8x8 (200 × 200 mm): for square and round designs, quilt blocks and wreaths.
- 8x12 (200 × 300 mm): for full back designs on sweatshirts and jackets. A full-back design is usually up to 250 mm (about 10 in) wide.
A big hoop holds a big area of fabric, and fabric in the middle of a large hoop can flex more. Use firm stabilizer and hoop carefully. For anything that fits a smaller hoop, use the smaller hoop.
Brother embroidery hoop sizes
Brother and Baby Lock machines read PES files. Brother hoops are commonly sold under these same inch names, and each machine's manual lists the field in millimeters. Which hoops your Brother machine takes depends on its maximum embroidery area: a machine with a 5x7 maximum can use a 4x4 or 5x7 hoop, but not a 6x10.
Brother PE800 hoop size: the PE800 is a 5x7 machine, so its maximum design size is 130 × 180 mm (5.1 × 7.1 in). Keep designs within that, and use a 4x4 hoop for smaller designs.
For any other model, look up "maximum embroidery area" in the manual or the spec sheet. That one number tells you the largest hoop and the largest design your machine can stitch.
Other machine brands use their own hoop names and sizes, and hoops generally aren't interchangeable between brands. The principle is the same everywhere: compare the design's width and height with the hoop's field, not its name.
How to choose the right hoop for a design
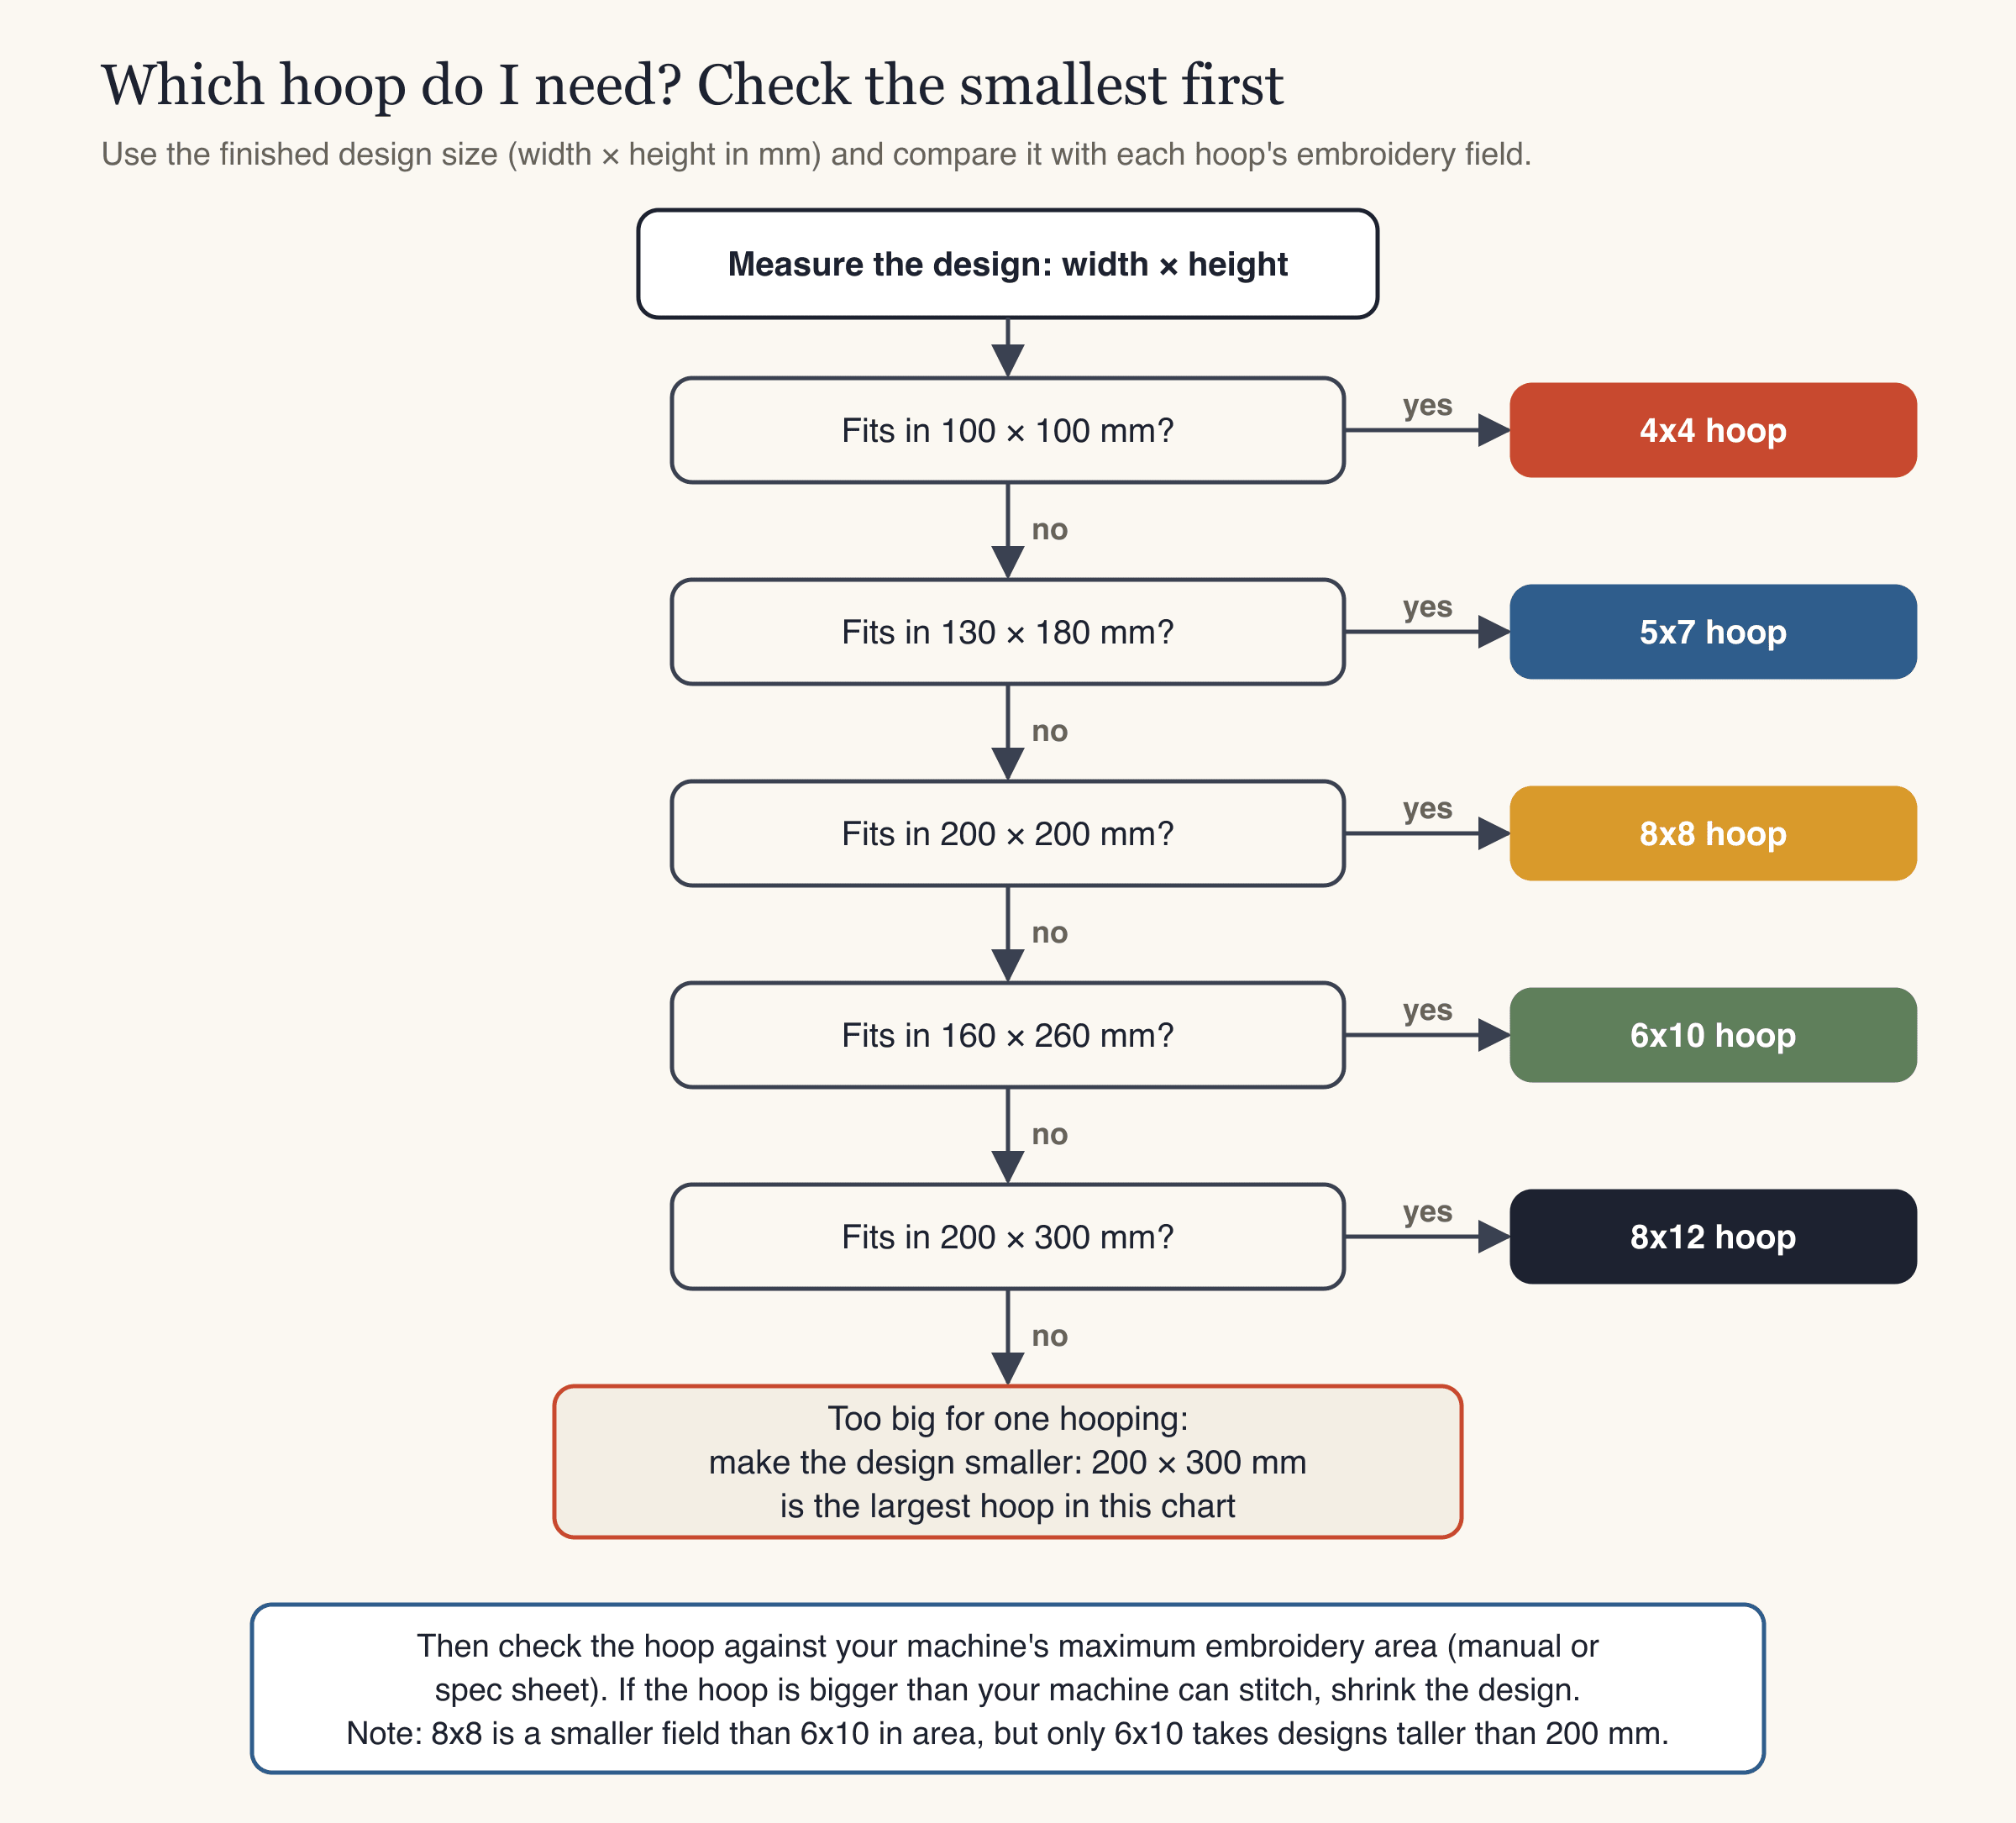
- Find the finished design size (width × height) in millimeters. It's shown in your design file's details, on the machine screen, or in StitchFile's preview stats.
- Compare it with the fields, smallest first: 100 × 100, then 130 × 180, then 200 × 200, then 160 × 260, then 200 × 300 mm. Allow rotation if your machine can rotate designs.
- Leave a few millimeters to spare. A design right at the edge of the field is hard to hoop accurately.
- Check your machine's maximum embroidery area. If the hoop you need is bigger than your machine allows, make the design smaller.
- Use the smallest hoop that fits. Less fabric between the rings means less flex, fewer gaps between colors and less puckering.
- Hoop the fabric and stabilizer together, smooth and firm, without stretching the fabric. Our stabilizer guide covers which backing to use.
If you're making a file from your own logo or artwork, StitchFile does the fitting for you: pick a size preset (left chest 90 mm, cap front 55 mm, patch 75 mm, sleeve 80 mm, 4x4 hoop 95 mm, full back 250 mm) or type any size from 20 to 300 mm, and the free preview shows the exact size in millimeters and the smallest hoop it fits, from 4x4 up to 8x12. Too big for your machine? Re-run it at a smaller size before you buy; the preview is free. Each design comes in PES, DST, JEF, EXP and VP3.
Typical design sizes and the hoop they need
| Placement | Typical size (longest side) | Smallest hoop |
|---|---|---|
| Cap front | 50–60 mm | 4x4 (or a cap hoop) |
| Sleeve | 60–80 mm | 4x4 |
| Patch | 60–90 mm | 4x4 |
| Left chest | 75–90 mm | 4x4 |
| Full 4x4 design | up to about 95 mm | 4x4 |
| Large chest or tote bag | 120–180 mm | 5x7 (check the shorter side fits 130 mm) |
| Full back | up to 250 mm | 6x10 or 8x12, depending on shape |
For placement measurements on garments, see the logo placement and size guide. Caps usually need a dedicated cap hoop or frame; our guide on how to embroider a hat covers that.
Common mistakes
- Sizing the design to the hoop's name. A 4 × 4 in design is bigger than a 4x4 field. Size to the field in millimeters, with a little room to spare.
- Using a big hoop for a small design. It works, but the fabric is held less firmly. Use the smallest hoop that fits.
- Buying hoops by size alone. Hoops are made for specific machine brands and often specific models. Check that a hoop fits your machine before you buy it.
- Forgetting the machine's limit. A design that fits a 6x10 hoop is no use on a 5x7 machine. Check the maximum embroidery area first.
- Stretching fabric to make it fit. Pulling fabric tight in the hoop distorts it, and the design puckers when you unhoop it.
FAQ
What are the standard embroidery machine hoop sizes? The most common are 4x4, 5x7, 6x10, 8x8 and 8x12 in. Their embroidery fields are about 100 × 100, 130 × 180, 160 × 260, 200 × 200 and 200 × 300 mm. Exact fields vary slightly by brand and model, so check your manual.
Is a 4x4 embroidery hoop really 4 inches? Not quite. The stitchable field of a 4x4 hoop is 100 × 100 mm, about 3.94 in. Size designs to about 95 mm on the longest side to leave a margin.
What size hoop do I need for a left-chest logo? A left-chest logo is usually 75–90 mm (3–3.5 in) on the longest side, so a 4x4 hoop is enough. It's also the firmest hoop for a small design.
What is the Brother PE800 hoop size? The PE800 has a 5x7 in maximum embroidery area, so designs must fit within 130 × 180 mm. Use the 4x4 hoop for smaller designs.
Can I stitch a design bigger than my hoop? Not in one hooping. You can resize the design to fit, or split it into sections and stitch them in several hoopings, which takes careful alignment. For most projects, resizing to fit your largest hoop is the simplest option.
Can I use any brand's hoop on my machine? Usually not. Hoops attach to the embroidery arm with a bracket made for specific machines. Check compatibility with your machine's maker or manual before buying.
Make a design that fits your hoop
The quickest way to avoid "design too large" on the machine screen is to make the file at the right size in the first place. Upload your artwork to StitchFile, choose a hoop preset or type your size, and the free preview tells you the exact dimensions and the smallest hoop it fits before you download. If you're new to all of this, start with machine embroidery for beginners.