Embroidery guide
Logo Placement on Shirt: Embroidery Size and Placement Guide
Logo placement on shirt made simple: left chest logo size, polo, cap, sleeve and back measurements, plus how to mark and hoop so every logo lands straight.
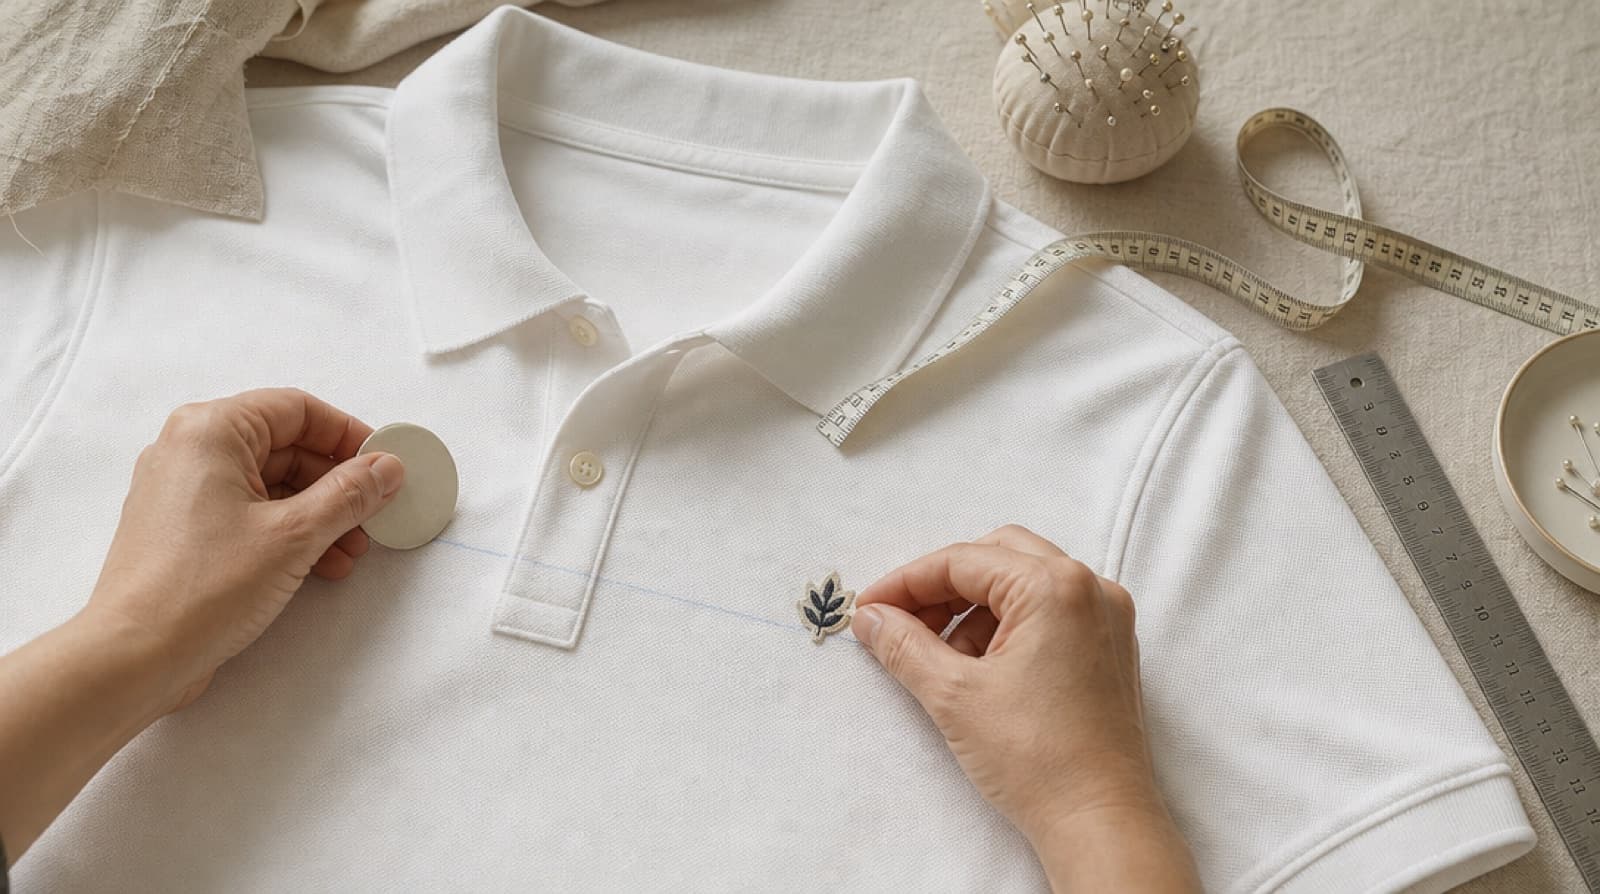
Good logo placement on a shirt comes down to two numbers: how far down from the shoulder and how far over from the center. Get those right, and pick a size that suits the spot, and the logo looks professional on every shirt in the stack. This embroidery placement guide gives you the measurements for left chest, polos, caps, sleeves and backs, the sizes that work in each spot, and a step-by-step way to mark and hoop so the logo goes where you planned.
Quick answer
- Left chest: center of the logo 7–9 in (18–23 cm) below the high point of the shoulder and 4–5 in (10–13 cm) from the center front.
- Left chest logo size: 3–3.5 in (75–90 mm) on the longest side. Polos: the same, sometimes a little smaller.
- Cap front: 2–2.4 in (50–60 mm), centered, about 0.5 in above the brim. Sleeve: 2.4–3.1 in (60–80 mm). Full back: up to 10 in (250 mm).
- Measure from the shoulder, not the hem, and pin a paper template on the actual shirt before you hoop.
Where to put a logo on a shirt: the main options
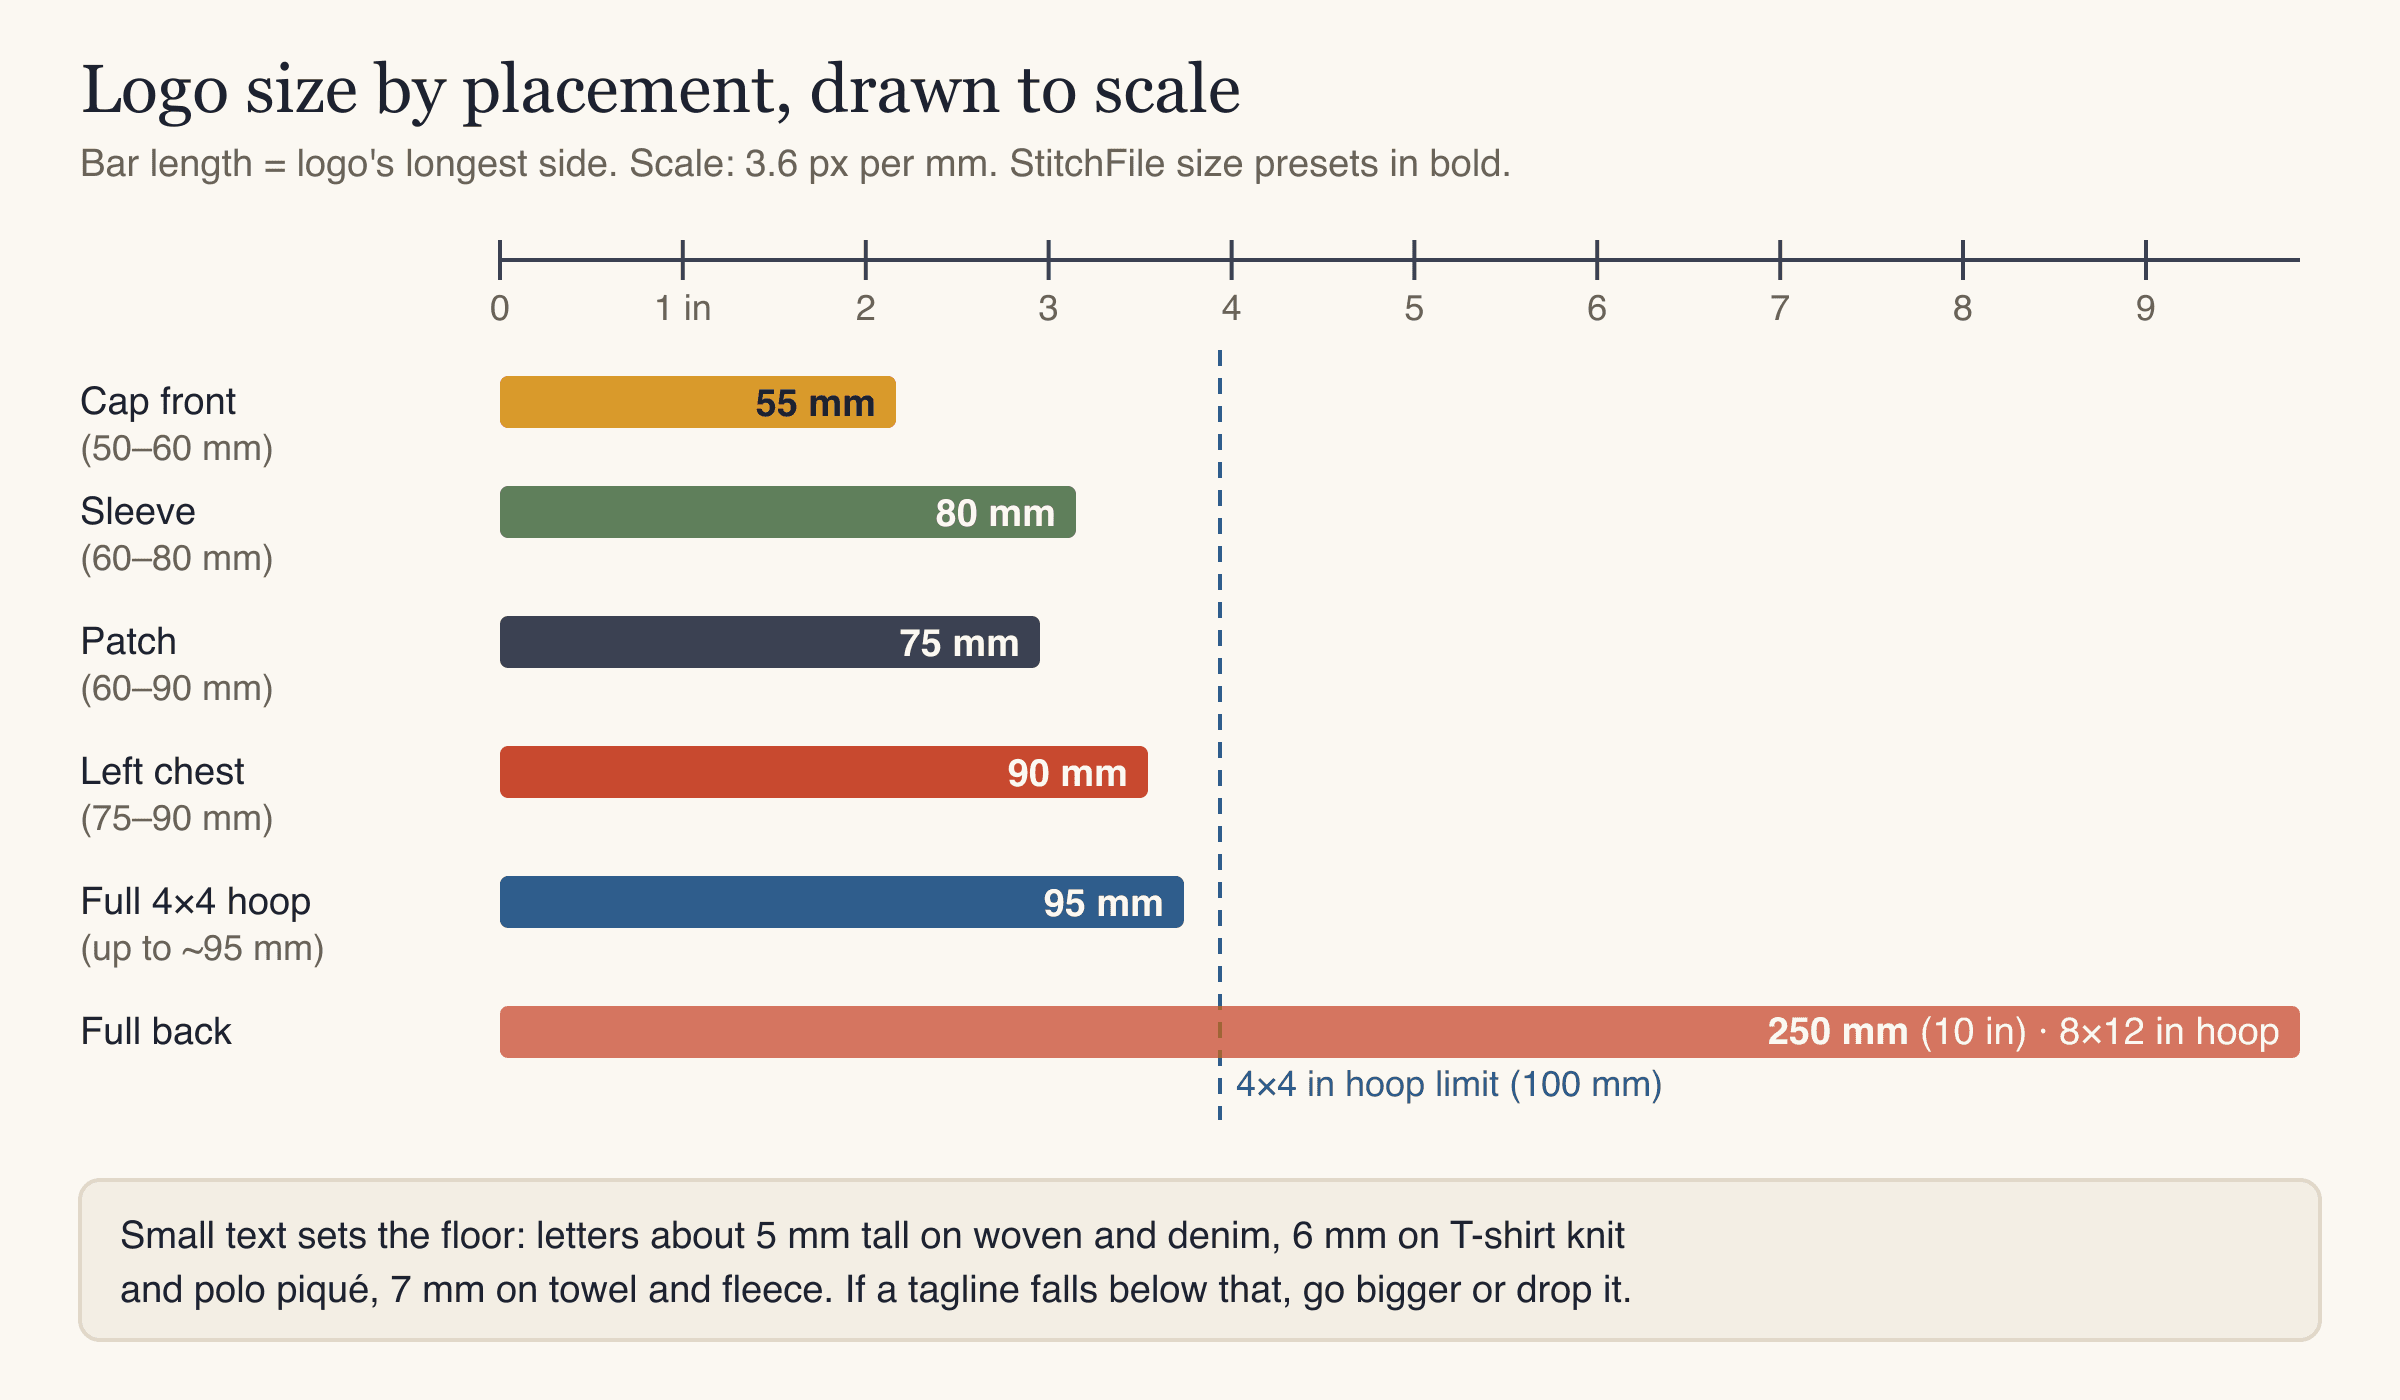
Most embroidered shirts use one of six placements. The table below sums up the usual sizes. All sizes are the logo's longest side, because that is what decides whether it fits a hoop.
| Placement | Typical logo size | Where it sits | Hoop it usually needs |
|---|---|---|---|
| Left chest | 3–3.5 in (75–90 mm) | 7–9 in below the shoulder, 4–5 in from center | 4×4 in |
| Right chest | 3–3.5 in (75–90 mm) | Mirror of left chest | 4×4 in |
| Cap front | 2–2.4 in (50–60 mm) | Centered on the front seam, ~0.5 in above the brim | Cap hoop or frame |
| Sleeve | 2.4–3.1 in (60–80 mm) | Outer sleeve, 1–1.5 in above the hem | 4×4 in |
| Nape (back of neck) | 1.5–2.5 in wide | 1–1.5 in below the back collar seam | 4×4 in |
| Full back | up to 10 in (250 mm) | Top edge 3–5 in below the back collar seam | 8×12 in |
These are working ranges used by many shops, not an official standard. Shirt cut, size and the shape of the logo all shift the final spot a little. A wide wordmark and a round badge with the same longest side will look different on the chest, so always judge on the garment.
Logo placement on shirt fronts: the left chest
The left chest is the most popular spot for a business or team logo. It shows on polos, tees, button-downs and jackets, and it stays visible under a lanyard or an open jacket.
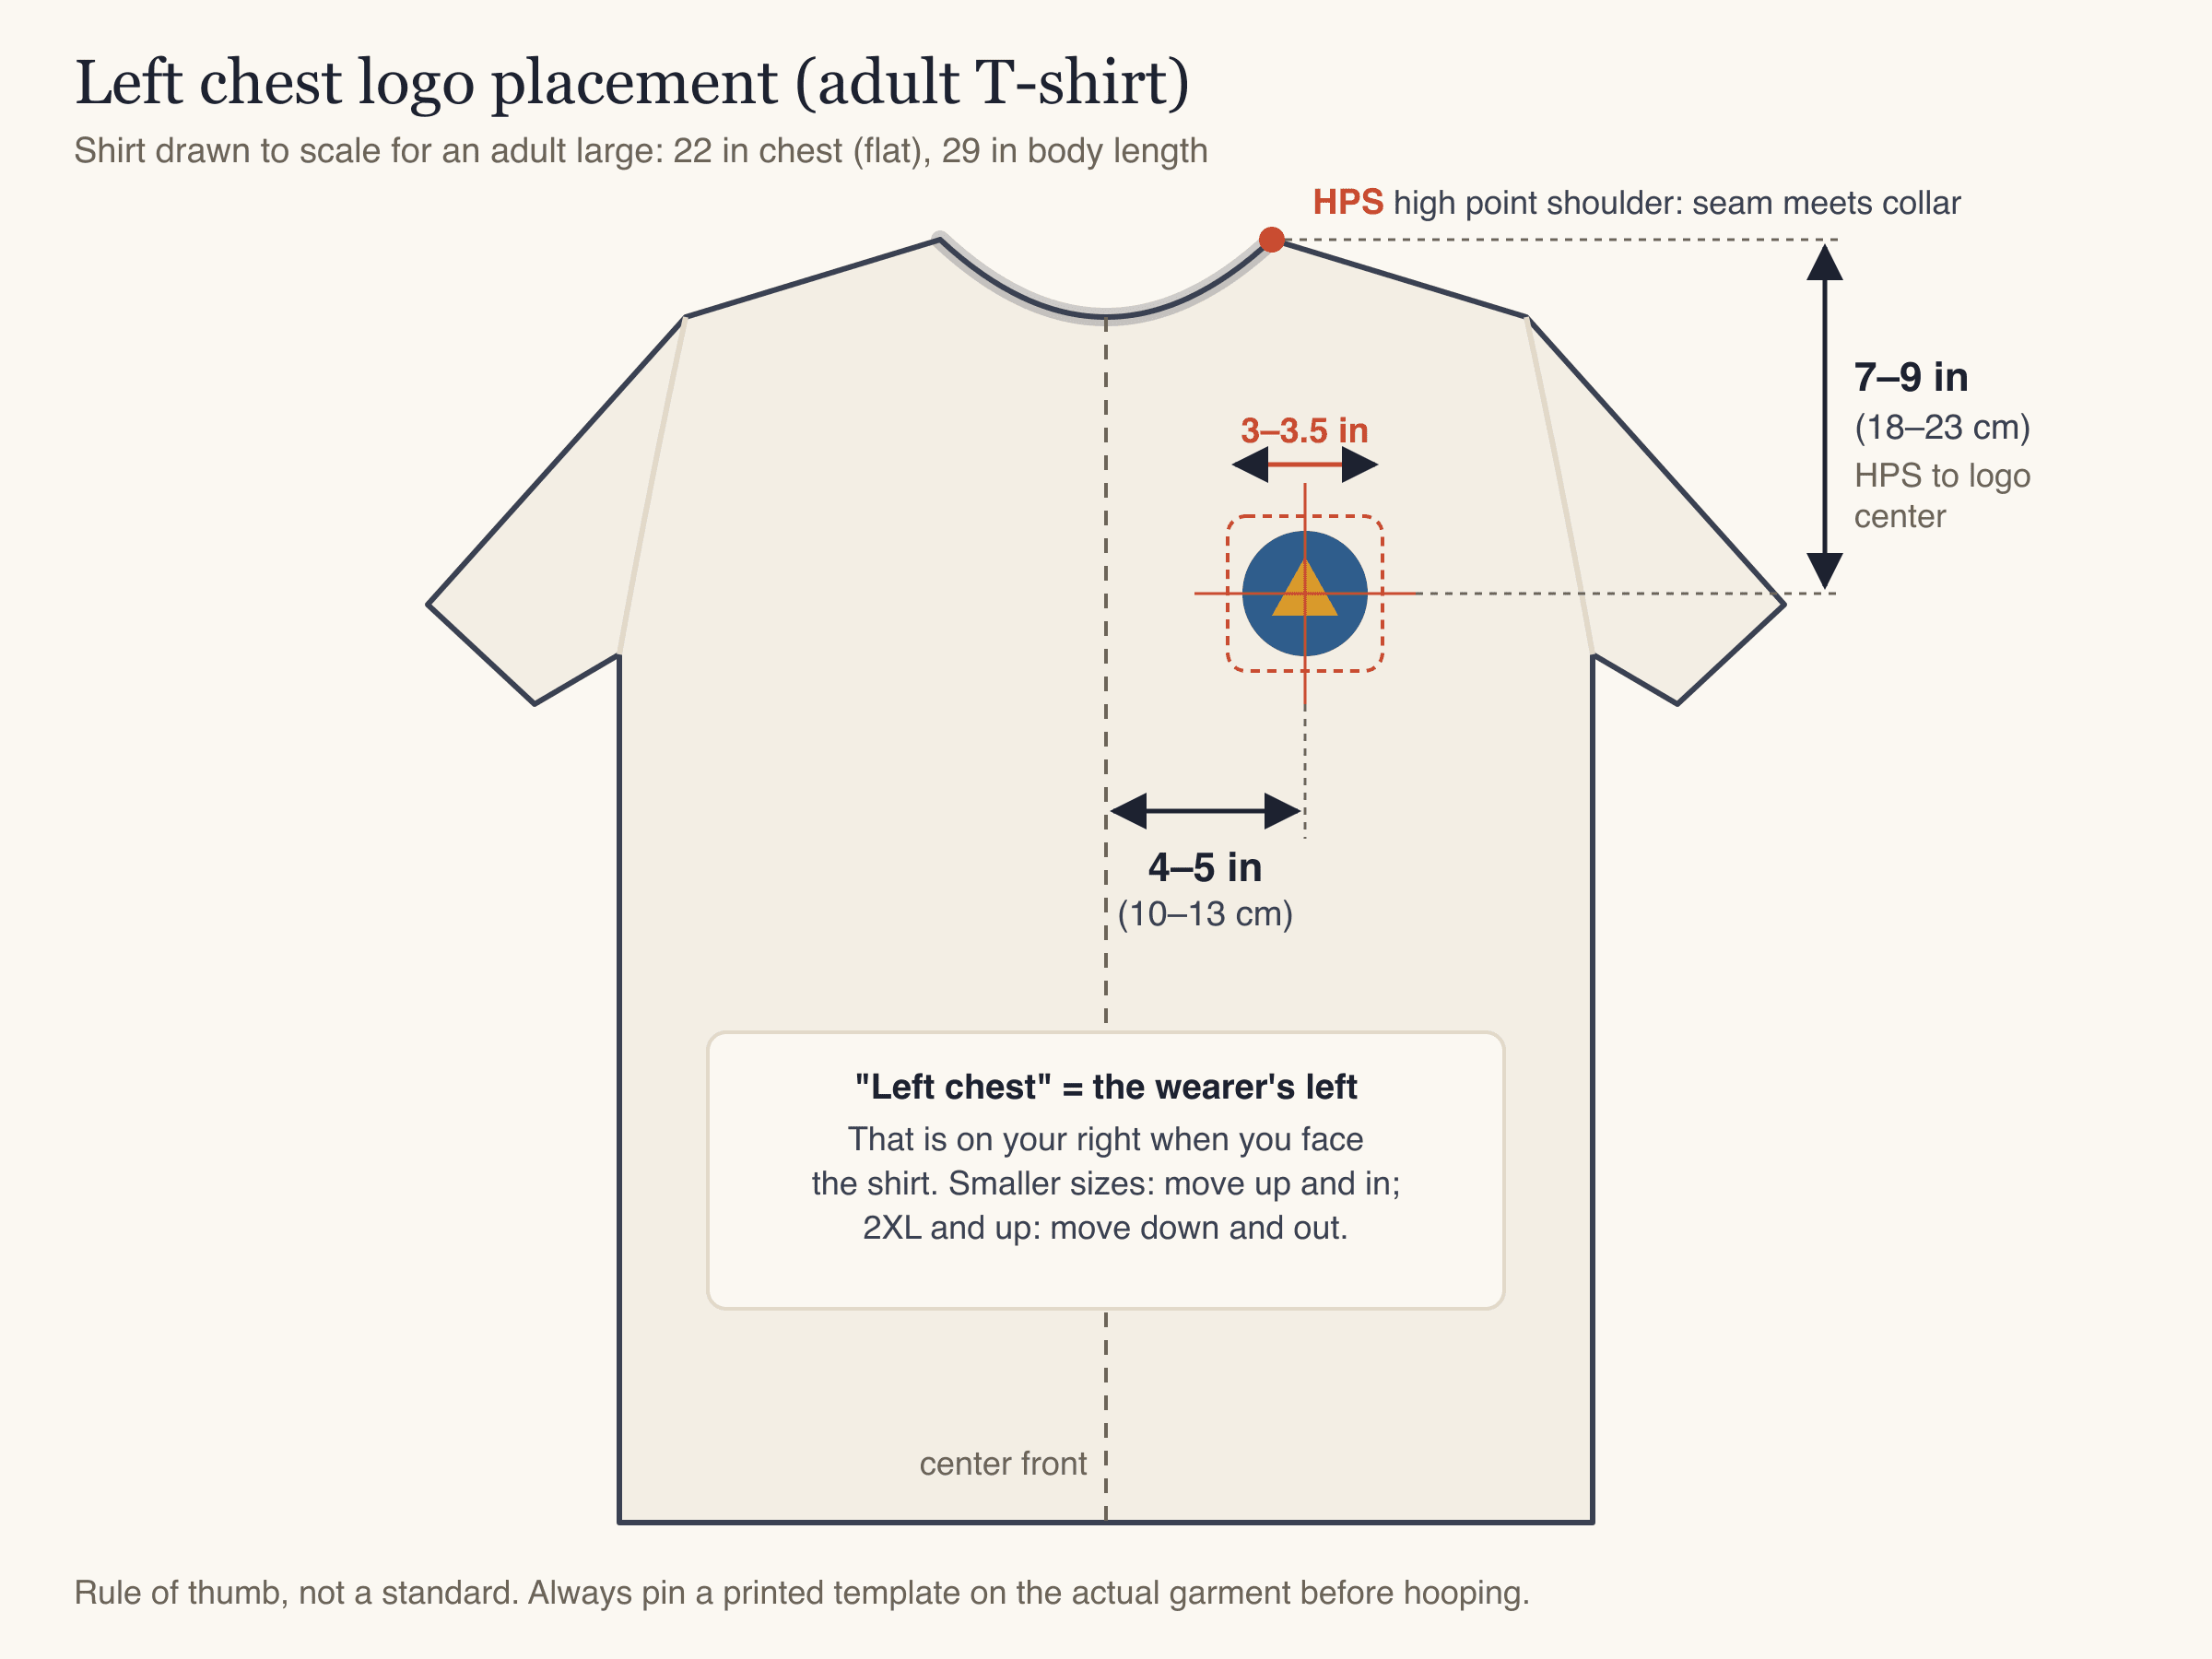
"Left chest" means the wearer's left. When you face the shirt on a table, that is the side on your right. It sounds obvious, but mirrored placements are one of the most common mistakes on a first order.
Measure from the high point shoulder
The reference point is the high point shoulder (HPS): the spot where the shoulder seam meets the collar. Measuring from here works across shirt styles because it ignores the collar shape and the shirt length.
- Down: the center of the logo sits 7–9 in (18–23 cm) below the HPS on adult shirts. Many shops use about 7 in for small and medium, 8 in for large and XL, and 9 in for 2XL and up.
- Across: the center of the logo sits 4–5 in (10–13 cm) from the center front of the shirt. Smaller sizes go closer to 4 in, larger sizes closer to 5 in.
A quick check without a ruler: on a T-shirt, the logo usually ends up roughly level with the bottom of the armhole. If yours is far above or below that line, measure again.
Left chest logo size
The usual left chest logo size is 3–3.5 in (75–90 mm) on the longest side. Up to about 4 in can work on large adult shirts and jackets, but it starts to look like a front print rather than a chest logo. For youth shirts, 2.5–3 in is safer.
Chest logo size also depends on the shape of the logo:
- Square or round badge: 3–3.5 in each way.
- Wide wordmark: up to 3.5–4 in wide, but often only 1–1.5 in tall.
- Tall logo: keep the height to about 3.5 in so it doesn't creep toward the collar or the armpit.
The left chest embroidery size is also limited by the smallest text in the logo. A tagline that is 4 mm tall at 90 mm will not stitch cleanly (more on that below).
Polo shirt logo size and placement
Polo shirt logo size follows the left chest rule: 3–3.5 in (75–90 mm). Some shops go slightly smaller on fitted or women's polos, around 2.5–3 in, so the logo does not crowd the placket.
Placement on a polo is easier to judge by eye because the placket (the buttoned strip at the neck) gives you landmarks:
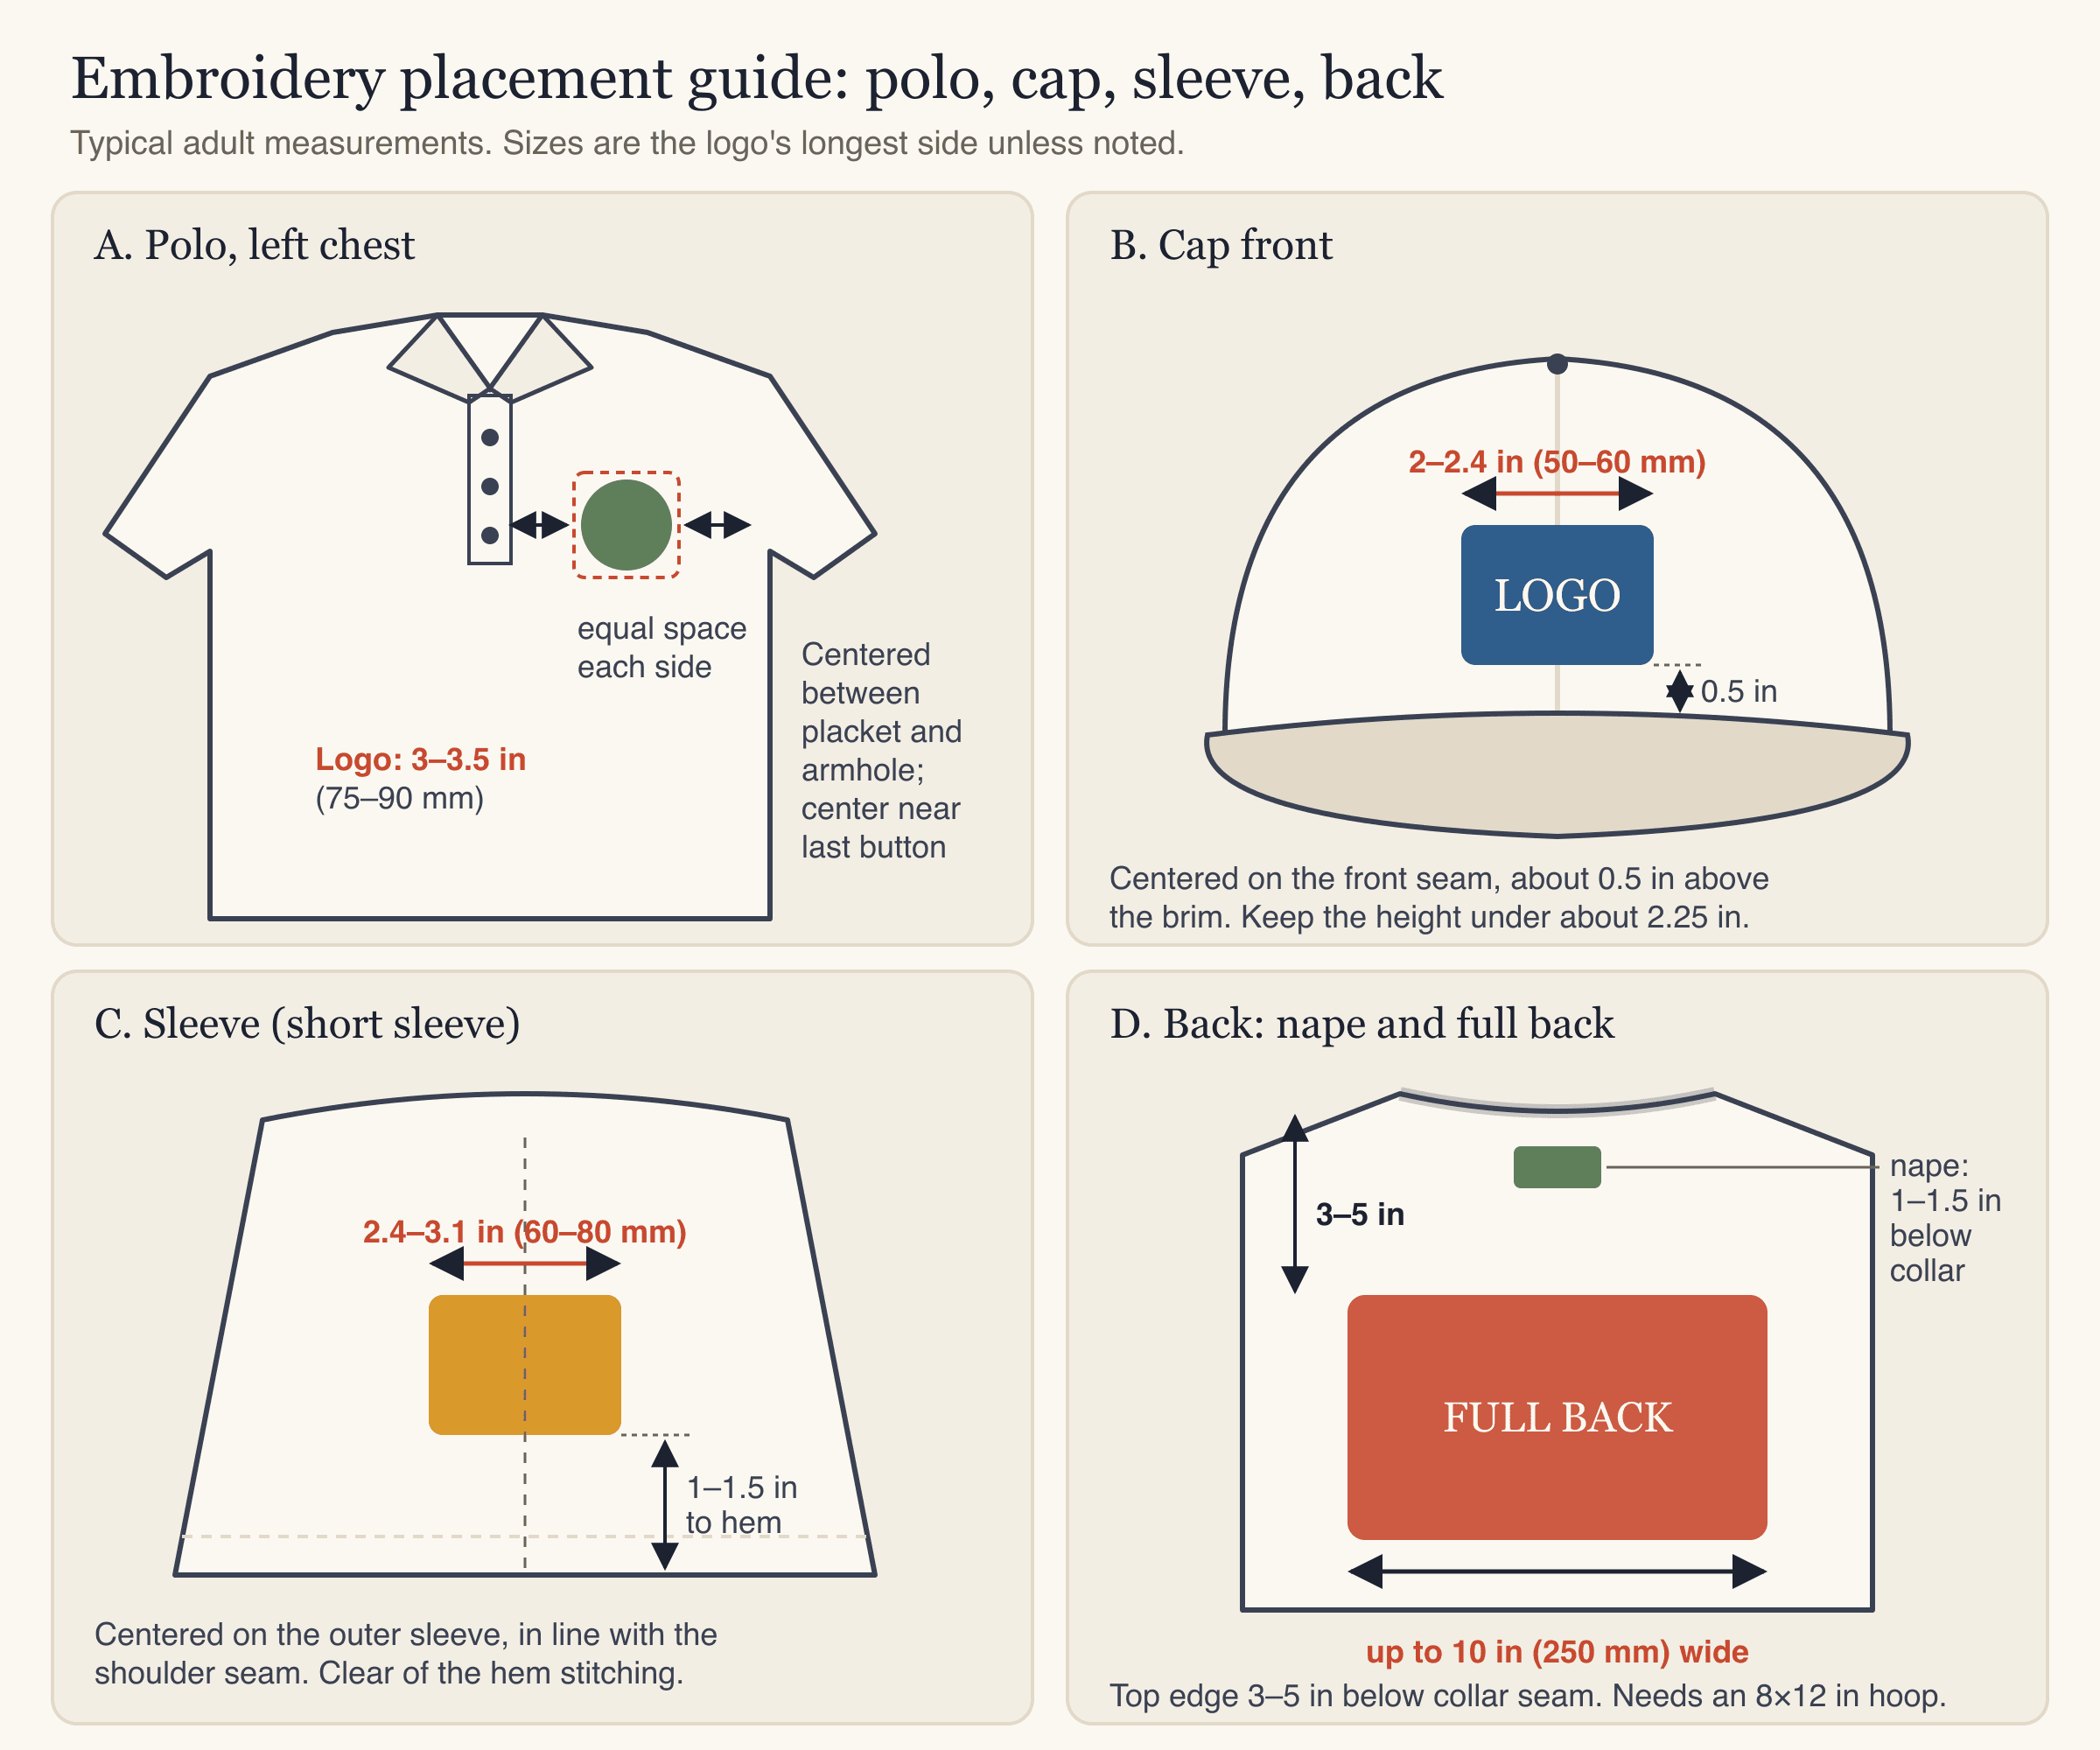
- Across: center the logo between the edge of the placket and the armhole seam, with roughly equal space on each side.
- Down: the center of the logo usually sits near the level of the bottom button. Use the same 7–9 in HPS measurement to confirm.
Polo piqué is a textured knit. It needs a cut-away stabilizer (the backing you hoop under the fabric) and a water-soluble topping on top, so the stitches don't sink into the texture. Small text needs to be at least about 6 mm tall on piqué.
Cap, sleeve and back placement
Cap front
Center the logo on the front seam of the cap, about 0.5 in above the brim. Most cap fronts look best at 2–2.4 in (50–60 mm), and the height should stay under about 2.25 in because the crown curves back above that. Structured caps hold the shape better than unstructured ones. The full method is in our guide on how to embroider a hat.
Sleeve
Sleeve logos run 2.4–3.1 in (60–80 mm). On a short sleeve, center the design on the outer sleeve in line with the shoulder seam, with the bottom edge 1–1.5 in above the hem. Keep it clear of the hem stitching, which is thicker and can deflect the needle. Sleeves are narrow tubes, so check that the hoop can close around the sleeve before you commit to a size.
Nape and full back
A small nape logo (1.5–2.5 in wide) sits 1–1.5 in below the back collar seam. A full back design can go up to about 10 in (250 mm) wide, with the top edge around 3–5 in below the collar seam. At that size you need an 8×12 in (200×300 mm) hoop and a long sew time. Our embroidery hoop sizes guide lists the real stitch area of each hoop.
Minimum text size: the hidden limit on chest logo size
Many logos have a name or tagline in small type. When you shrink the whole logo to 3 in, that text may become too small to stitch. Thread has thickness, and below a certain height the letters fill in and blur.
| Fabric | Smallest letter height that stitches cleanly |
|---|---|
| Woven cotton, twill, denim | about 5 mm (0.2 in) |
| T-shirt knit, polo piqué | about 6 mm (0.24 in) |
| Towel, fleece | about 7 mm (0.28 in) |
If the text is too small, you have three options: make the logo bigger, drop the tagline from the chest version, or move the text to a separate placement such as the sleeve. For more on this, see embroidery lettering and fonts.
How to mark and hoop a left chest logo: step by step
- Print a template. Print the logo at its final size on paper and cut around it with a small margin. Mark the center with crosshairs.
- Lay the shirt flat. Button polos and button-downs. Smooth the front without stretching it.
- Find the HPS and center front. Fold the shirt in half lengthwise and press lightly, or measure across from seam to seam, to find the center line.
- Measure down and across. From the HPS on the wearer's left side, measure 7–9 in down. From the center front, measure 4–5 in across. Where the two meet is the logo's center.
- Pin the template and check. Pin the paper on the spot, then hold the shirt up or put it on a person or form. Check that the logo isn't too close to the armpit or the collar. Adjust by eye if needed.
- Mark the crosshairs. Use tailor's chalk or a water-soluble marking pen to draw a vertical and horizontal line through the center. Make the lines longer than the logo so you can see them in the hoop.
- Hoop with stabilizer. Hoop the shirt with the right stabilizer underneath (cut-away for knits and polos, tear-away for wovens), lining up the hoop's center marks with your crosshairs. The fabric should be taut but not stretched.
- Check the needle position. On the machine, move the needle to the design center and lower it close to the fabric without stitching. It should sit on your crosshairs. Use the machine's trace or outline function, if it has one, to see the full stitch area.
- Test on scrap first. Sew the file once on a similar fabric before you start on the order.
Getting the size right in the file
Placement is half the job. The other half is a design file at the right size for that placement, with stitch settings that suit the fabric. Scaling a finished embroidery file by a large amount on the machine is risky, because the stitch count stays the same while the shapes grow or shrink, so the stitching gets too sparse or too dense.
This is where StitchFile helps. Upload your logo as SVG, PNG or JPG, pick a size preset (left chest 90 mm, cap front 55 mm, sleeve 80 mm, 4×4 hoop 95 mm, full back 250 mm, or any size in mm or inches) and a fabric (woven, T-shirt knit, polo piqué, denim, or towel and fleece). The fabric sets stitch density, pull compensation and the stabilizer we recommend. The free preview shows your design at real size on a T-shirt, woven shirt, cap and jersey, flags lettering that is too small for the size, and tells you the smallest hoop it fits.
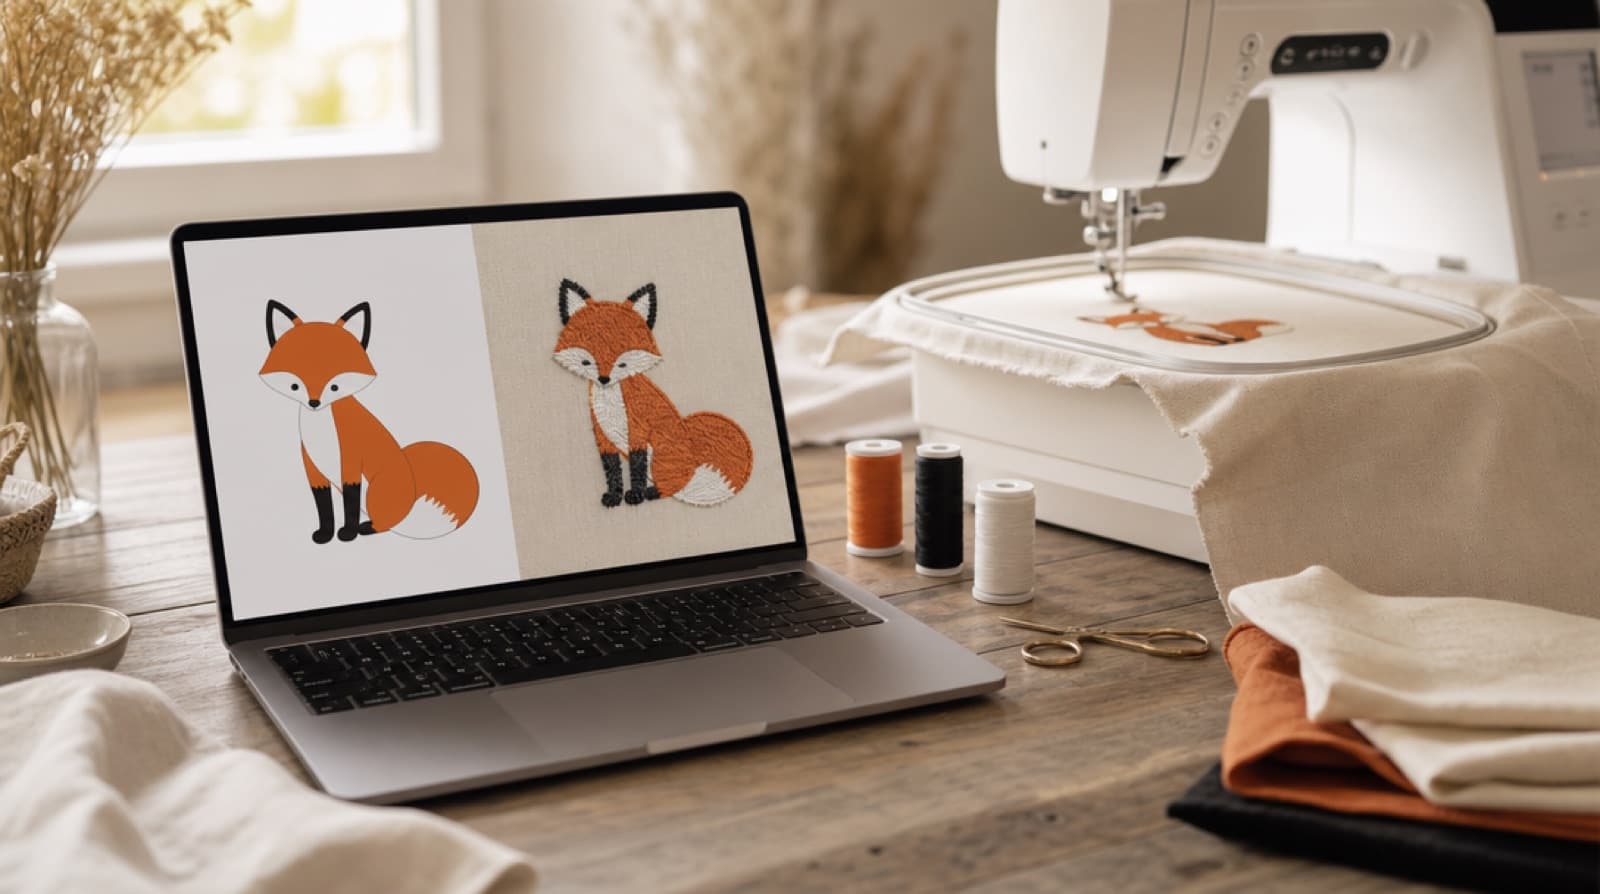
Here is a real example: a fox logo made with the left chest preset (90 mm) on polo piqué.
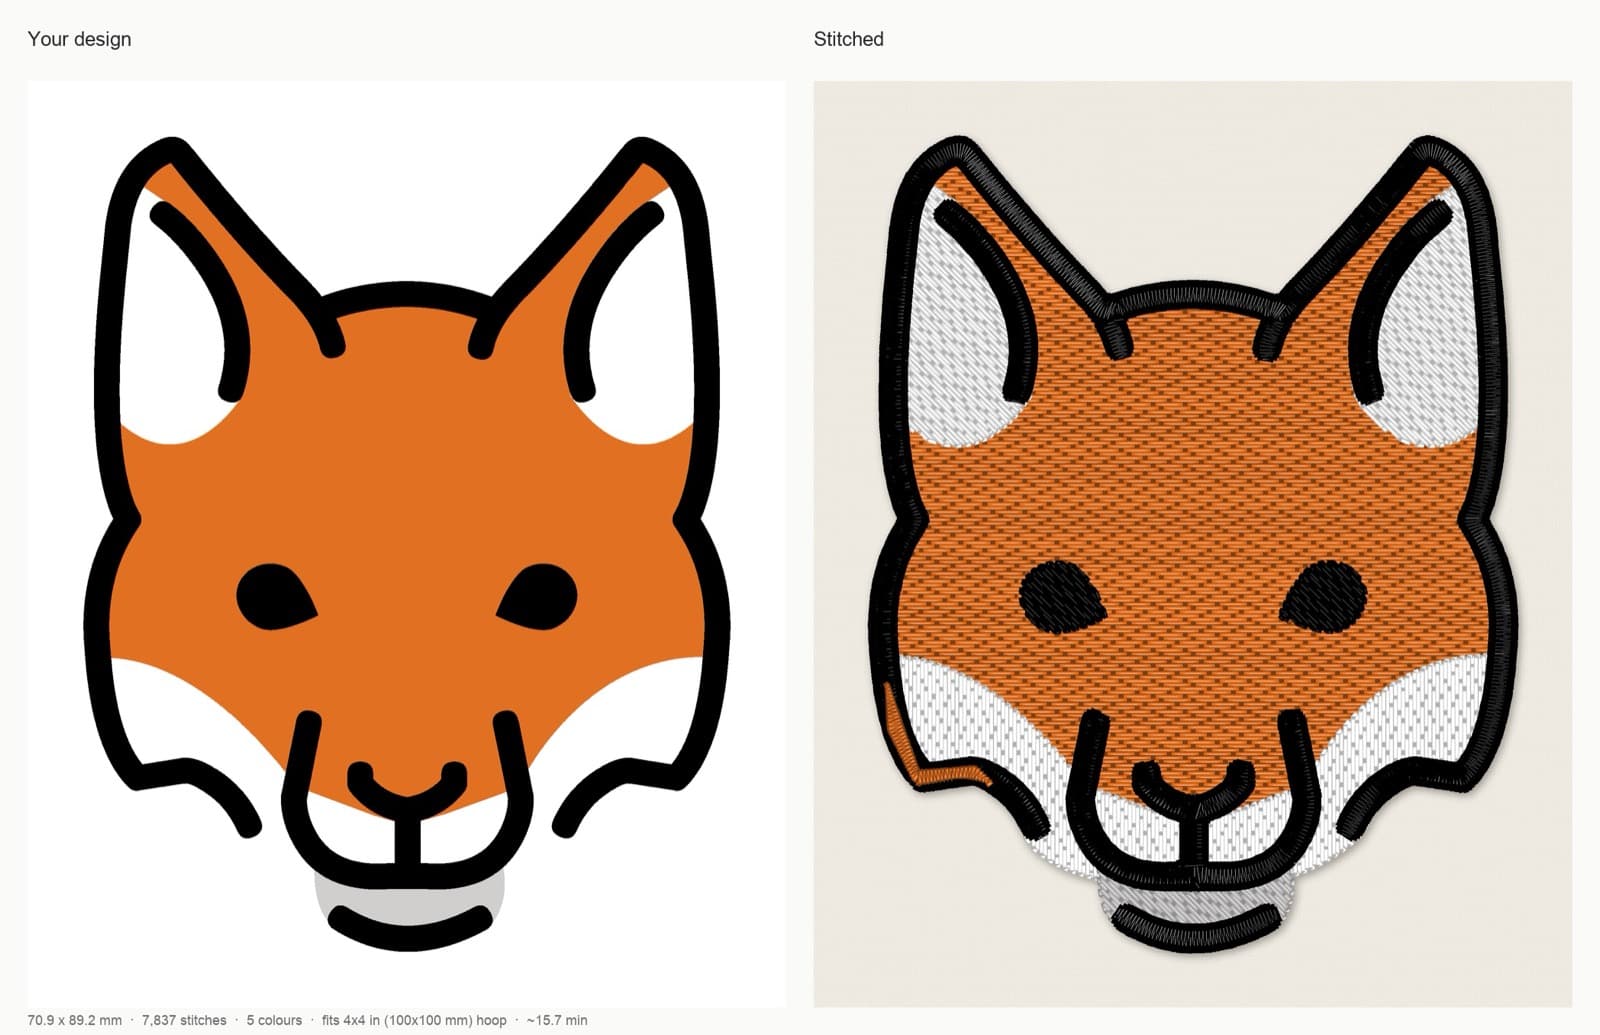
StitchFile stitch preview: fox logo at 70.9 × 89.2 mm, 7,837 stitches, 5 color stops, fits a 4×4 in (100×100 mm) hoop, about 15.7 minutes at 700 stitches per minute. Recommended stabilizer: cut-away plus water-soluble topping.
Artwork: OpenMoji fox, CC BY-SA 4.0. StitchFile converted the artwork into the stitch preview shown here; these adaptations are shared under the same license.
Notice that the size is set on the longest side. The fox is taller than it is wide, so 90 mm becomes the height and the width ends up at about 71 mm. For a wide wordmark, the same 90 mm would be the width instead. Keep that in mind when you compare your logo with the measurements above.
Common mistakes
- Placing on the wrong side. Left chest is the wearer's left. Mark it with the shirt facing you and double-check before hooping.
- Measuring from the hem. Shirt lengths vary a lot between brands and sizes. The shoulder and collar are more consistent reference points.
- Using one spot for every size. A logo at 7 in on an XS sits much lower, proportionally, than on a 3XL. Adjust by size, or sort the order by size and set the spot for each group.
- Too big for the chest. Over about 4 in, a chest logo starts to wrap toward the armpit and looks like a print. Stick to 3–3.5 in.
- Tiny text at chest size. If the tagline is under 5–6 mm tall, it won't read. Make it bigger, split it off, or remove it.
- Placing the logo too low on polos. Below the placket, it looks like it has slipped. Keep the center near the bottom button.
- Stretching knit fabric in the hoop. It looks fine in the hoop, then puckers and shifts the logo when released. Hoop knits taut, not stretched, with cut-away stabilizer. See machine embroidery on T-shirts for more.
- Skipping the test sew. Placement, size and fabric all affect the result. One test on scrap catches problems before you ruin a shirt.
FAQ
What is the standard left chest logo size?
The usual left chest logo size is 3–3.5 in (75–90 mm) on the longest side. Up to 4 in can work on large adult shirts and jackets. For youth and fitted shirts, 2.5–3 in is a safer choice.
How far down from the collar should a left chest logo be?
Measure from the high point shoulder, where the shoulder seam meets the collar. The center of the logo usually sits 7–9 in (18–23 cm) below that point on adult shirts. Go nearer 7 in for small sizes and nearer 9 in for 2XL and up.
How far from the center should a chest logo be?
The center of the logo usually sits 4–5 in (10–13 cm) from the center front of the shirt. On a polo, centering the logo between the placket edge and the armhole seam gets you to the same spot.
What size should a polo shirt logo be?
A polo shirt logo is usually 3–3.5 in (75–90 mm) on the longest side, the same as a T-shirt left chest. Fitted and women's polos often use 2.5–3 in. Keep small text at least about 6 mm tall on piqué.
What size should a logo be on a cap?
Most cap front logos are 2–2.4 in (50–60 mm), centered on the front seam about 0.5 in above the brim. Keep the height under about 2.25 in, because the crown curves back above that.
Can I use one embroidery file for every placement?
It is better to make a file for each size. Resizing a stitch file by a large amount changes how dense the stitches are, and small text may fall below the size that stitches cleanly. Making a separate file for chest, cap and sleeve keeps the density right at each size.
Make the file for your placement
Once you know where the logo goes and how big it should be, the next step is a stitch file made for that size and fabric. Upload your logo to StitchFile, choose the placement preset and fabric, and check the free preview on a shirt and cap at real size before you buy. Every purchase includes PES, DST, JEF, EXP and VP3 files, so it works with whatever machine you sew on.