Embroidery guide
Embroidery on Hat Fronts: How to Embroider a Cap for Beginners
Embroidery on hat fronts, step by step: flat-hoop soft caps on a home machine, use a cap frame for structured caps, and get size and placement right.
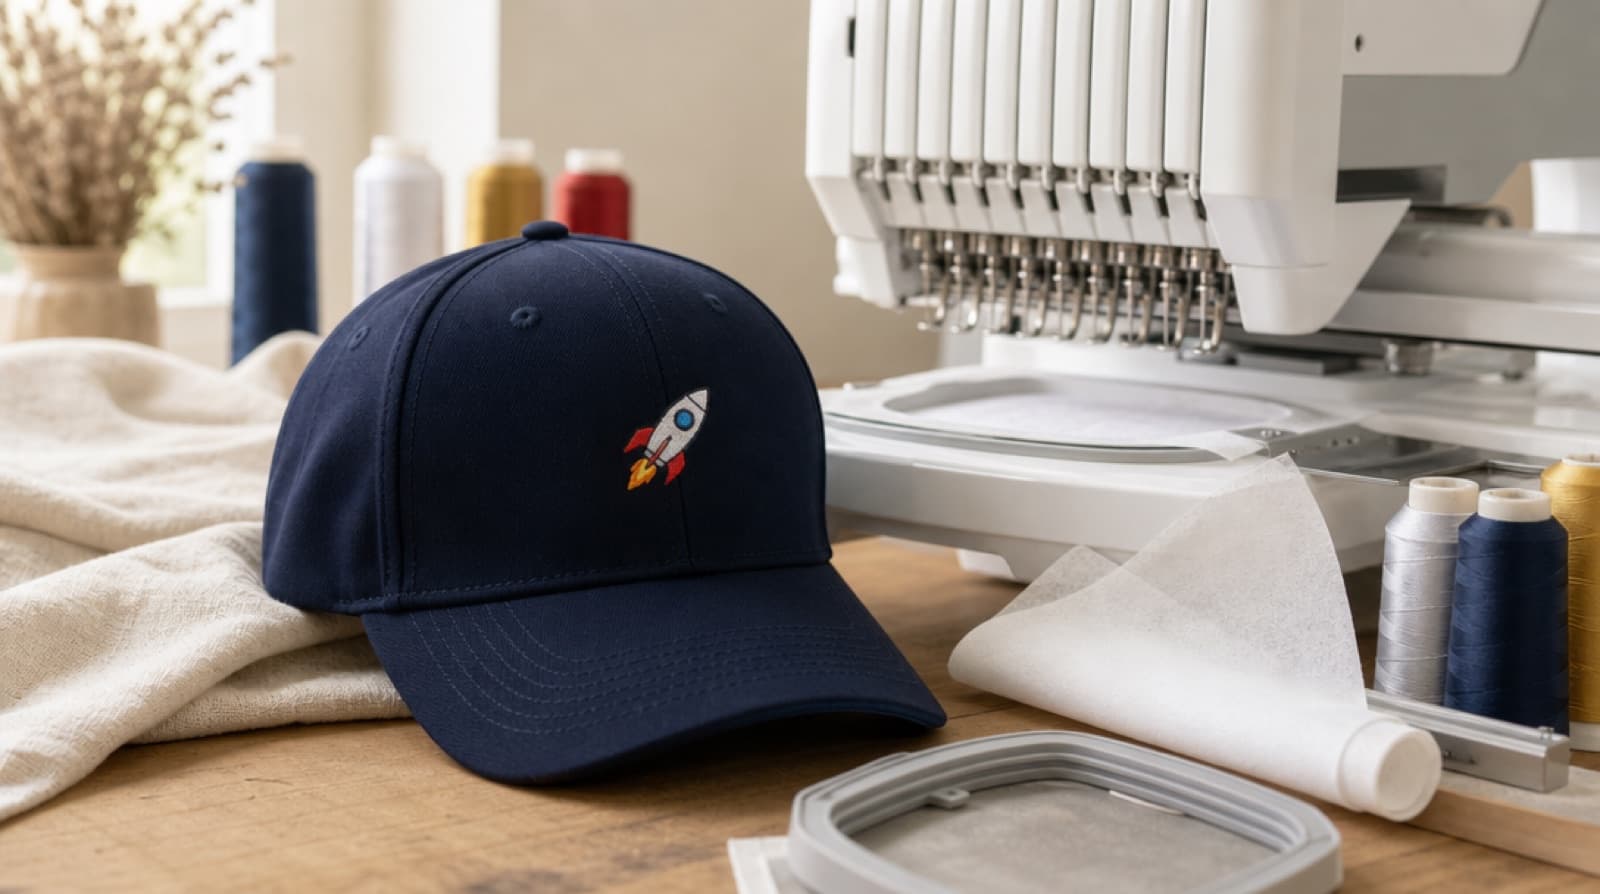
Quick answer: Machine embroidery on hat fronts depends on the cap and the machine.
- Soft, unstructured caps (dad hats): hoop sticky tear-away stabilizer flat, press the cap front onto it and sew. A single-needle home machine can do this.
- Stiff, structured caps (baseball caps with buckram inside) sew best on a cap frame, which multi-needle machines use.
- Keep the design about 50–60 mm (2–2.4 in) on its longest side, centered on the front seam, about 1/2 in above the brim.
- Use a simple design with few colors and letters at least 5 mm tall, and test on a spare cap first.
Embroidery on a hat looks simple: a small logo on the front of a cap. In practice, a cap is curved, has a stiff seam down the middle, and comes with a brim that gets in the way of the presser foot. This guide shows how to embroider a hat on the two kinds of machines people actually own: a single-needle home machine with flat hoops, and a multi-needle machine with a cap frame. It is honest about what each one can do.
If you've never stitched anything on your machine yet, start with our machine embroidery for beginners guide and come back. Caps are a good second project, not a first one.
Structured or unstructured: check your cap first
Before you think about hoops, squeeze the front of the cap.
- Unstructured caps have soft front panels with no stiffening. They fold flat easily. Washed cotton "dad hats" and many low-profile caps are unstructured.
- Structured caps have a stiff backing called buckram fused or sewn behind the two front panels. The front stands up on its own. Most classic baseball caps and trucker caps are structured.
This one check decides your method. A soft front can be pressed flat onto stabilizer in an ordinary hoop. A stiff front fights you when you flatten it, and it wants to be sewn while it keeps its curve, which is what a cap frame does.
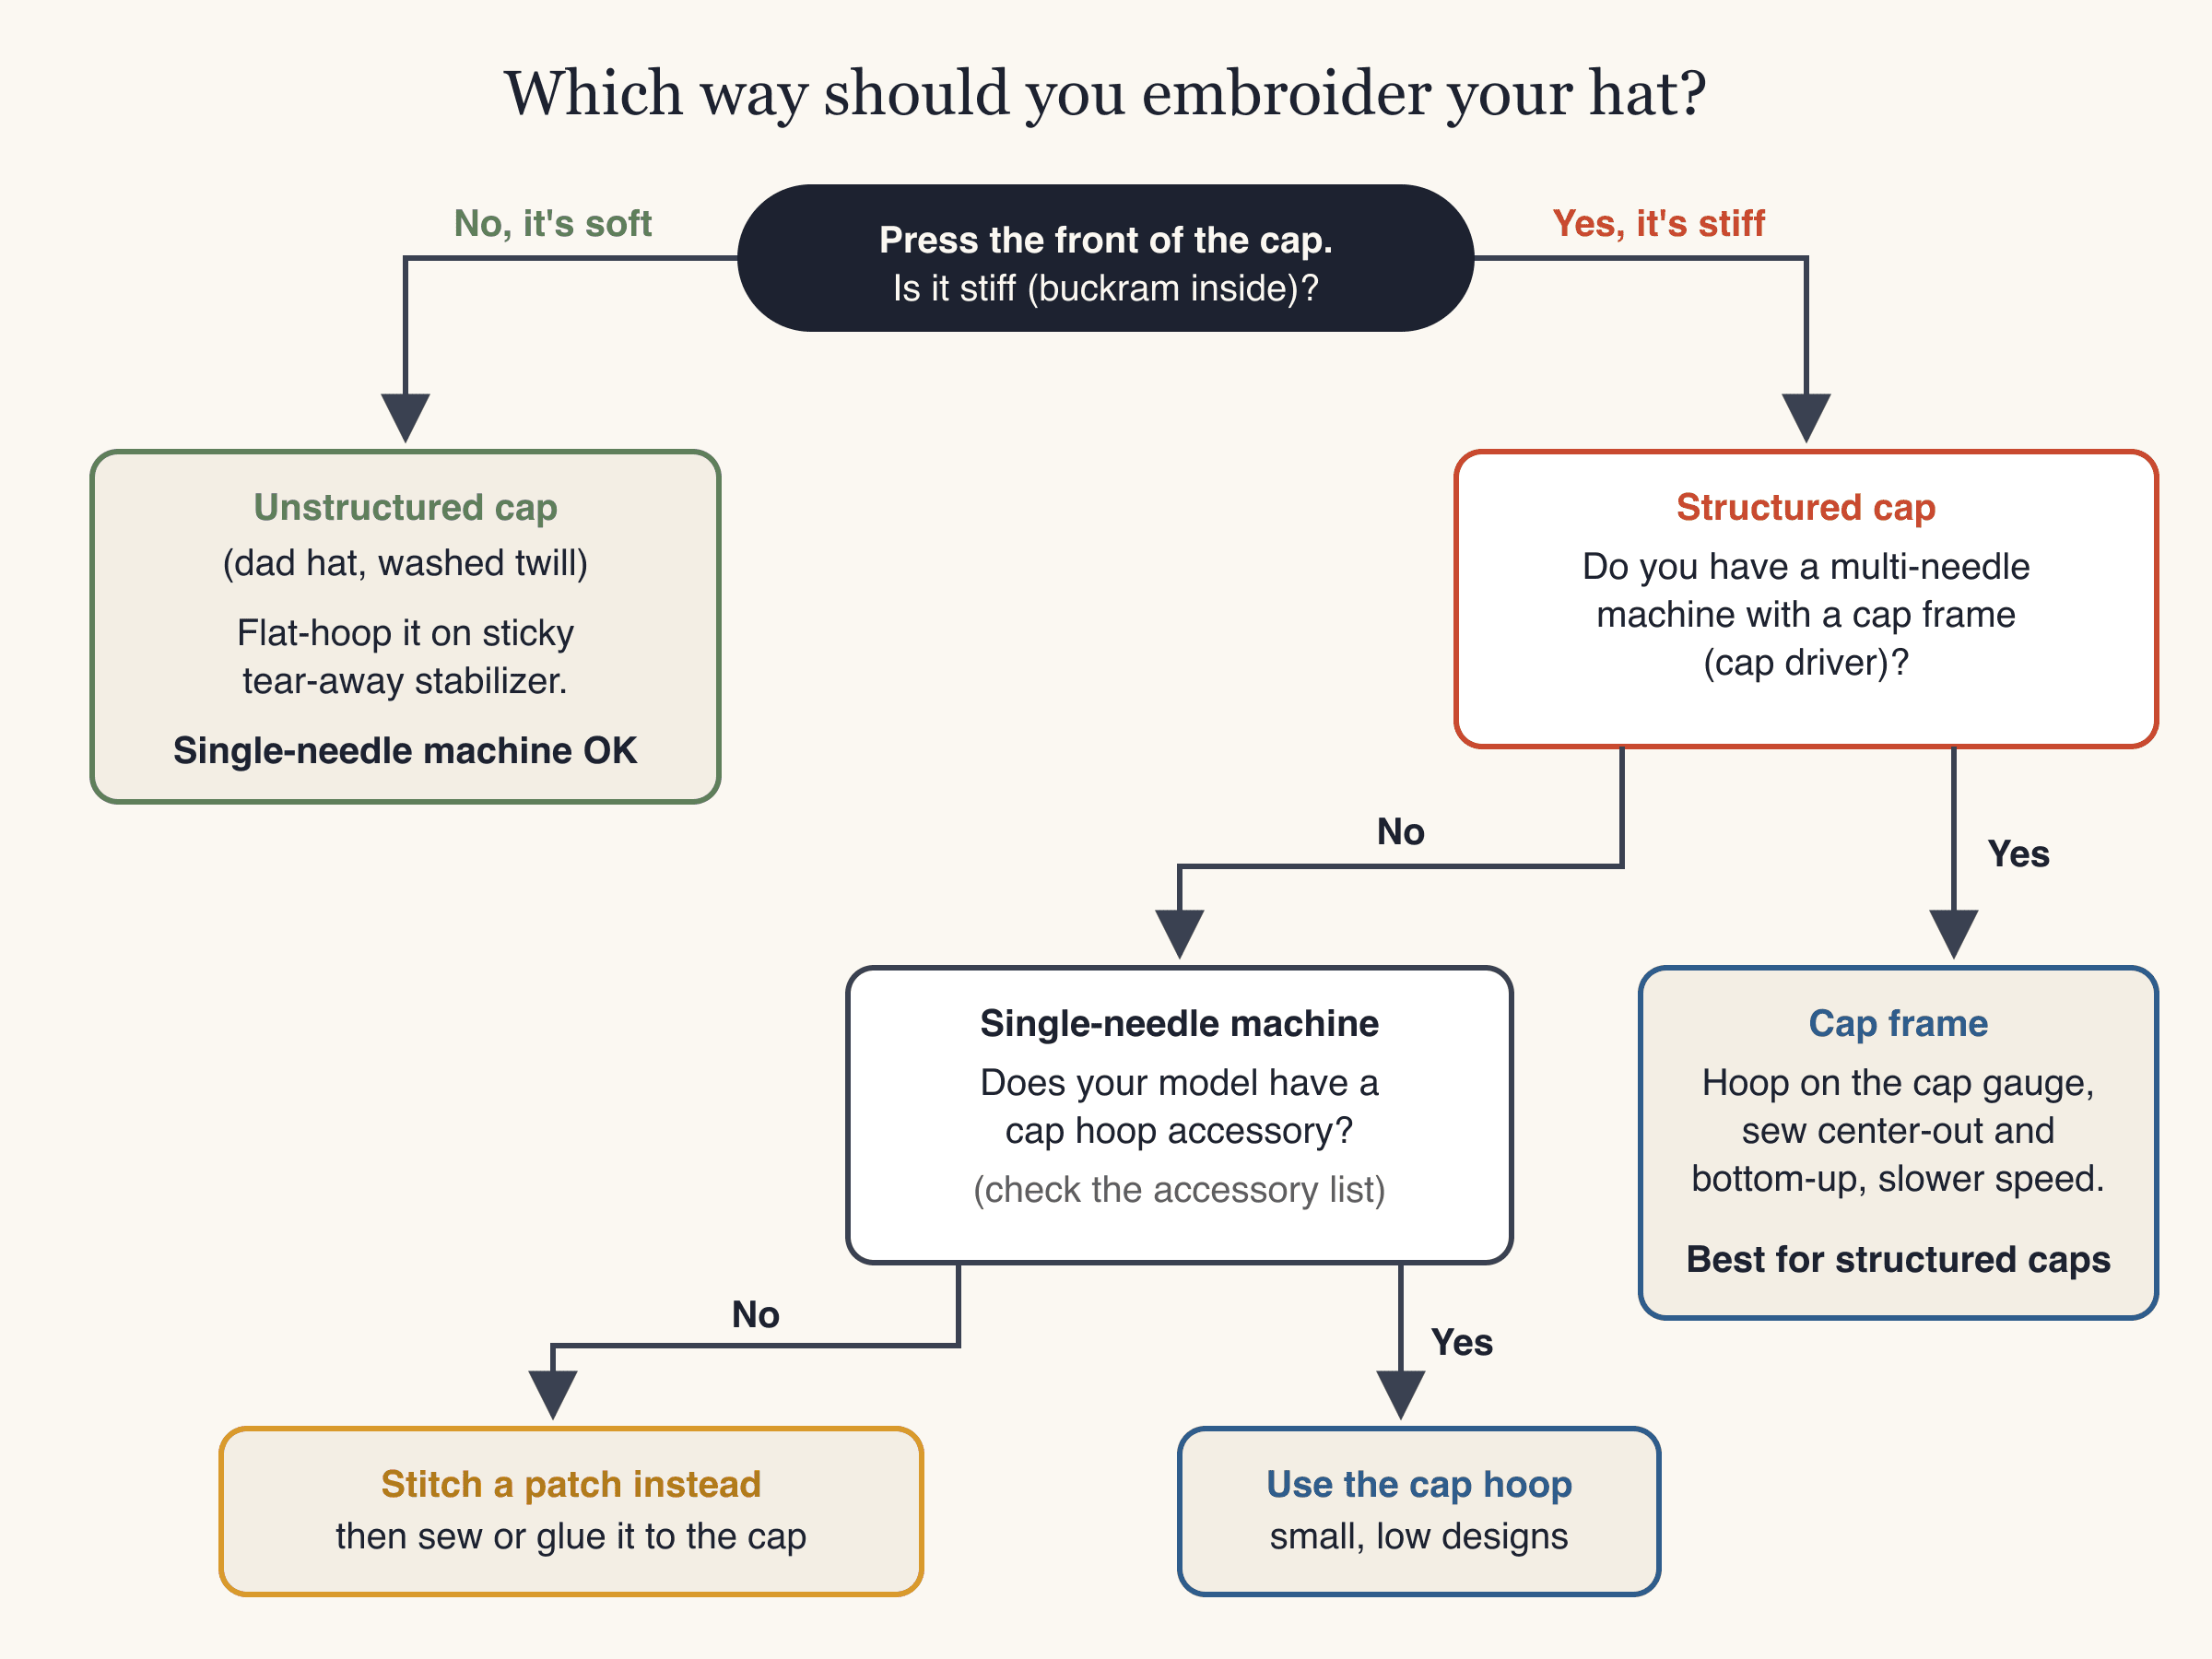
Which method fits your cap and machine. If you have no cap frame and a stiff cap, an embroidered patch is the reliable fallback.
| Single-needle home machine | Multi-needle machine with cap frame | |
|---|---|---|
| Unstructured caps | Yes, flat-hooped on sticky stabilizer | Yes, on the cap frame |
| Structured caps | Difficult; distortion and needle strikes on thick seams are common | Yes, this is what cap frames are made for |
| How the cap is held | Pressed flat onto adhesive stabilizer | Clamped around a curved frame that rotates with the cap driver |
| Practical design size | Small, kept well inside the hoop | Wider designs possible; height stays limited by the curve |
| Typical file format | Your machine's format (PES, JEF, VP3, EXP) | Usually DST |
Embroidery on hat fronts: size and placement
The most common question about cap embroidery is size. A cap front is small and curved, so designs that look fine on a shirt look huge on a hat.
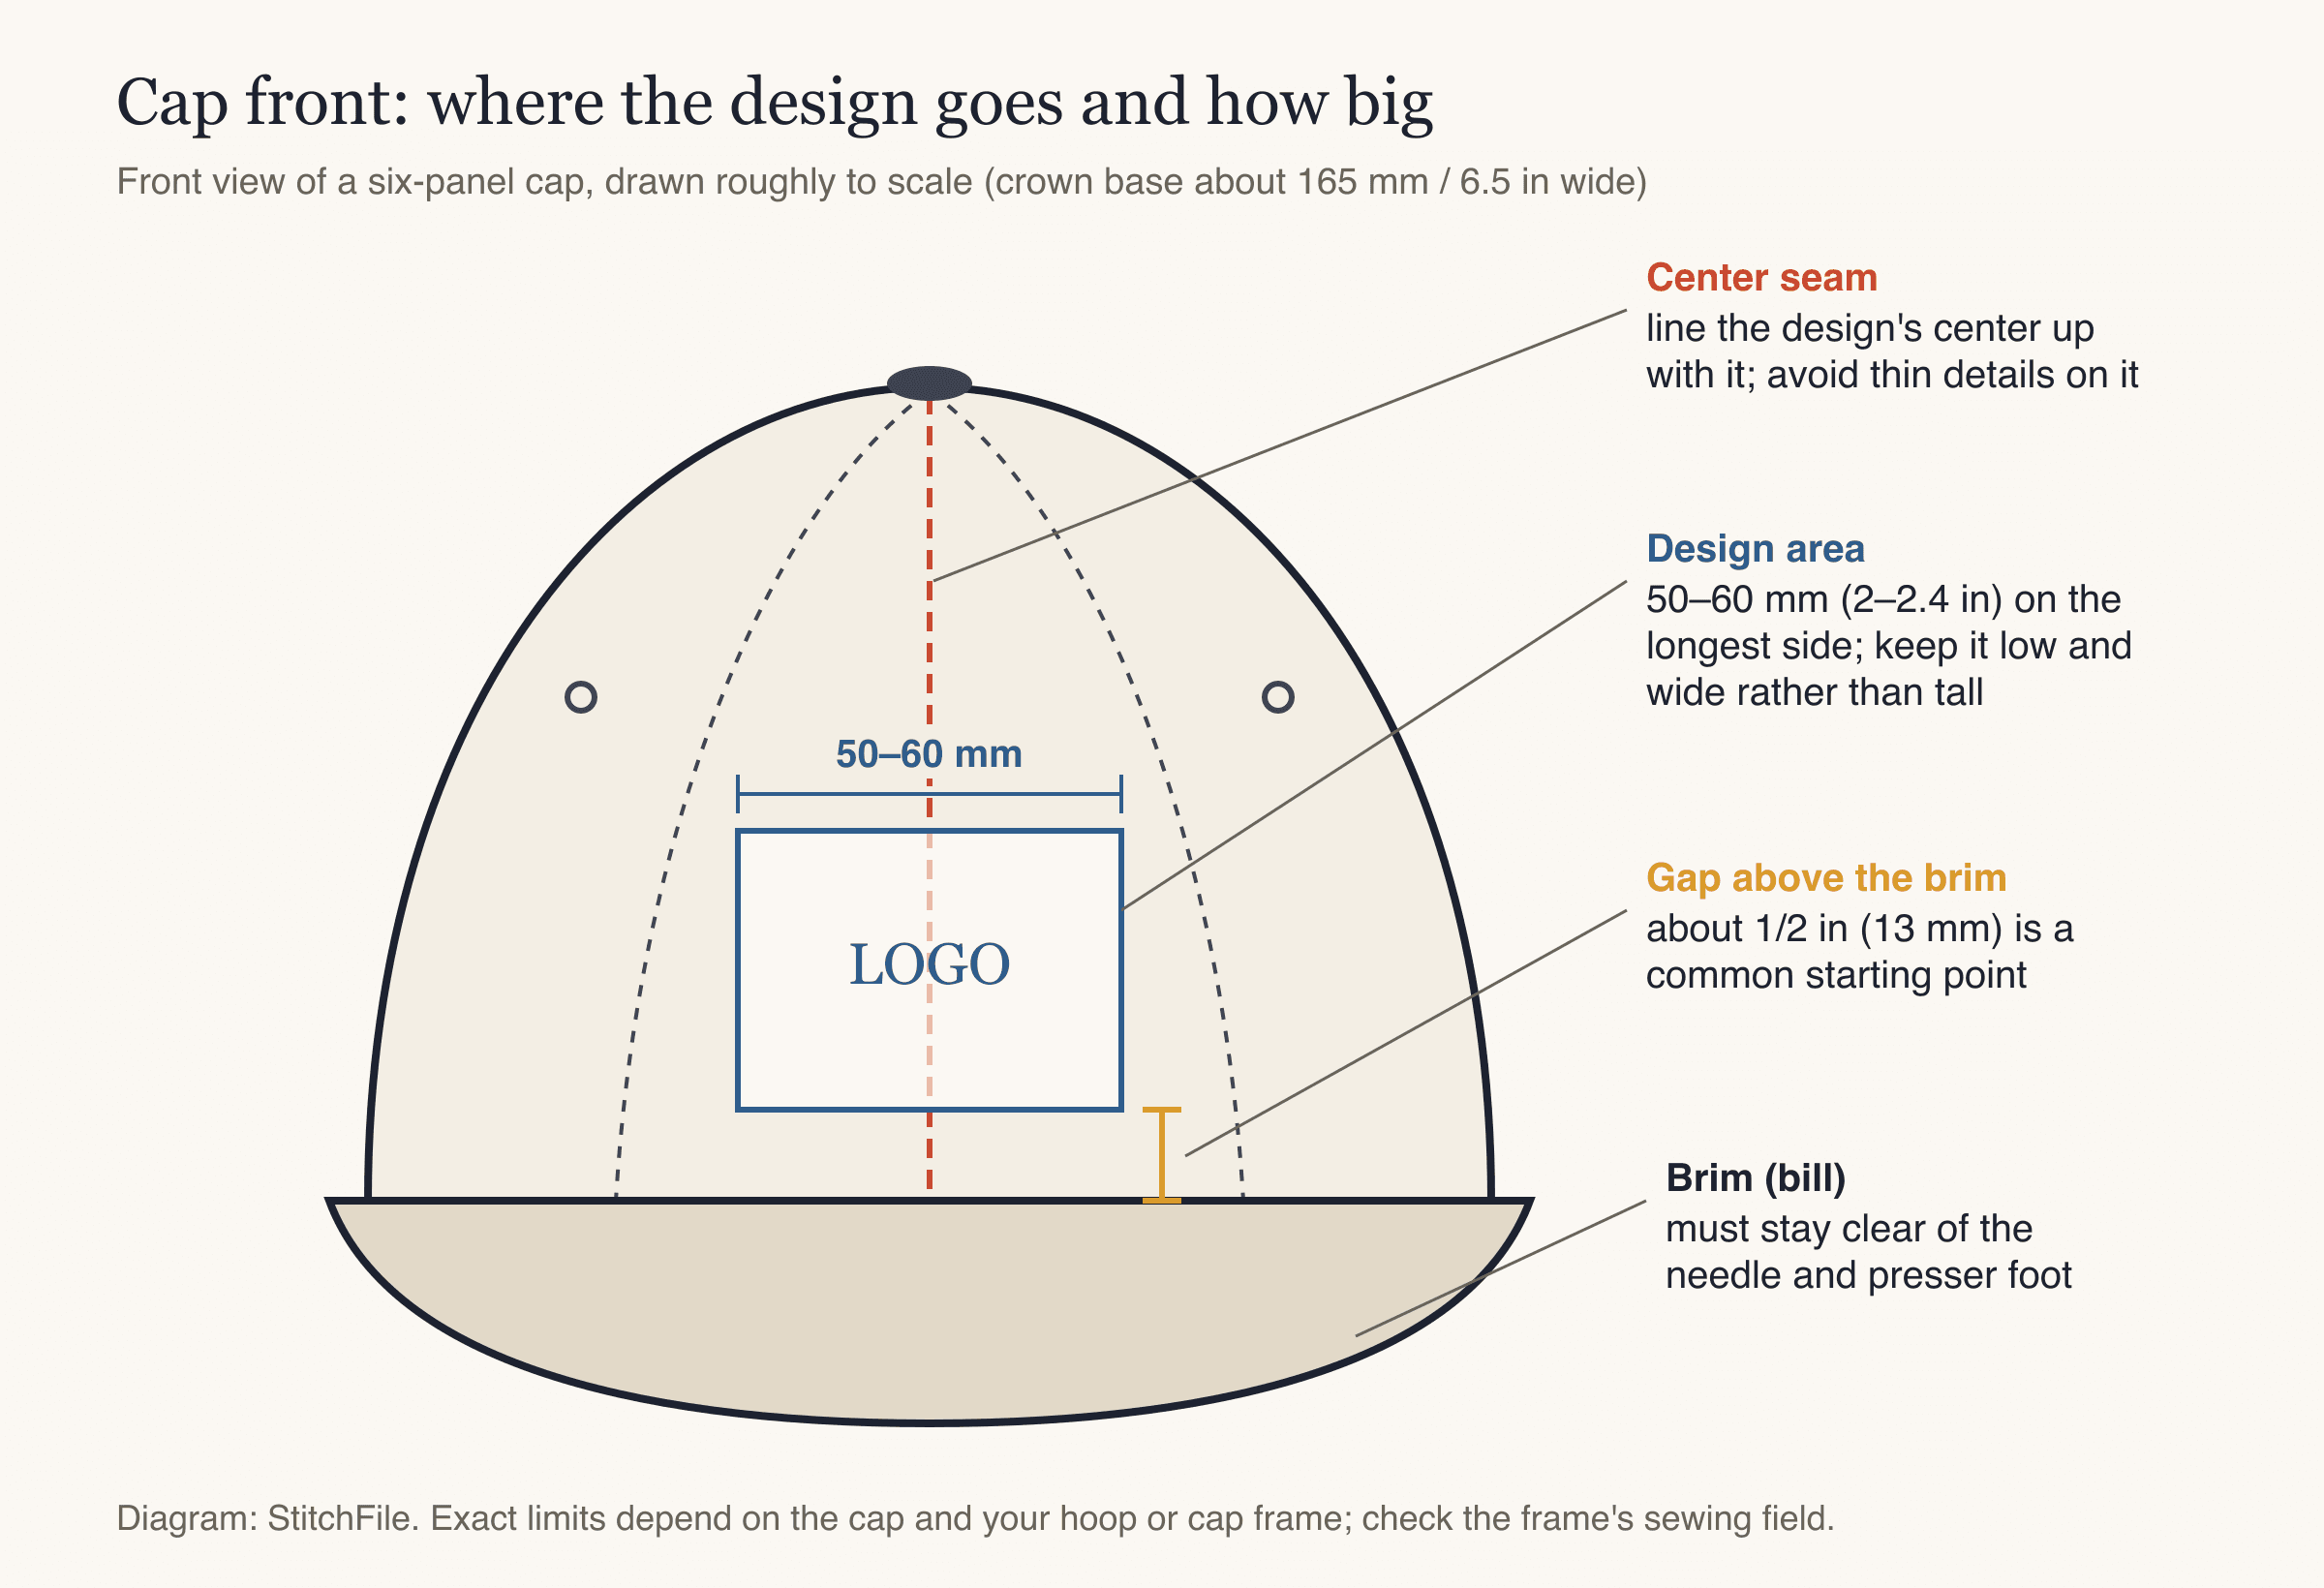
Cap front drawn roughly to scale: the design sits centered on the seam, low on the crown, with a small gap above the brim.
| Placement | Typical size (longest side) | Notes |
|---|---|---|
| Cap front (center) | 50–60 mm (2–2.4 in) | Keep it wider than tall; tall designs run up into the curve |
| Cap front, text-only on a cap frame | Can run wider than 60 mm | Height still about 2 in or less; check your cap frame's sewing field |
| Side of the cap | Small, about 25–40 mm | Avoid eyelets and side seams |
| Back, above the strap opening | Short line of text | Letters at least 5 mm tall |
A few placement rules that work on almost every cap:
- Center on the front seam. Line the middle of the design up with the center seam between the two front panels.
- Sit low. Start with the bottom of the design about 1/2 in (13 mm) above where the brim meets the crown, then adjust for the cap's shape.
- Avoid thin details on the seam. A narrow satin line that lands right on the thick center seam can sink into it or look broken. Bolder shapes cross the seam better.
- Respect minimum letter height. On woven cap fabric (cotton twill, canvas), letters need to be at least about 5 mm tall to stitch cleanly.
What you need
- A cap: for your first try, an unstructured cotton twill cap. Buy a spare to test on.
- Stabilizer: medium tear-away for cap twill. For flat hooping, a sticky (adhesive) tear-away with a paper backing, or regular tear-away plus temporary spray adhesive. See the embroidery stabilizer guide for how each type works.
- Needle: a fresh embroidery needle, 75/11 for soft caps; a heavier size such as 90/14 helps with thick structured fronts.
- Thread: 40 weight polyester or rayon embroidery thread, with bobbin thread in the bobbin.
- A design file sized for a cap front, in your machine's format.
- Hoop or cap frame: the hoop for your single-needle machine (a 5×7 in hoop gives more room around the cap than a 4×4), or a cap frame and cap driver on a multi-needle machine.
- Clips or pins, small curved scissors, and a pin or seam ripper to score the stabilizer paper.
How to embroider a hat on a single-needle home machine
This is the flat-hooping method. It works on unstructured caps. The idea: only the stabilizer goes in the hoop, and the cap is pressed onto its sticky surface, so you never have to force a curved, seamed cap between the hoop rings.
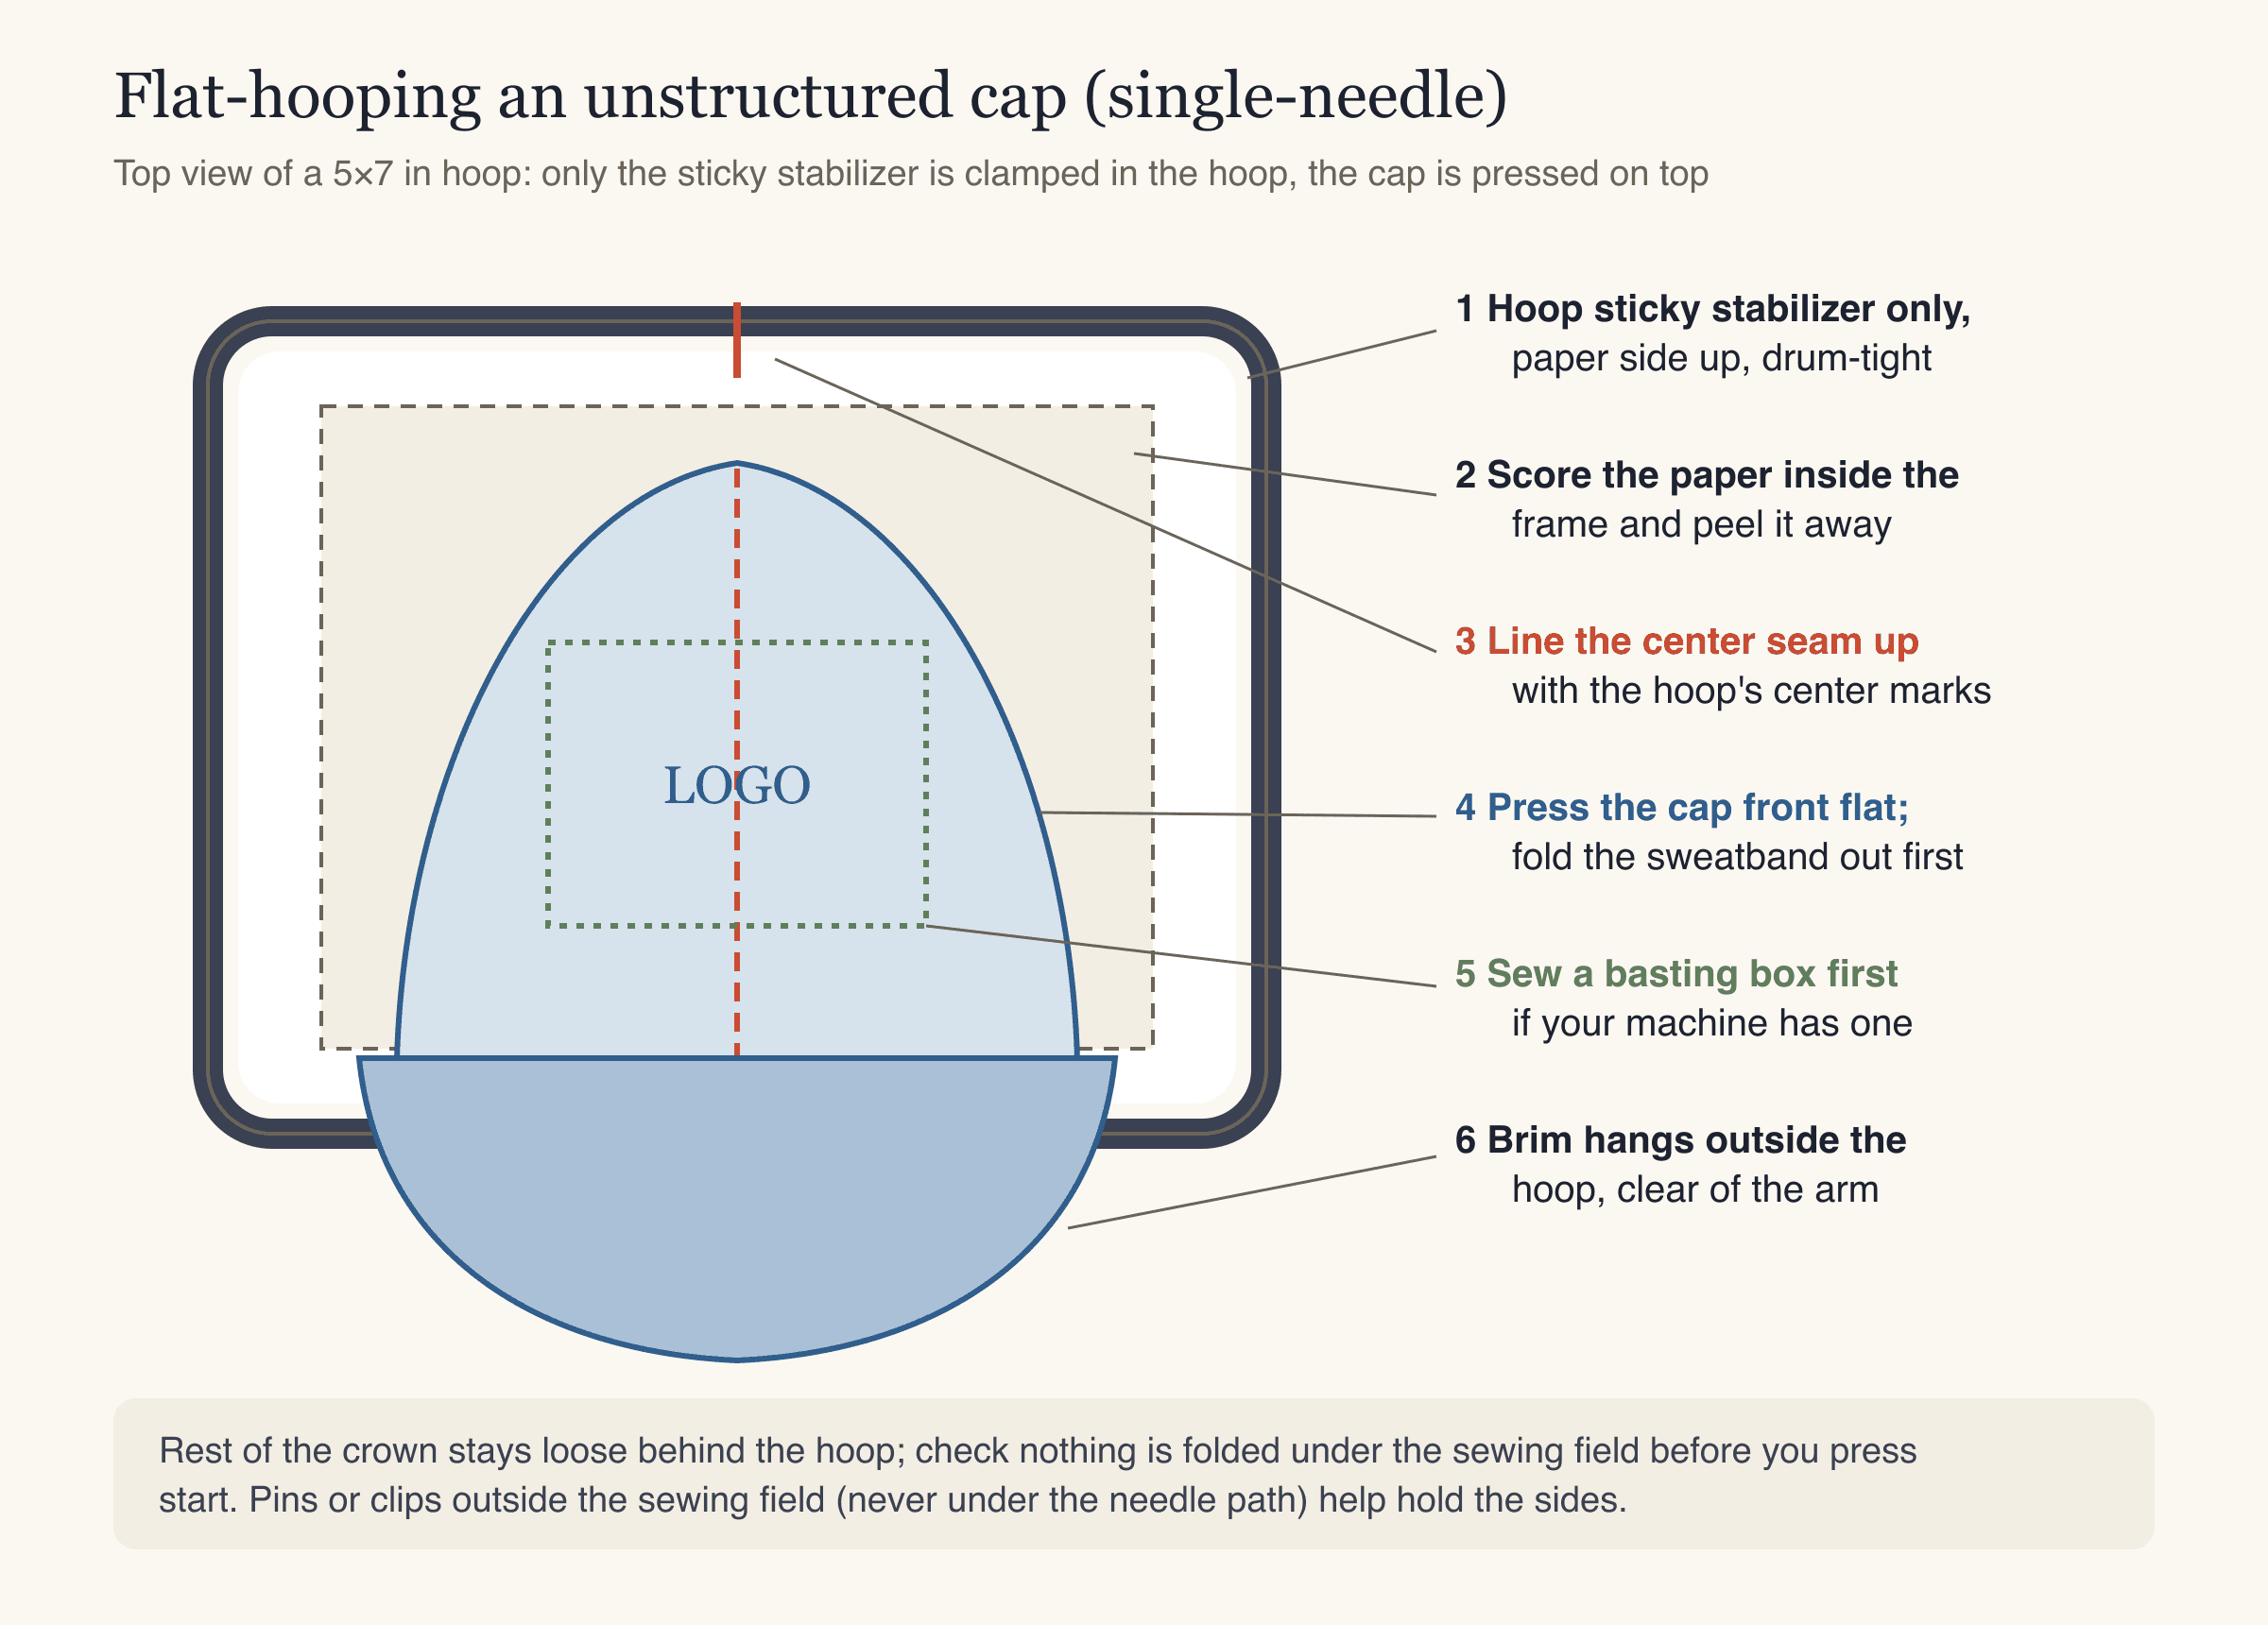
Flat hooping: the stabilizer is hooped, the cap front is pressed on top, and the brim hangs outside the hoop.
- Prepare the design. Size it to about 50–60 mm on the longest side and load it onto the machine. Check the orientation on the screen: depending on how your cap sits in the hoop, you may need to rotate the design so it sews upright relative to the brim.
- Prepare the cap. Fold the inner sweatband out of the way so it won't be stitched down. Some people also pull out a few stitches of the sweatband at the front and sew it back afterwards; on most soft caps, folding it out is enough.
- Hoop the stabilizer only. Hoop sticky tear-away paper side up, drum-tight. Score the paper inside the hoop with a pin and peel it off to expose the adhesive.
- Mark the center. Mark the center of the cap front on the seam, at the height you want the middle of the design. Line it up with the hoop's center marks.
- Press the cap down. Smooth the front panels onto the adhesive from the center outward. The brim hangs outside the hoop, and the rest of the crown stays loose behind it. Make sure nothing is folded under the sewing area.
- Secure the sides. Use clips or pins at the edges, well away from where the needle will go.
- Baste if you can. If your machine has a basting function (a loose outline stitch around the design), run it first. It holds the cap to the stabilizer while the design sews.
- Check clearance. Attach the hoop and move the needle to the corners of the design (most machines have a trace or "check size" function). The brim and the cap's sides must not touch the needle bar, presser foot or arm.
- Sew slowly. Lower the speed and watch the first color. Stop if the cap lifts or the brim drifts toward the needle.
- Finish. Remove the basting, unhoop, tear the stabilizer away close to the stitching, trim jump threads, and fold the sweatband back.
What about structured caps on a single-needle machine? You can sometimes flatten one onto sticky stabilizer, but the buckram fights back, the center seam is thick, and the curve of the crown means the design is sewn flat and then bent. Results range from fine to wrinkled. Some single-needle machines offer a cap hoop accessory for specific models; check your machine's accessory list. If yours doesn't, stitching a patch and attaching it to the cap is the dependable route. Our embroidered patches guide shows how.
How to embroider on a hat with a cap frame (multi-needle)
Multi-needle machines are built for embroidery on baseball caps. The cap is clamped onto a curved cap frame, and a cap driver on the machine rotates the frame as the design sews, so the needle always meets the fabric close to the surface. Wide-angle cap frames (often sold as "270°") let the frame turn further for wider designs.
- Install the cap driver on the machine and set the machine to cap mode if it has one. Follow your machine's manual; each brand does this slightly differently.
- Mount the cap frame on the hooping gauge (the bench fixture that holds the frame while you load the cap).
- Add backing. Slide a piece of tear-away cap backing into the frame so it sits behind the front panels.
- Load the cap. Fold the sweatband out, pull the cap over the frame, and push the brim edge firmly against the frame's lip. Center the front seam on the frame's center mark.
- Close the strap. Pull the cap tight and close the frame strap or band below the brim. The front should be smooth and firm, with no wrinkles across the panels. Clip the sides.
- Attach the frame to the cap driver, load the design (usually DST), and trace it to check clearance.
- Sew at a reduced speed. Caps sew best a bit slower than flat garments; use your machine's guidance.
- Unload and finish. Remove the backing, trim threads, and steam lightly if the crown needs reshaping.
Why cap designs sew center-out and bottom-up
On a cap frame, every stitch pushes the fabric a little. If a design sews from left to right, that push builds up on one side and the fabric bunches into ripples. Designs made for caps usually sew from the center outward and from the bottom up, so slack is pushed out to the sides and up, away from the brim, where there is room for it.
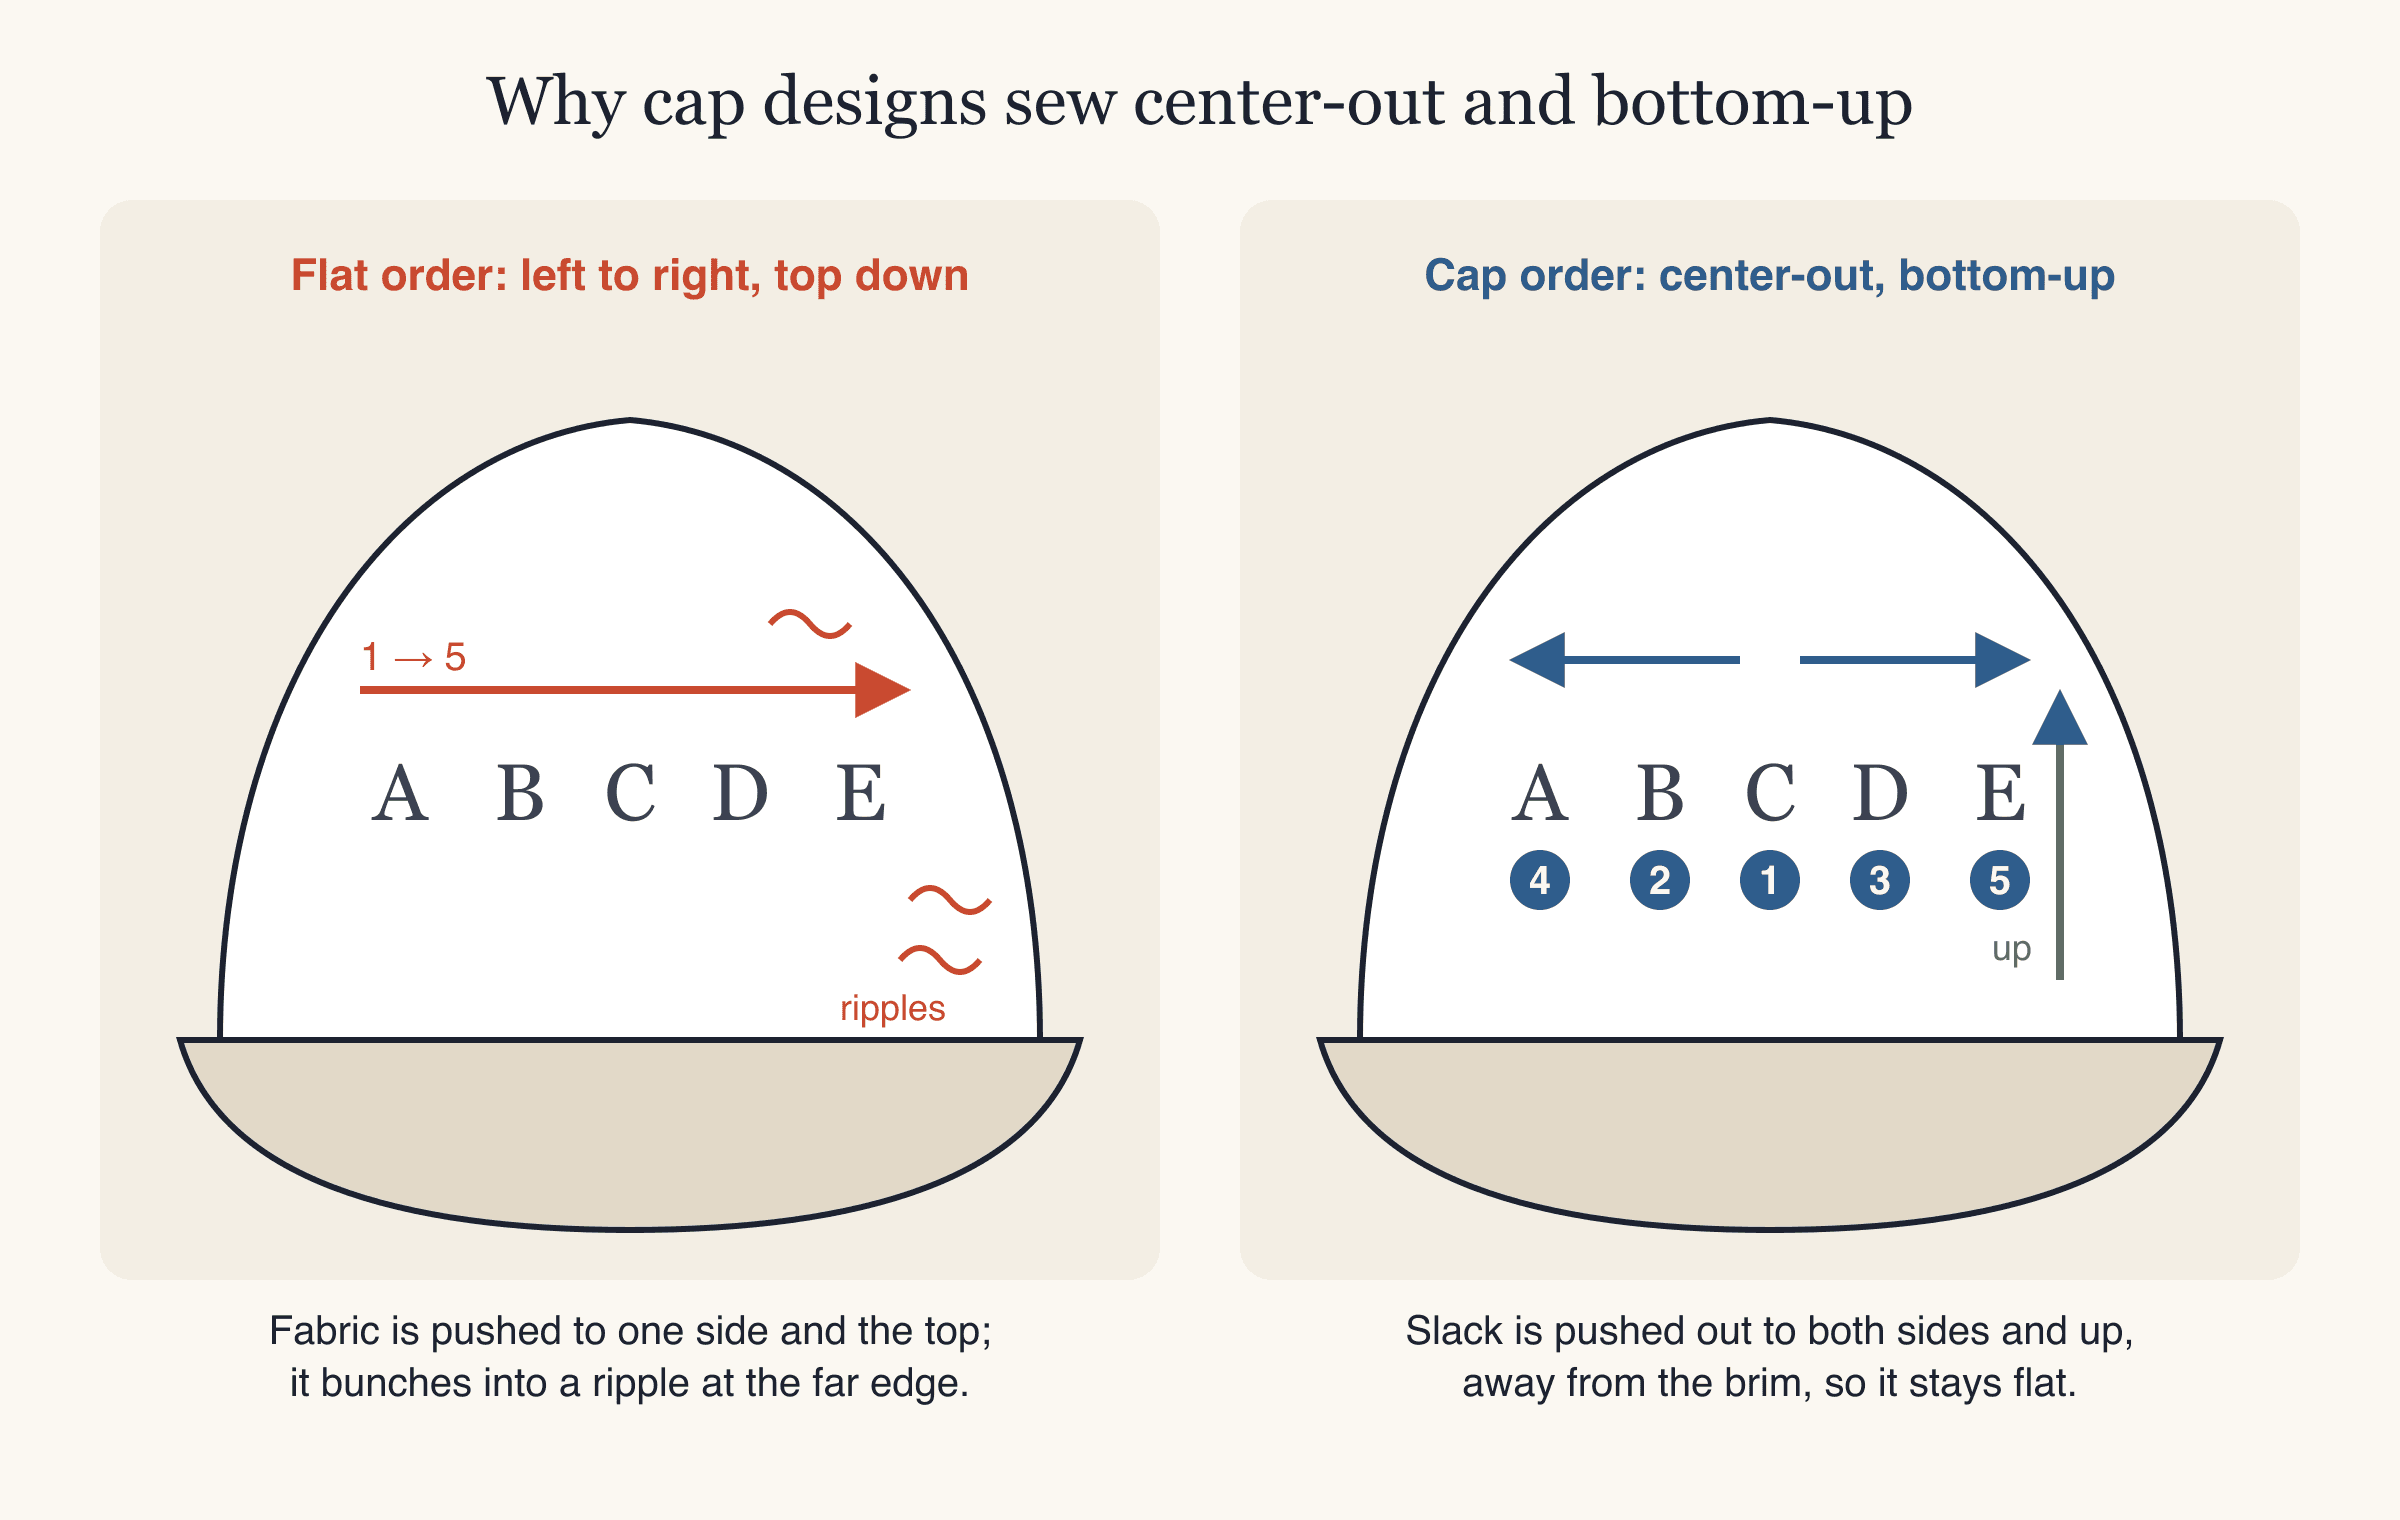
Left: a flat sewing order pushes fabric to one side. Right: center-out, bottom-up keeps the cap front flat.
This matters most on structured caps run on a cap frame. A soft cap pressed flat onto sticky stabilizer is held over its whole surface, so sewing order is much less critical.
Getting a cap-sized file
You need a design file that is small enough for a cap and digitized for it: satin edges that hold at 50–60 mm, no hairline details, and lettering big enough to read.
StitchFile does this from a logo or artwork file. Upload an SVG, PNG or JPG, pick the Cap front (55 mm) size preset, and choose the Woven fabric (the one for cotton, twill, canvas and caps). In about 20 seconds you get a free stitch preview, a view of the design on a cap at real size, the stitch count, thread colors, and the smallest hoop it fits. If any lettering is too small for that size, the preview flags it and suggests a size that would work. Every purchase includes PES, DST, JEF, EXP and VP3, so the same design runs on a Brother or Baby Lock (PES), a Janome (JEF), a Husqvarna Viking or Pfaff (VP3), a Bernina or Melco (EXP), or a multi-needle machine (DST). The file formats guide explains the differences.
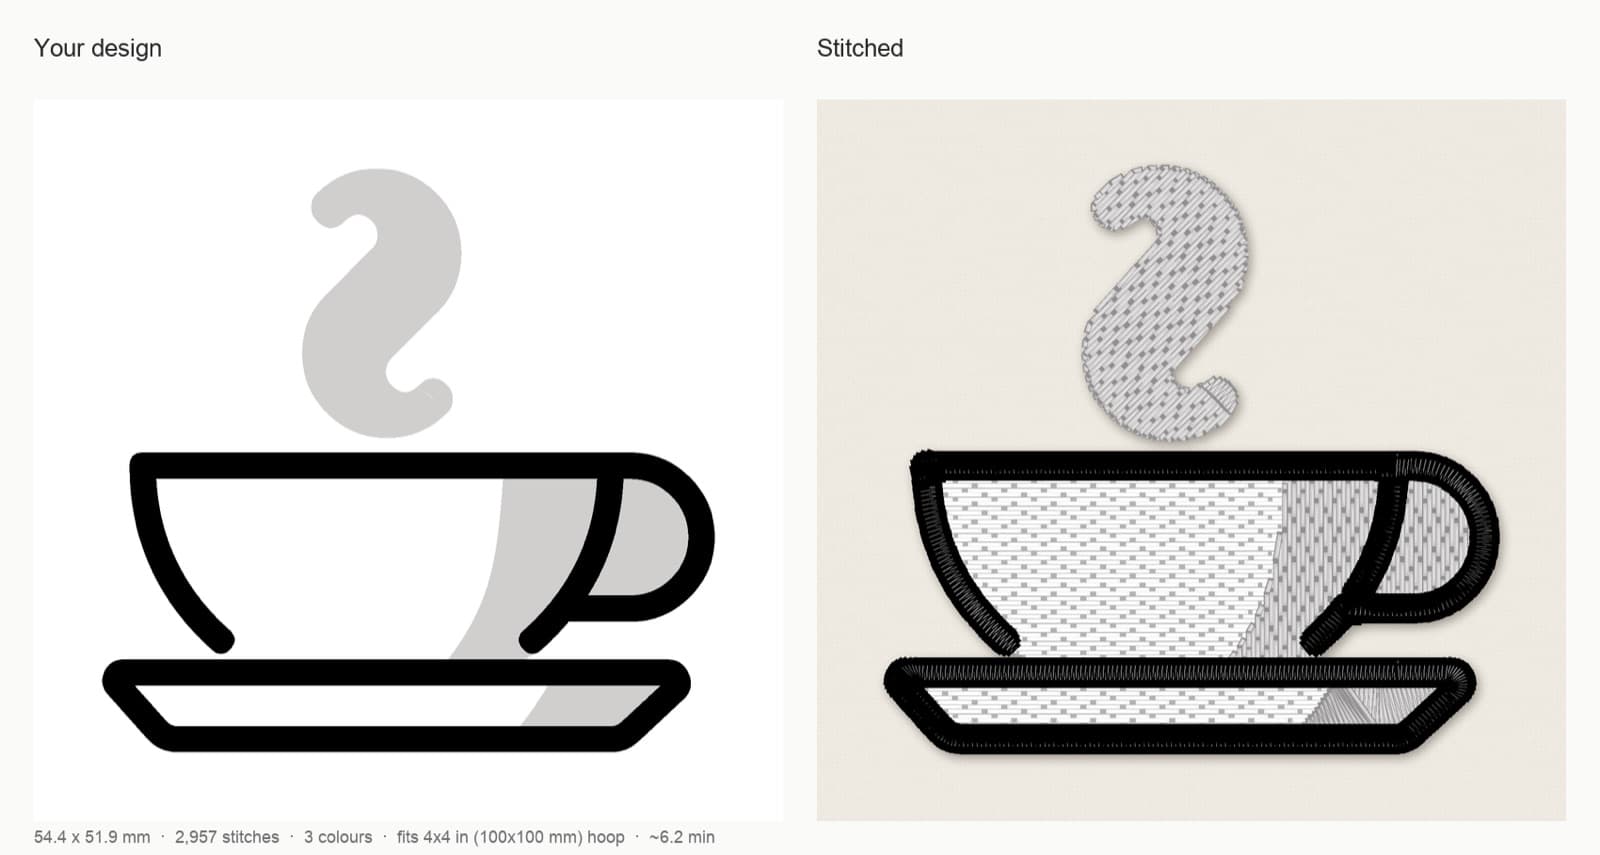
StitchFile stitch preview at the cap front preset on woven fabric: 54.4 × 51.9 mm, 2,957 stitches, 3 colors, fits a 4×4 in hoop, about 6.2 minutes at 700 stitches per minute (a cap sewn at a slower speed takes longer).
Artwork: OpenMoji hot beverage, CC BY-SA 4.0. StitchFile converted the artwork into the stitch preview shown here; these adaptations are shared under the same license.
Two cap-specific checks before you buy or sew: use Watch it sew in the preview to see the order the machine will follow, and keep thin outlines off the center seam. For structured caps on a cap frame, always sew one test cap first.
Common mistakes in cap embroidery
- Design too big. A 90 mm left-chest logo is far too large for a cap front. Start at 50–60 mm.
- Placing it too high. The crown curves away quickly. Keep the design low and wider than tall.
- Tiny lettering. Text under about 5 mm tall turns into blobs on twill. Enlarge it, simplify it, or drop the tagline.
- Stitching the sweatband down. Always fold it out before you sew.
- Brim hitting the machine. Trace the design before sewing and keep the brim clear of the presser foot and needle bar.
- Forcing a structured cap flat. It may look fine in the hoop and wrinkle once it springs back. Use a cap frame or a patch.
- Too many colors and tiny details. Each color is a stop; each tiny part is a trim. Simple designs sew cleaner on a small curved area.
- Skipping the test. Caps aren't cheap and stitches are hard to remove from twill. Sew one spare first.
FAQ
Can you embroider a hat with a regular embroidery machine?
Yes, if the cap is unstructured. Hoop sticky tear-away stabilizer, press the soft cap front onto it, keep the brim outside the hoop, and sew a small design slowly. Structured caps with a stiff front are much harder on a single-needle machine and are better done on a cap frame or with a patch.
What size should embroidery on a hat be?
For a cap front, about 50–60 mm (2–2.4 in) on the longest side is a reliable starting point. Keep the design wider than it is tall and about 1/2 in above the brim. Text-only designs can run wider on a cap frame, but the height stays around 2 inches or less.
What stabilizer is best for cap embroidery?
A medium tear-away is the usual choice for cap twill. For flat hooping on a home machine, use a sticky tear-away (or tear-away with temporary spray adhesive) so the cap can be pressed onto it. On a cap frame, slide tear-away cap backing behind the front panels even on structured caps.
What needle should I use to embroider a hat?
A new 75/11 embroidery needle works for most soft caps. For thick structured fronts and heavy twill, step up to a larger size such as 90/14. Change the needle if you hear a loud punching sound or see skipped stitches.
Why does my hat embroidery pucker or wrinkle?
Usually the cap moved while sewing. On a home machine, press the cap firmly onto the adhesive, baste first and slow down. On a cap frame, tighten the strap and push the brim fully against the frame. A design that sews center-out and bottom-up also helps.
What file format do I need for cap embroidery?
The one your machine reads: PES for Brother and Baby Lock, JEF for Janome, VP3 for Husqvarna Viking and Pfaff, EXP for Bernina and Melco, and DST for most multi-needle commercial machines. Many machines read more than one; your manual lists them.
Make your cap design
Pick your cap, check whether it's structured, and choose flat hooping or a cap frame. Then get a file that's actually sized for a hat. Upload your logo to StitchFile, choose the Cap front preset and Woven fabric, and check the free stitch preview on a cap before you sew.