Embroidery guide
Embroidered Christmas Stockings: How to Add Names by Machine
Embroidered Christmas stockings by machine: name size and centering on the cuff, settings for velvet, knit and canvas, and stitching finished stockings.
Quick answer
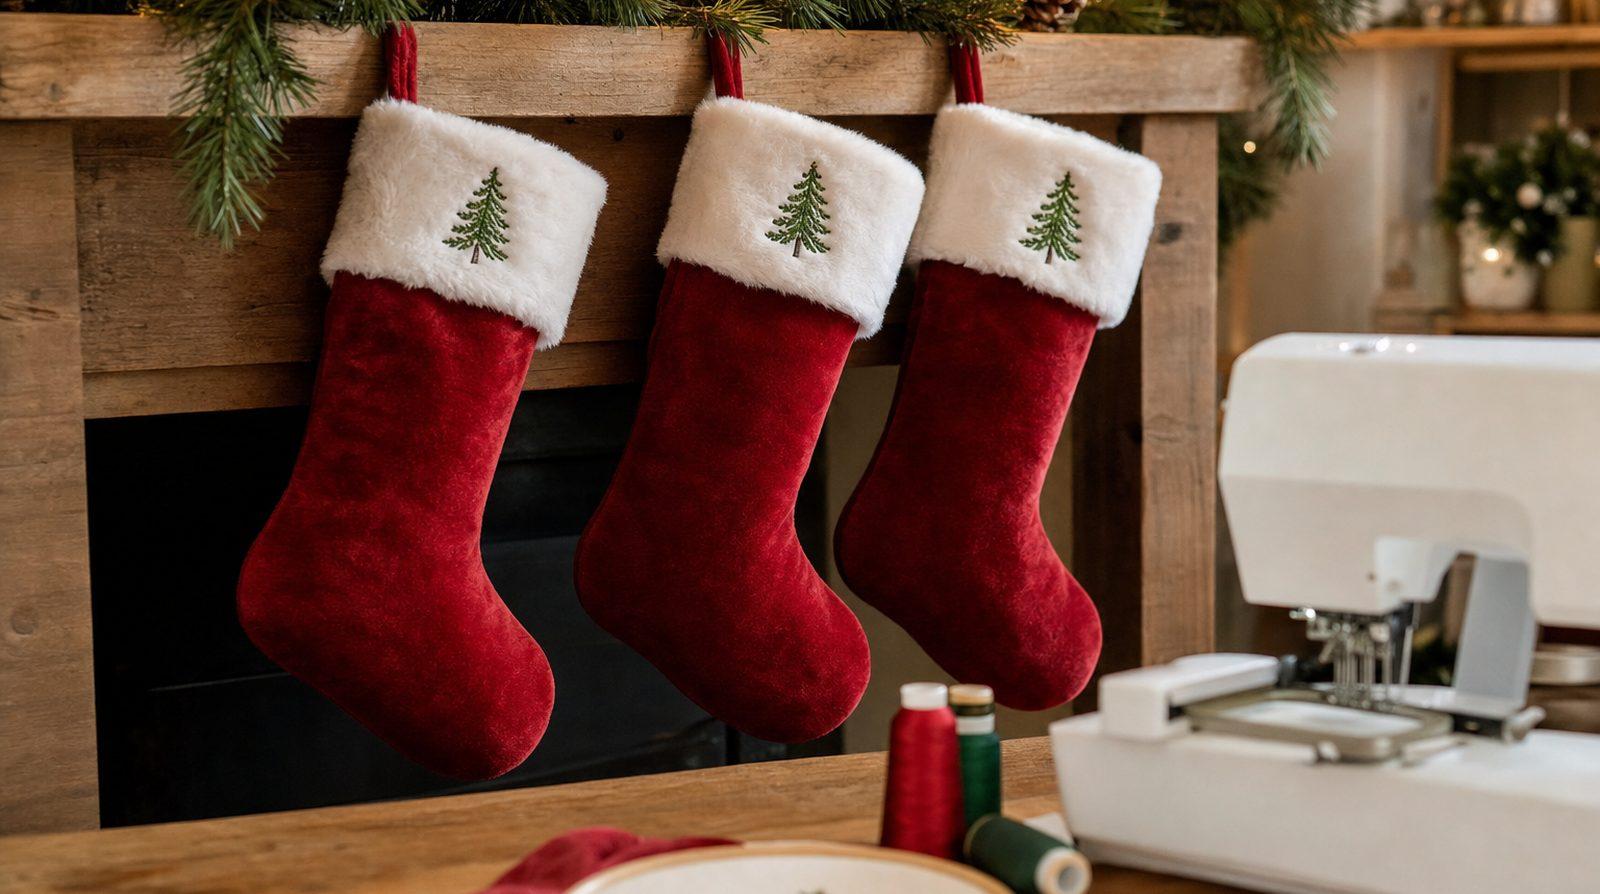
- Embroidered Christmas stockings are easiest when you embroider the cuff before the stocking is sewn. On a finished stocking, open the lining seam or slide hooped sticky stabilizer in through the top, so only the front layer goes under the needle.
- Names on the cuff: 20–30 mm (about 3/4 to 1 1/4 in) capital height is a common starting point. Never go below 5 mm on woven fabric, 6 mm on knit or 7 mm on plush.
- Velvet, plush and faux fur: water-soluble topping on top, float instead of clamping, and use a file digitized for towel and fleece.
- For a family set, keep one letter height and one center line on every stocking. Test-sew on a scrap first.
A name on a stocking cuff takes minutes to sew and gets used every December for years. It's also easy to get slightly wrong: the cuff is a small, thick, often fluffy target, the stocking is a closed tube that wants to slide under the needle, and a set of names looks messy if every one is a different size. This guide covers sizing, fabrics, finished stockings and family sets.
On timing: if the stockings are for this Christmas, start a few weeks before December so there's room for a test stitch-out and a redo. If you sell personalized stockings, you'll want samples and files ready well before orders arrive.
Where the embroidery goes on a stocking
Most embroidered stockings carry the name on the cuff, but there are three common spots:
| Placement | What usually goes there | Typical size | Notes |
|---|---|---|---|
| Cuff | A first name, sometimes with a small motif | Name 20–30 mm tall | The most common choice: flat, near the top, easy to reach |
| Body (upper leg) | A monogram, a year, a larger motif | 70–100 mm | Good when the cuff is faux fur too deep to stitch cleanly |
| Foot and toe | A small motif: tree, snowflake, star | 40–80 mm | Decorative; hard to reach on a finished stocking |
Monograms work best on the body or on a smooth cuff. A single large initial reads from across the room; a three-letter monogram needs more room than most cuffs give. The lettering and fonts guide shows the classic monogram layouts.
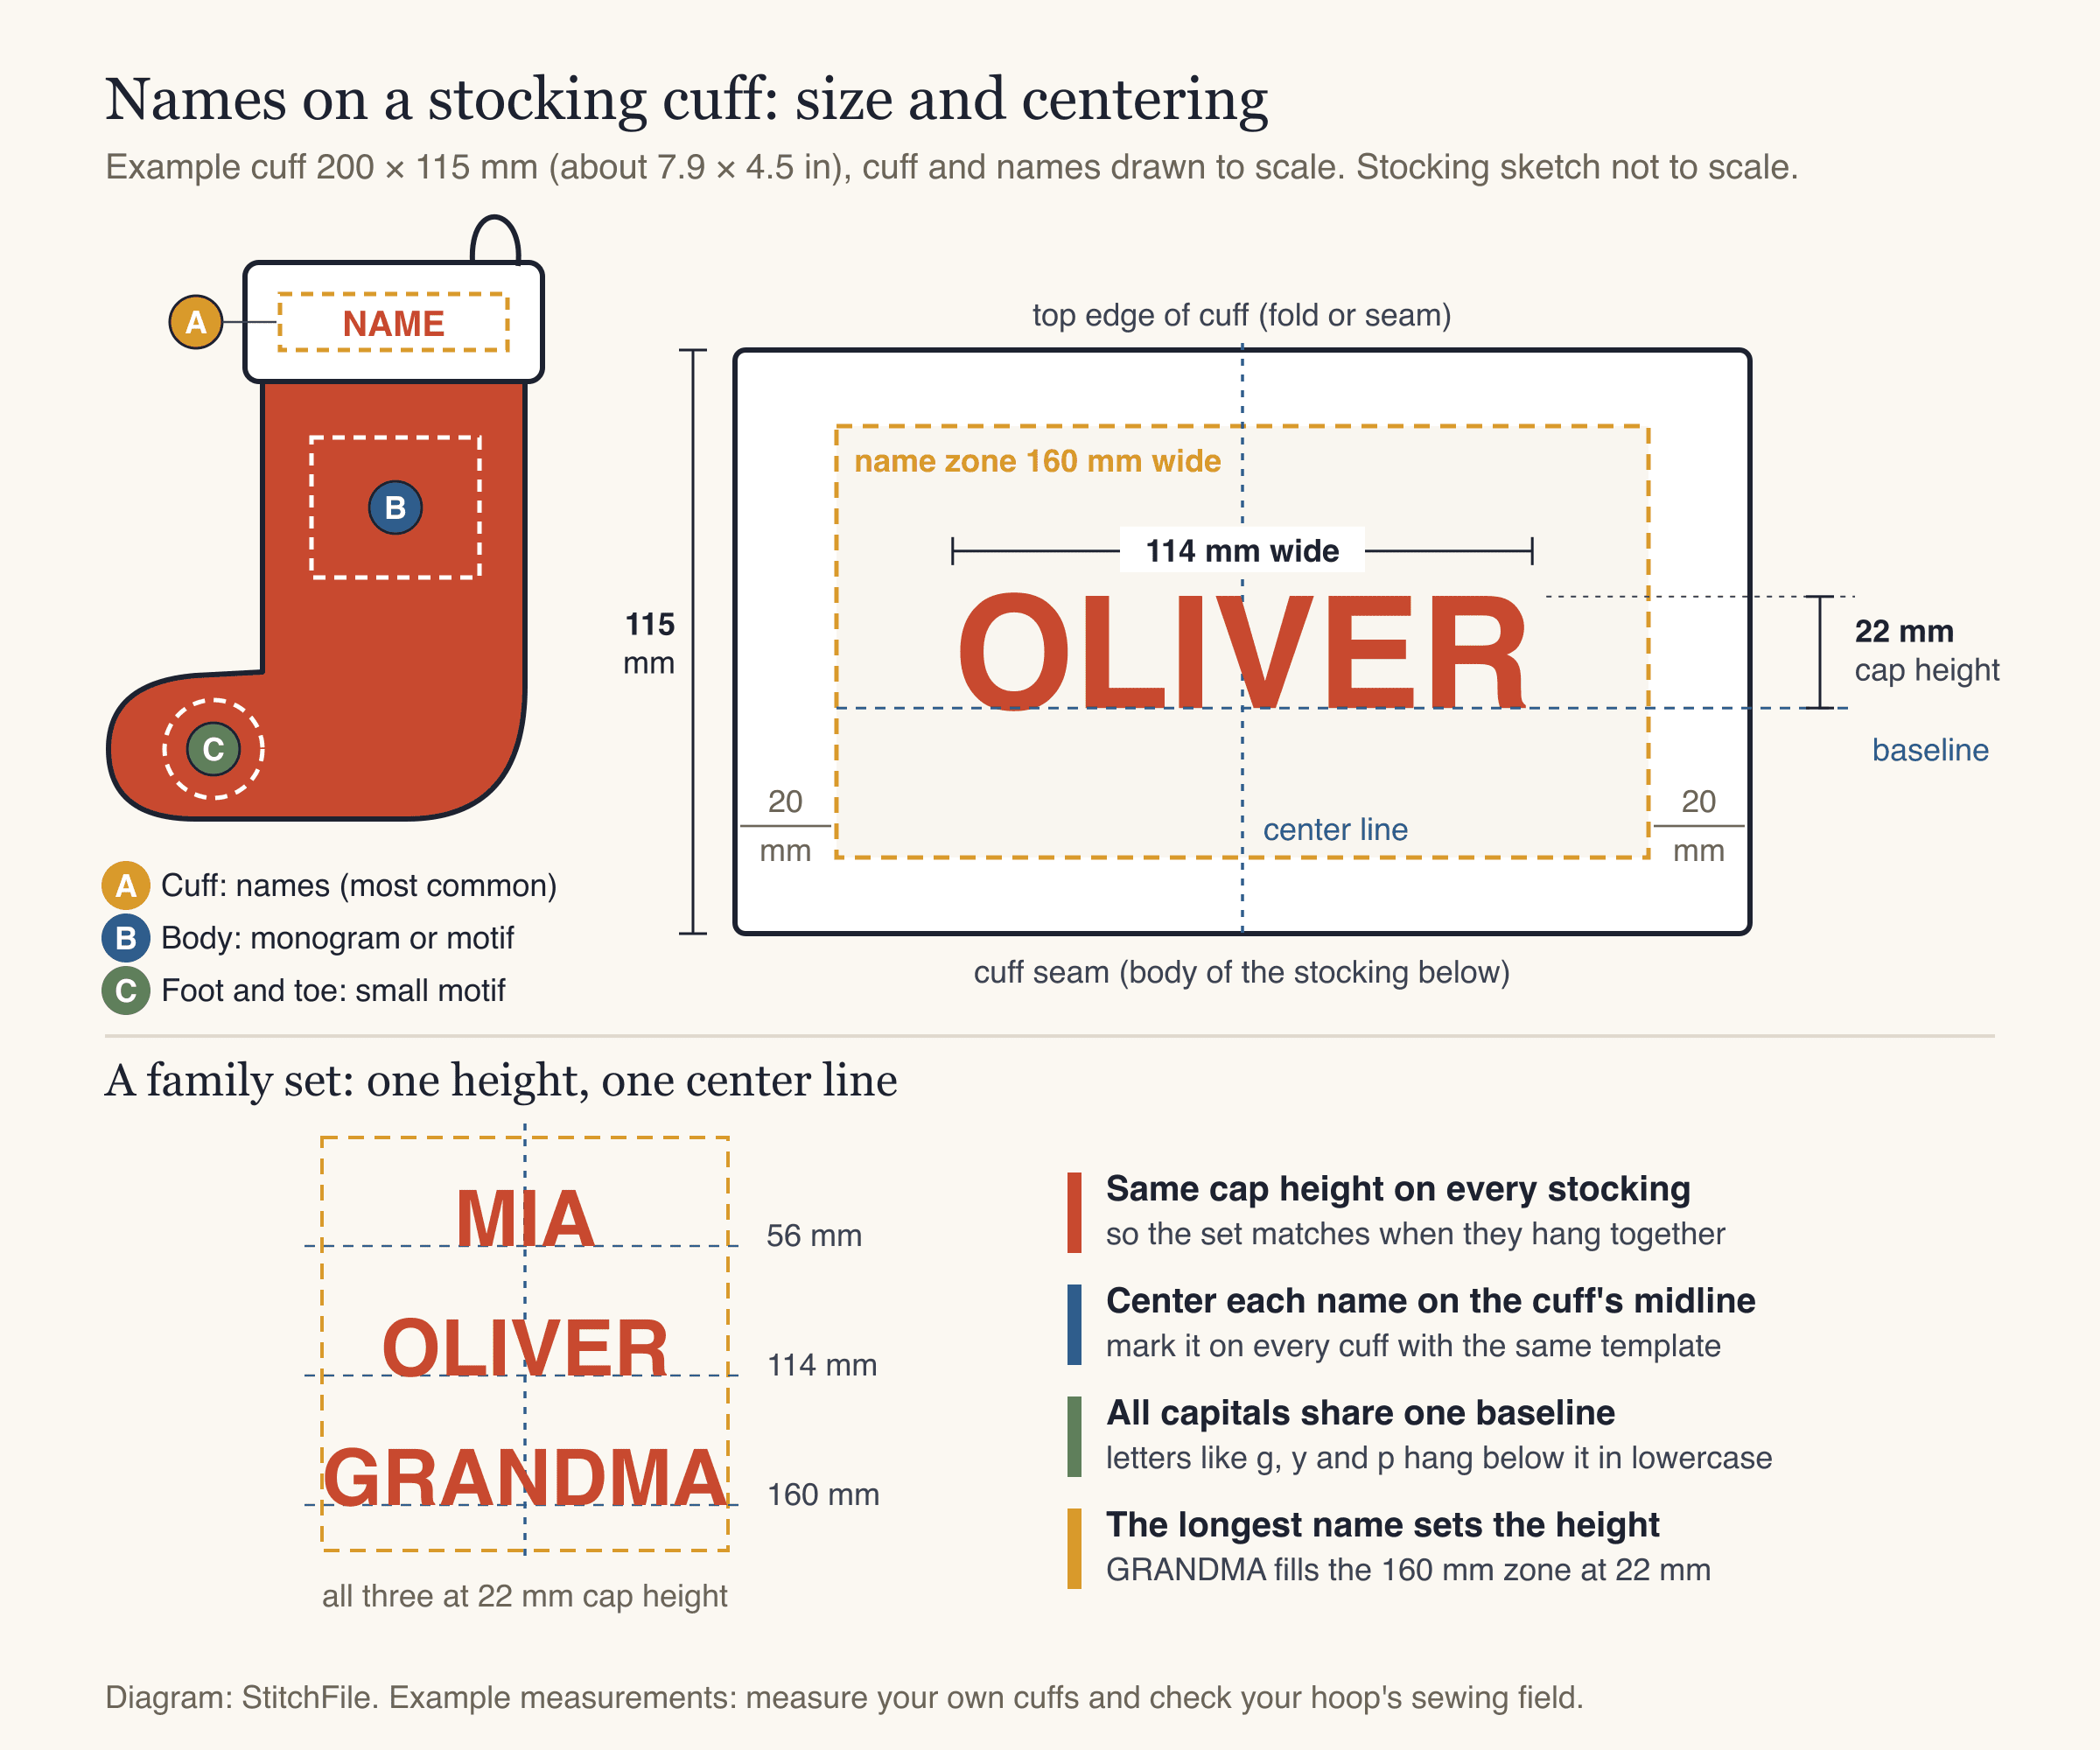
An example cuff drawn to scale. The name zone leaves about 20 mm at each side seam and 15 mm at the top and bottom. Measure your own cuffs; they vary a lot.
Lettering size and fonts for names on stocking cuffs
Measure the front of the cuff flat, then take off margins: about 20 mm (3/4 in) from the side seams and 15 mm from the top and bottom edges is a sensible start. Closer than that, the needle runs into thick seam allowances and the name looks off-center once the cuff curves.
On a typical adult-size cuff, a capital height of 20–30 mm reads well from across a room. Small stockings, long names and two-line names push you lower. Whatever you choose, stay above the minimum letter height for the fabric. These are the minimums StitchFile uses for each fabric setting:
| Stocking fabric | StitchFile fabric setting | Minimum letter height |
|---|---|---|
| Quilted cotton, canvas, linen, burlap | Woven | 5 mm |
| Heavy canvas | Denim | 5 mm |
| Knit (sweater-style) stockings | T-shirt knit | 6 mm |
| Velvet, plush, faux fur, fleece | Towel & fleece | 7 mm |
A cuff name rarely gets near these numbers. They matter for the small extras under a name: a year, "Baby's First Christmas", a short tagline. Lowercase letters are only about two thirds to three quarters of the capital height, so check those too.
Fonts: bold sans-serif and rounded fonts are the safest, especially on plush. Script fonts look traditional but have thin joins, so give them more height (about 15 mm and up) and keep them off deep faux fur. Hairline serifs and outline styles vanish into pile.
Centering names of different lengths
A matching set looks right when every name has the same letter height and sits on the same center line. "MIA" being a third the width of "GRANDMA" is fine. What looks wrong is each name stretched to fill the cuff: short names huge, long names tiny.
- Start with the longest name. Set it at the height you want. If it doesn't fit the name zone, lower the height for the whole set.
- Set every name at that height. Each ends up a different width, which is correct.
- Use all capitals if you can. Capitals have no descenders (the tails on g, j, p, q and y), so hooping each cuff to the same center mark lines up the baselines.
- With mixed case, watch the descenders. The machine centers each design on its overall size, so "Peggy" sits a little higher than "Anne". Nudge it down on screen by about half the descender depth.
- Make a paper template of the cuff with the center line and baseline, and mark every stocking from it.
Stocking fabrics and what each one needs
| Fabric | Fabric setting | Stabilizer (under) | Topping (on top) | Hooping |
|---|---|---|---|---|
| Velvet, velour | Towel & fleece | Tear-away; cut-away if it stretches | Water-soluble, always | Float on sticky stabilizer |
| Plush, minky, faux fur | Towel & fleece | Cut-away for stretchy plush; tear-away for stable faux fur | Water-soluble, always | Float |
| Knit (sweater-style) | T-shirt knit | Cut-away (no-show mesh) | Helps on chunky or textured knits | Hoop relaxed, never stretched, or float |
| Quilted cotton | Woven | Medium tear-away | Not needed | Embroider before quilting if you can |
| Canvas, duck | Woven (Denim for heavy canvas) | Medium or heavy tear-away | Not needed | Hoop or float |
| Burlap, loose linen | Woven | Cut-away or a heavier tear-away | Optional | Float so the weave doesn't distort |
The embroidery stabilizer guide explains how each stabilizer type works.
Velvet, plush and faux fur cuffs
These are the classic stocking fabrics and the trickiest. They all have a pile, a layer of soft fibers standing up from a backing fabric, usually leaning one way (the nap). Three things go wrong:
- Stitches sink. The pile pushes up between stitches and swallows thin letters. A water-soluble topping (a clear film that dissolves in water) on top holds it down while the machine sews. On these fabrics it isn't optional.
- Crush marks. Clamping velvet between hoop rings leaves a shiny ring that may not recover. Float the stocking instead: hoop the stabilizer alone and press the fabric onto it.
- Thin-looking stitching. A file made for flat cotton doesn't put down enough underlay (stitches sewn first to flatten the pile). Use a file made for plush; in StitchFile, that's the Towel & fleece setting.
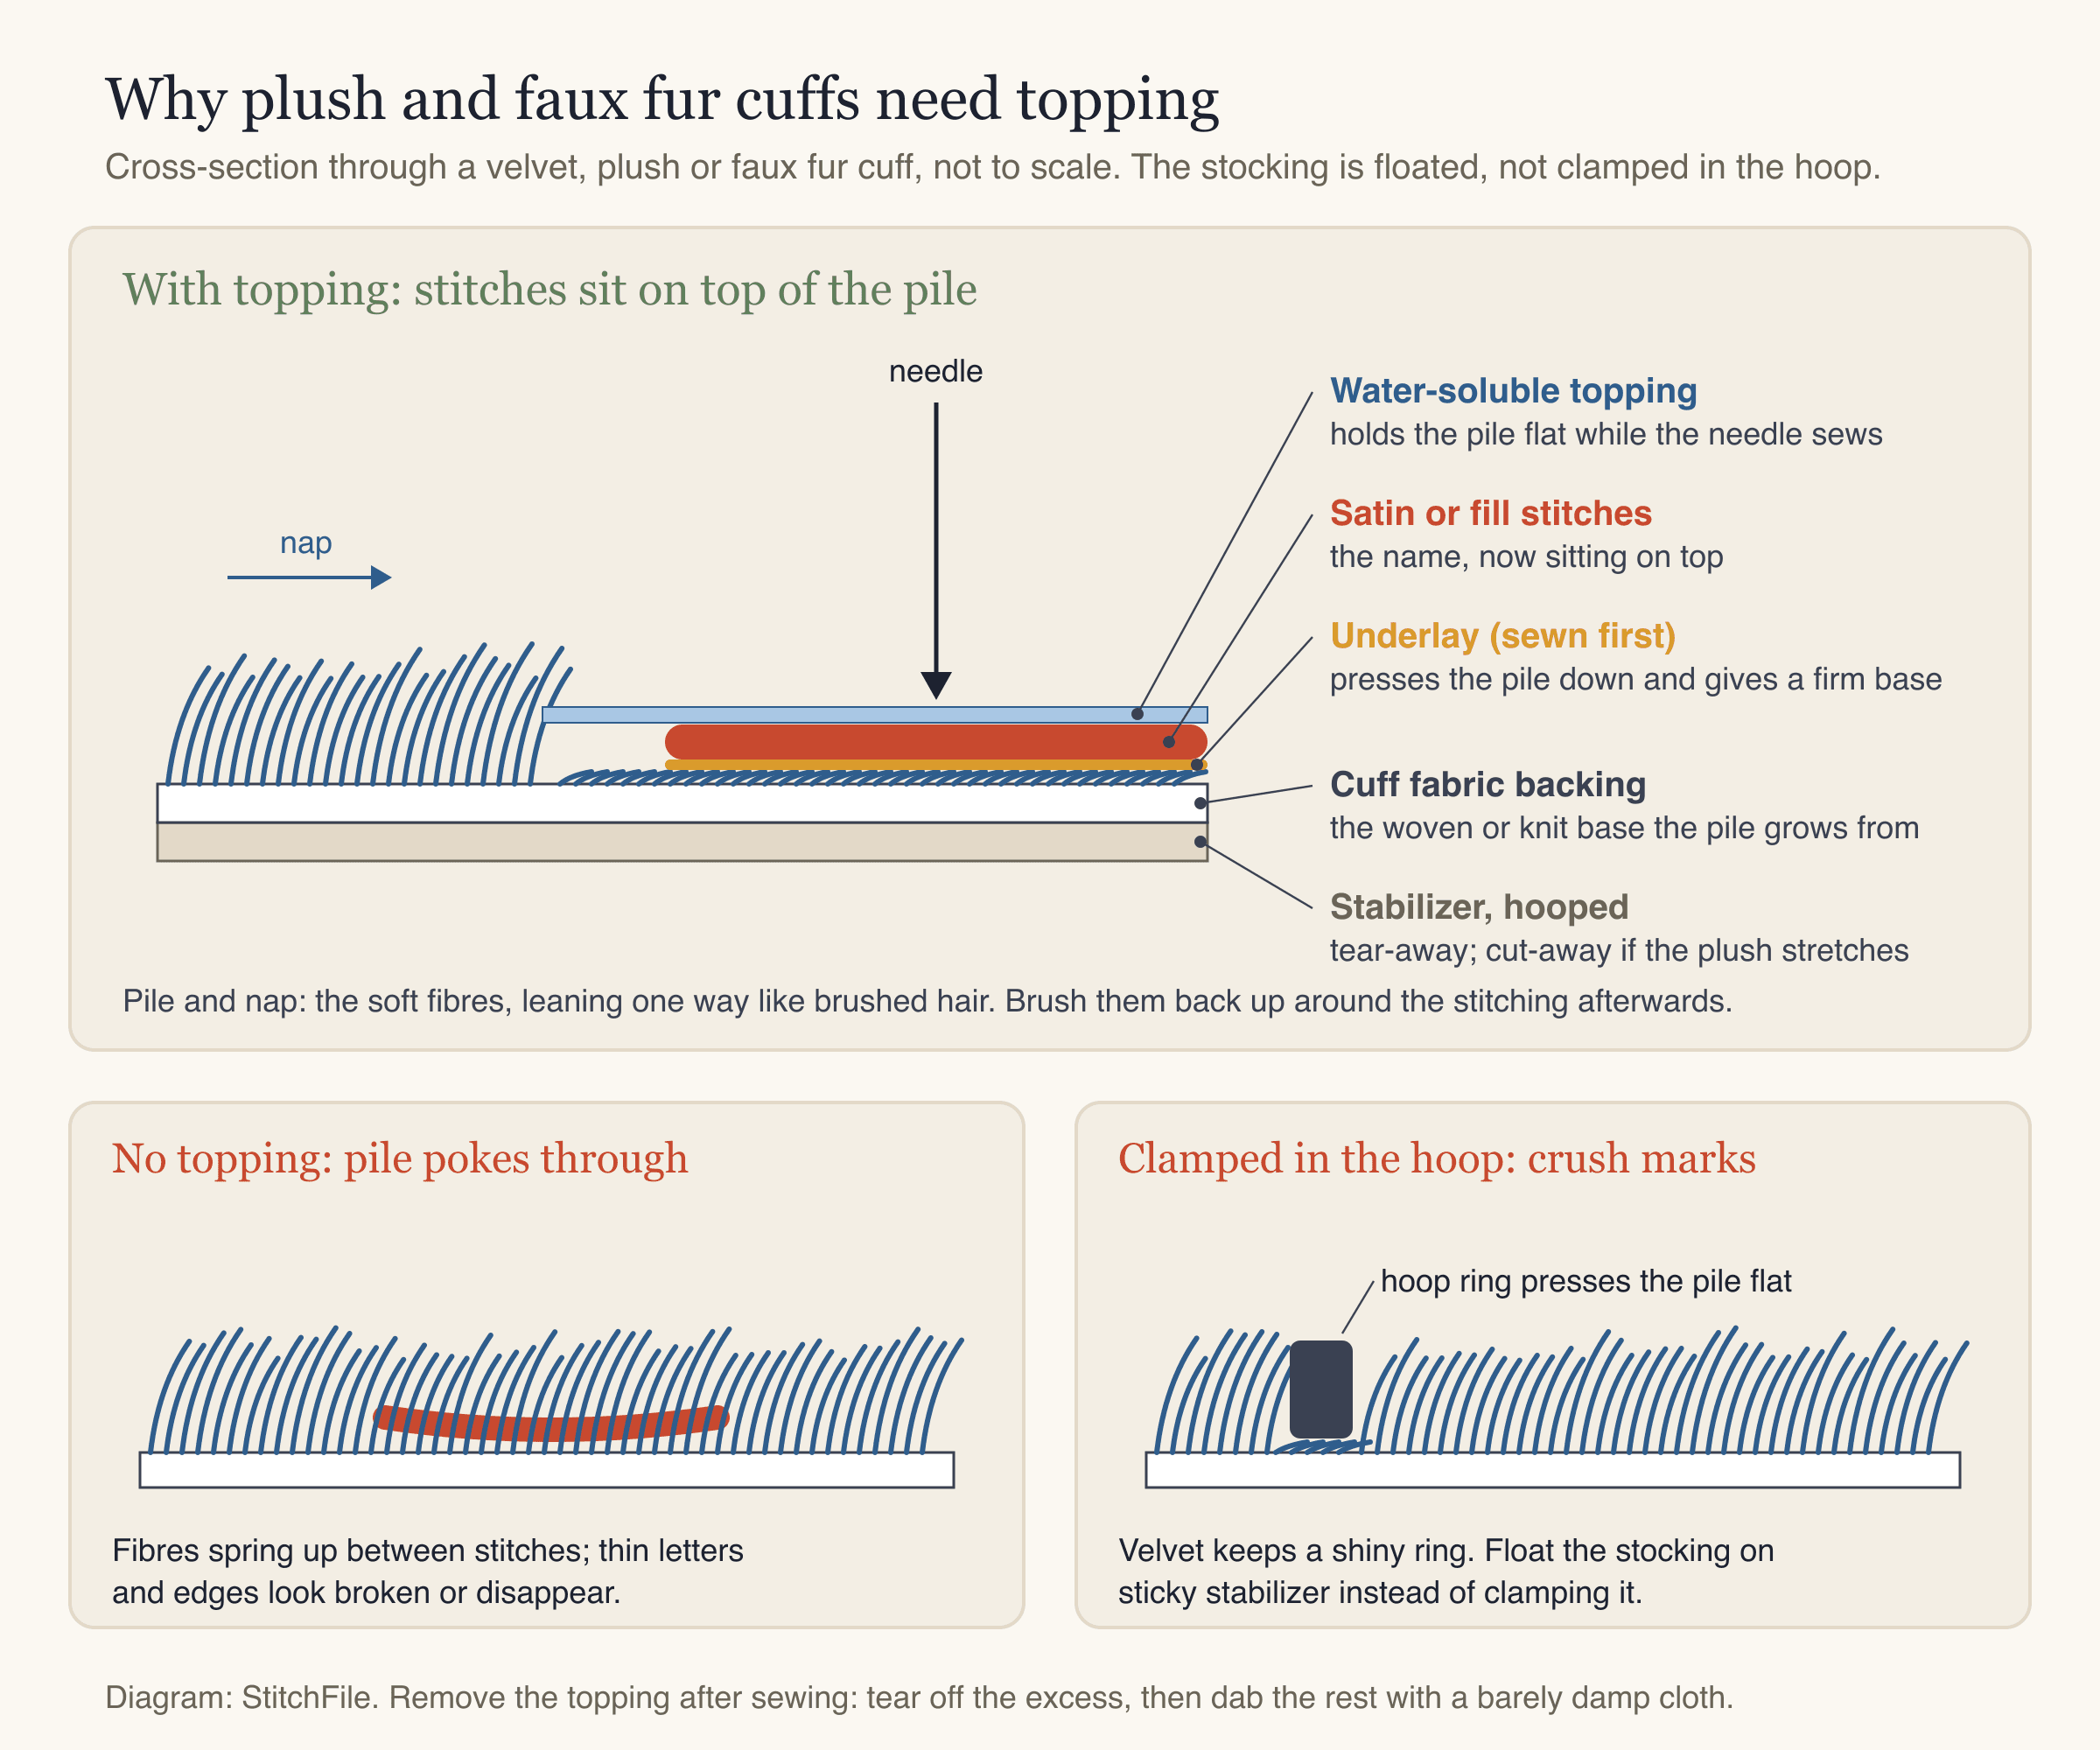
Topping keeps the stitches on top of the pile. Floating the stocking on hooped sticky stabilizer avoids the shiny ring a hoop leaves on velvet.
On long-pile faux fur, the simpler option is to put the name on the body, or on a smooth band sewn to the cuff. Afterwards, brush the pile back up around the letters. If velvet is crushed, hold a steam iron just above the back of the fabric (never press it flat) and let the pile lift. The towels and fleece guide covers topping and floating in more detail.
Knit, quilted, canvas, burlap and linen stockings
Knit stockings stretch, so never stretch them in the hoop. Very open, chunky cable knits are poor candidates for small names because the needle falls into the gaps; embroider a smooth cuff or a separate band instead.
Woven stockings: quilting lines running through a name look busy, so embroider before quilting or pick an unquilted cuff. Burlap and loose linen shift, so float them and keep letters bold.
Embroidered Christmas stockings: before sewing or after?
This decides how hard the job is. Either way, the aim is to get only the front layer of the cuff under the needle, so you don't sew the stocking shut.
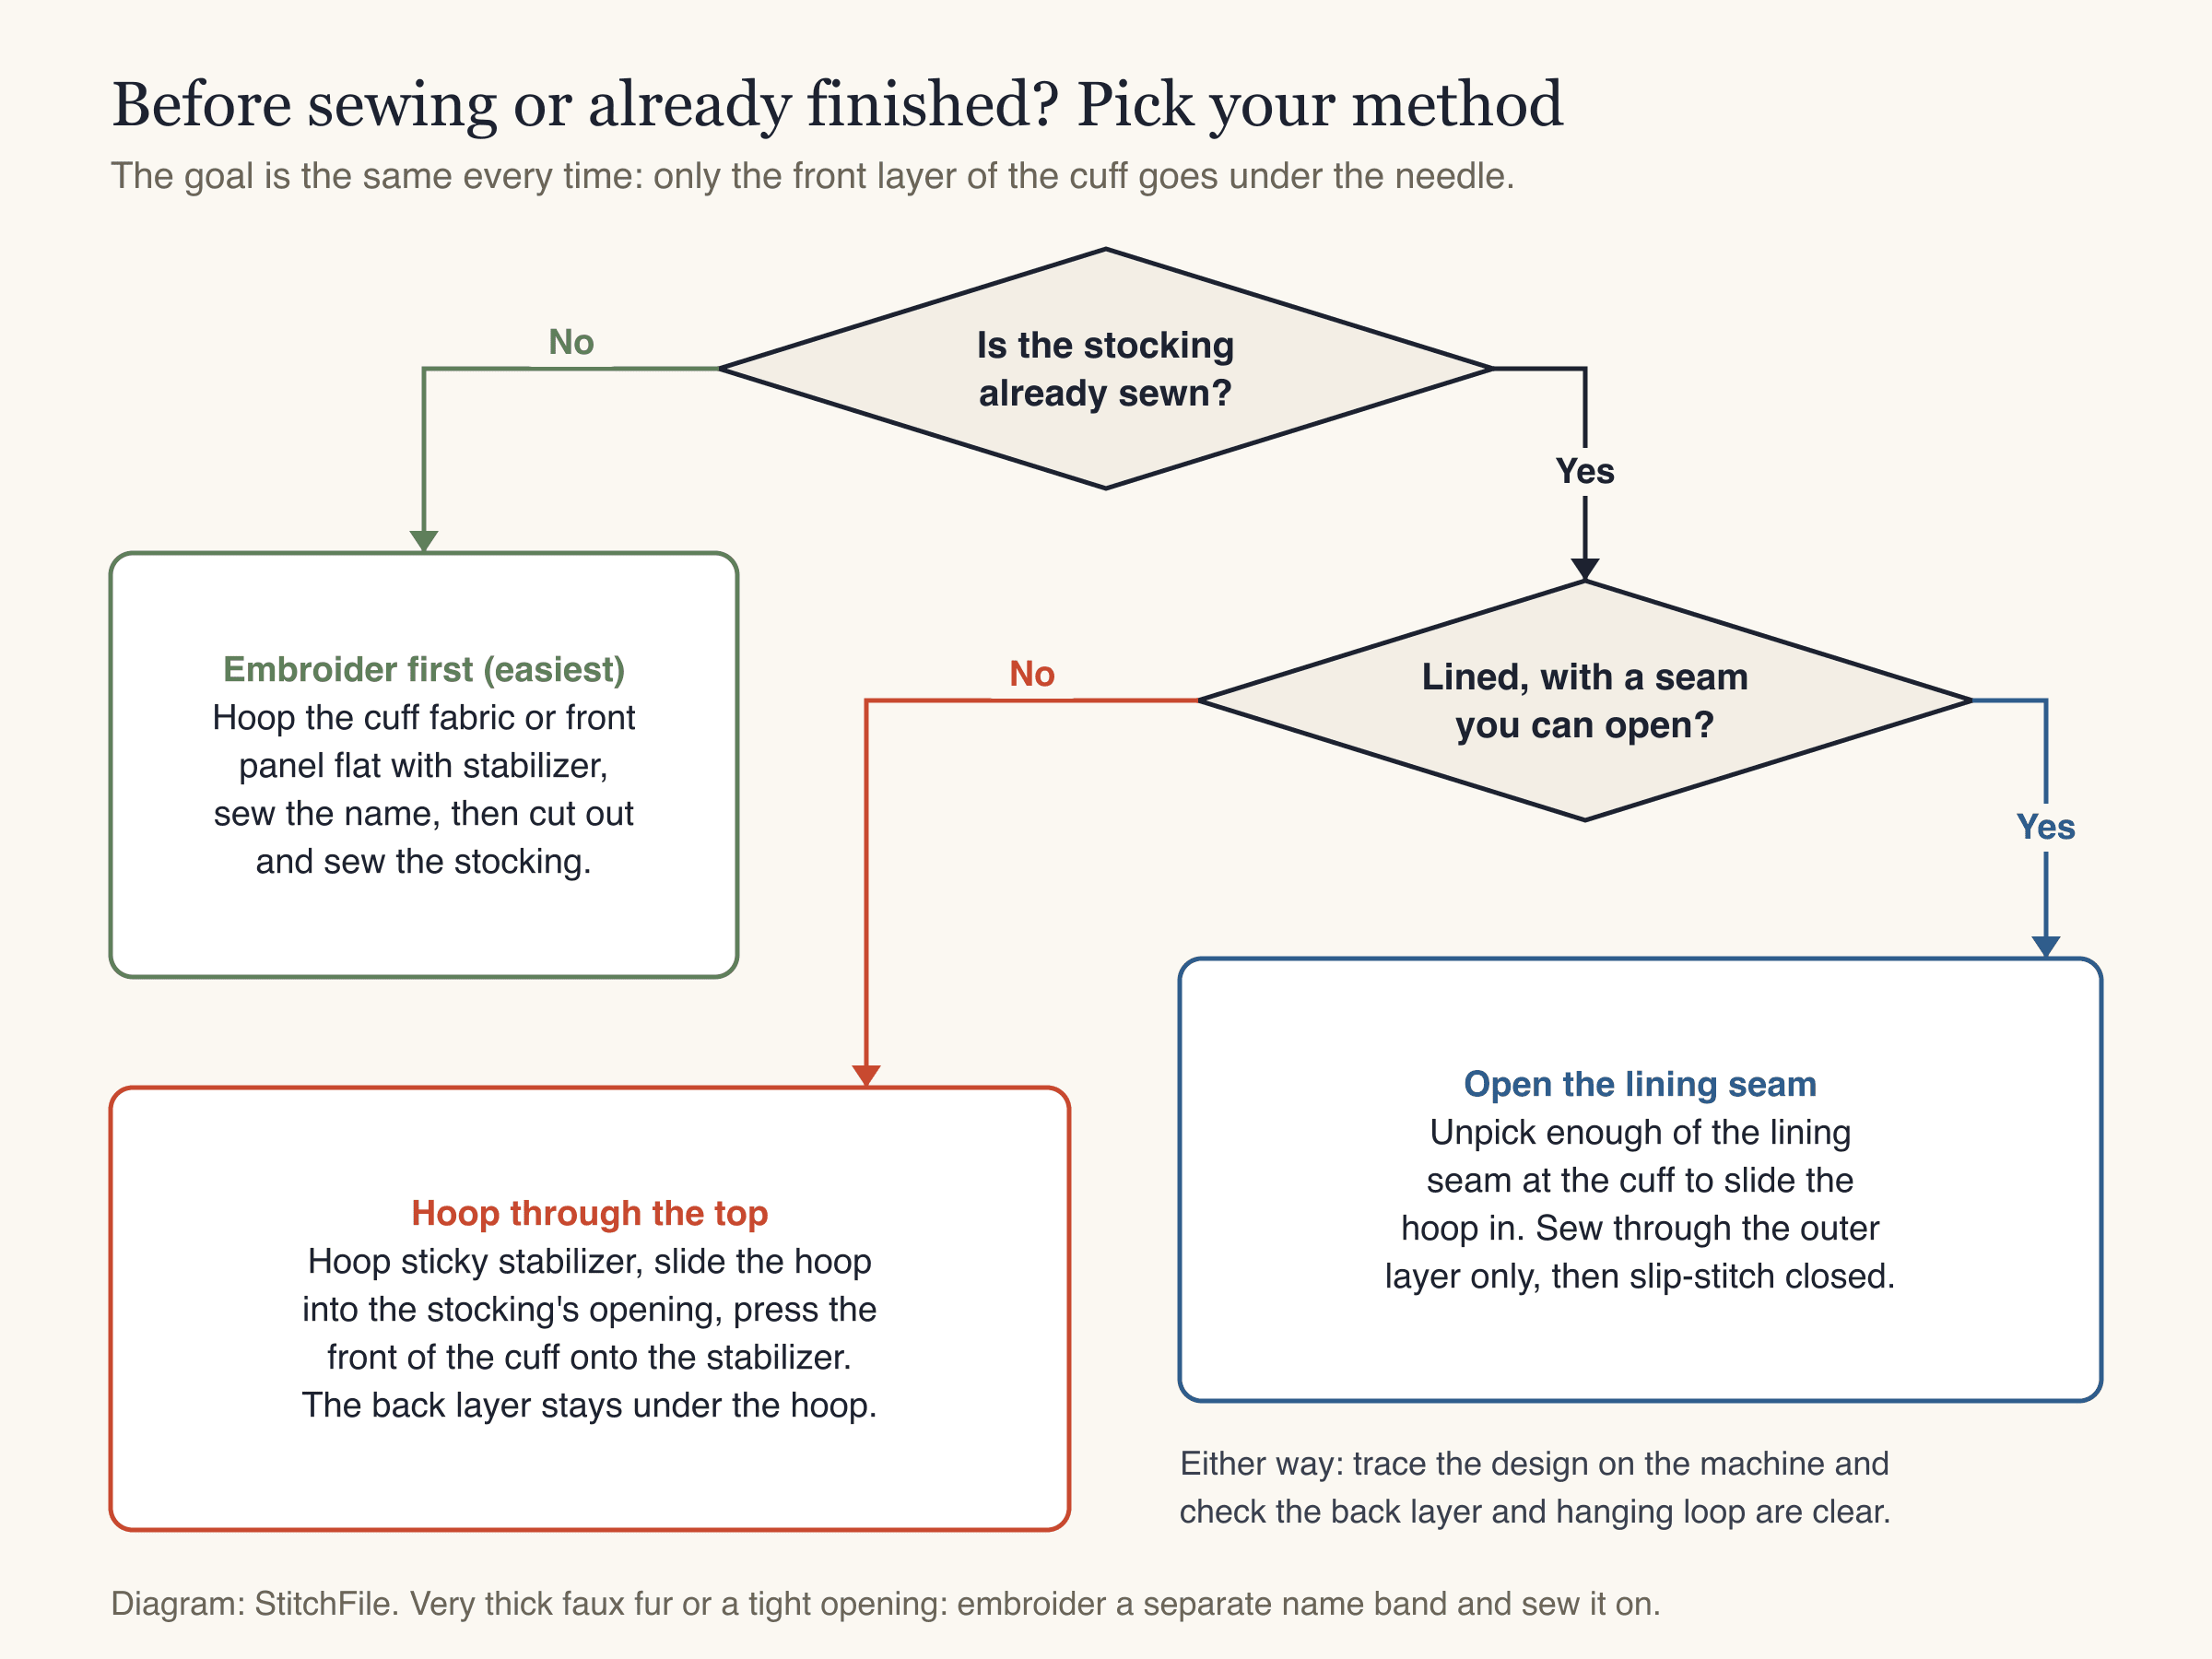
Three ways to get the name onto the cuff, from easiest to fiddliest.
Easiest: embroider the cuff or panel before sewing
- Cut the cuff piece oversized, with at least 25 mm (1 in) extra on every side, to trim to the pattern later.
- Mark the center line and baseline from your template.
- Hoop with stabilizer. Smooth fabrics can be hooped normally; float velvet, plush and burlap on sticky stabilizer.
- Add topping on pile fabrics and textured knits.
- Trace the design, then sew at a moderate speed.
- Remove stabilizer and topping, trim to the pattern and assemble the stocking.
How to embroider names on stockings that are already sewn
Most bought blank stockings come finished. There are two ways in.
Open the lining seam. Many lined stockings have a seam where the lining meets the cuff or along the lining's side.
- Unpick enough of it to slide a hoop between the lining and the outer stocking.
- Hoop or float only the outer cuff layer, with stabilizer under it.
- Add topping, trace the design and sew.
- Remove the stabilizer and topping and slip-stitch the lining closed. The back of the embroidery is now hidden.
Hoop through the top. If there's no seam you want to open:
- Hoop sticky tear-away stabilizer paper side up, then score and peel the paper.
- Slide the hoop into the stocking's opening, so the hoop sits inside the stocking.
- Line up your marks and press the front of the cuff onto the adhesive. The back of the stocking stays under the hoop.
- Roll or clip the leg, foot and hanging loop away from the needle. Add topping.
- Trace the design to check nothing else is in the way, then sew slowly and watch the first color.
This only works if the opening fits around your hoop. On a lined stocking the back of the name shows inside, which is usually fine. The name has to fit the hoop, too. A 160 mm name needs a 5×7 in hoop (130 × 180 mm field) used sideways; a 4×4 in hoop takes names up to about 95 mm wide. See the hoop sizes guide.
Thread colors on red, white and green stockings
| Stocking or cuff color | Thread colors that read well |
|---|---|
| White or ivory cuff | Red, dark green, navy, gold |
| Red velvet or felt | White, cream, gold, dark green |
| Green | White, cream, red, gold |
| Natural burlap or linen | Red, dark green, white, black |
On deep pile, a thread close to the pile color nearly disappears, so go for strong contrast.
Metallic thread looks festive but breaks and frays more easily. Use a needle made for metallic thread (a larger, elongated eye), slow the machine down, loosen the top tension slightly and let the thread feed straight up off the spool. Keep it for bold parts like a star, an outline or a large initial, not small letters. The thread guide covers thread types in more detail.
Making the name or motif file
You can use your machine's built-in lettering or desktop digitizing software. StitchFile is another route, with one honest caveat: it turns artwork into stitch files and has no font or text tool, so the name must be part of the artwork you upload. Set the name in any design app, convert the text to outlines ("create outlines" or "convert to paths"), and export an SVG or a large, sharp PNG. A holiday motif works the same way.
- Upload the artwork (SVG, PNG or JPG).
- Set the size. StitchFile sizes a design by its longest side, which for a name is its width. To keep a set at one letter height, measure each name's width at real size in your design app and enter that width.
- Choose the fabric: Towel & fleece for velvet, plush and faux fur, T-shirt knit for knits, Woven for cotton, canvas, linen and burlap. This sets stitch density, pull compensation (extra width so stitches don't pull shapes narrow) and the recommended stabilizer.
- Pick the garment color so the thread choices suit your cuff.
- Check the free preview. It warns you if any lettering is under the minimum height for that fabric and suggests a size that would work, and it shows the smallest hoop the design fits.
Here's a real StitchFile stitch preview of a Christmas tree for the toe or body of a plush stocking, at 80 mm with the Towel & fleece setting:
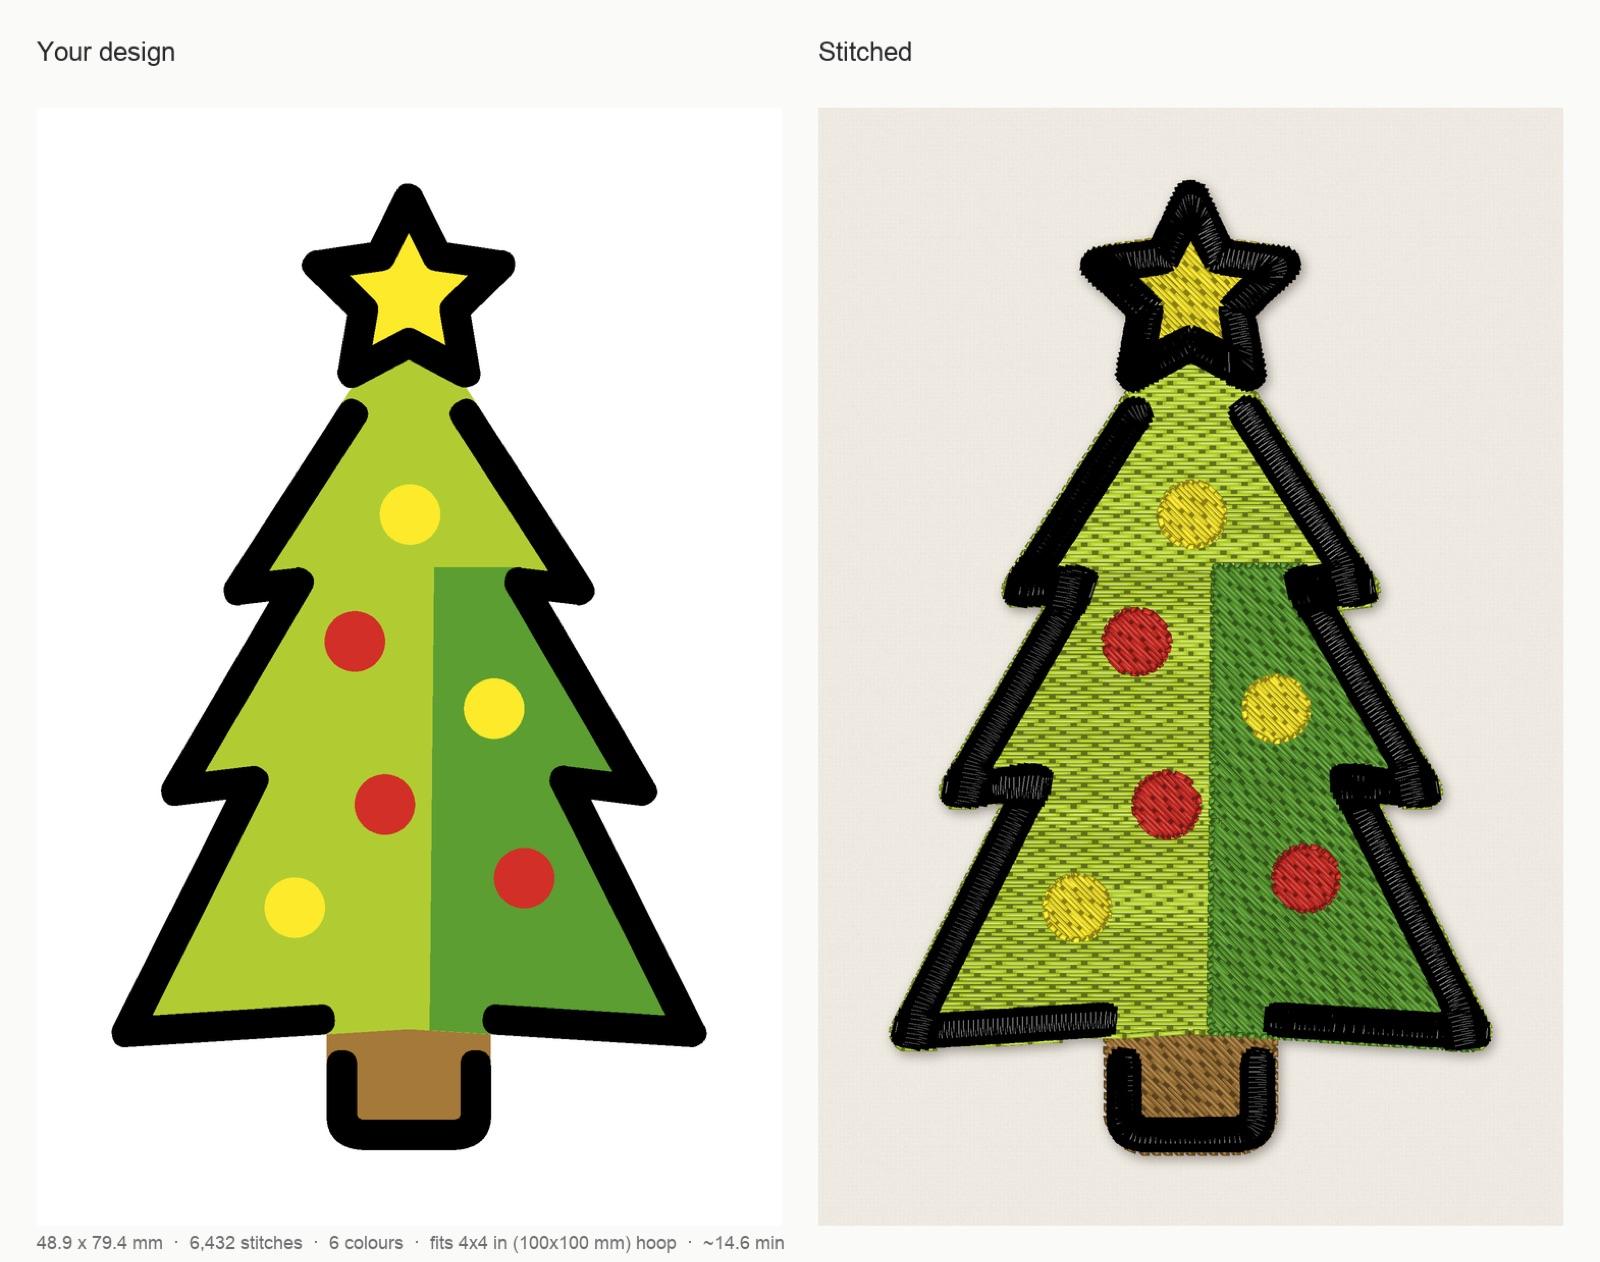
StitchFile stitch preview at 80 mm on the Towel & fleece setting: 48.9 × 79.4 mm, 6,432 stitches, 6 thread colors, 29 trims, fits a 4×4 in (100 × 100 mm) hoop, about 14.6 minutes at 700 stitches per minute. Recommended stabilizer: tear-away plus water-soluble topping.
Artwork: OpenMoji Christmas tree, CC BY-SA 4.0. StitchFile converted the artwork into the stitch preview shown here; these adaptations are shared under the same license.
Every download includes PES, DST, JEF, EXP and VP3. Each name is a separate design, so a 10-pack of credits (they never expire) suits a family set. Selling personalized stockings needs a Pro or Shop plan, which covers commercial use.
Batch workflow for a family set
Personalized Christmas stockings embroidered for a whole family go faster as one job than as one embroidered Christmas stocking after another.
- Check the spelling with whoever ordered the stockings; unpicking velvet rarely ends well.
- Measure every cuff and set the name zone from the smallest one.
- Choose one font and one cap height, set by the longest name.
- Make one artwork per name on the same template, in one thread color, and create the stitch files with clear names (
stocking_OLIVER_114mm.pes). - Test-sew the longest name on a scrap of the same fabric, stabilizer and topping.
- Mark every cuff from the paper template.
- Sew the set in one session. With every name in the same color, you thread the machine once.
- Finish together: remove stabilizer and topping, trim threads and brush up the pile.
Caring for embroidered stockings
- Follow the stocking's care label. Velvet and faux fur are often spot clean only. If washing is allowed, use cool water and a gentle cycle, inside out.
- Remove every trace of topping before storing; leftover topping turns stiff.
- Never iron directly on the embroidery, especially metallic thread or plush. Steam from the back.
- Store flat or loosely rolled in tissue paper, not folded through the name.
Common mistakes with embroidered stockings
| Mistake | What you see | Fix |
|---|---|---|
| Sewing through both layers | The stocking is stitched shut | Open the lining seam or hoop through the top; trace first |
| Each name sized to fill the cuff | Short names huge, long names tiny | One cap height for the set, set by the longest name |
| Thin script on deep pile | Joins and loops disappear | Bold sans or a heavier script, larger letters |
| A flat-cotton file on plush | Patchy, thin stitching | A file made for towel and fleece |
| Stitching over side seams | Needle strikes, wobbly letters | Keep about 20 mm from seams |
FAQ
How do you embroider a name on a Christmas stocking that's already sewn?
Unpick part of the lining seam so you can hoop just the outer cuff layer, or slide hooped sticky stabilizer into the stocking's opening so only the front of the cuff sits on it. Trace the design before sewing so you don't stitch the stocking shut.
What size should the name be on a Christmas stocking?
On a typical adult-size cuff, 20–30 mm (about 3/4 to 1 1/4 in) capital height is a common starting point. Keep the name about 20 mm from the side seams and check it fits your hoop. Never go below 5 mm letters on woven fabric, 6 mm on knit or 7 mm on velvet, plush and faux fur.
What stabilizer should I use for a velvet or faux fur stocking?
Tear-away under stable velvet and faux fur, cut-away under stretchy plush or minky. Always add water-soluble topping on top so stitches don't sink into the pile. Float the stocking on hooped sticky stabilizer rather than clamping it, to avoid crush marks.
Can you embroider a knit Christmas stocking?
Yes, on smooth or medium knits. Use cut-away stabilizer, don't stretch the knit in the hoop, and keep letters at least 6 mm tall. On very chunky, open knits, stitch the name on a separate band and sew it on.
How do you center names of different lengths on stockings?
Give every name the same letter height and center each on the cuff's midline, marked with the same paper template. Let the longest name set the height for the whole set. All capitals keep the baselines lined up, because no letters hang below the line.
Can I use metallic thread on embroidered stockings?
Yes, for bold parts like a star, an outline or a large initial. Use a needle made for metallic thread, slow the machine down, loosen the top tension slightly and let the thread feed straight up off the spool. Avoid it for small lettering, and test on a scrap first.
Make your stocking files
Measure your cuffs and pick one letter height for the set. Then set each name or holiday motif as artwork, upload it to StitchFile, choose Towel & fleece for velvet and plush, and check the free stitch preview before you sew the real stockings.