Embroidery guide
Embroidered Sweatshirts: How to Make Custom Crewnecks and Hoodies
Embroidered sweatshirts at home: placement and sizes for crewnecks and hoodies, the right stabilizer for each fleece, and how to hoop all that bulk.
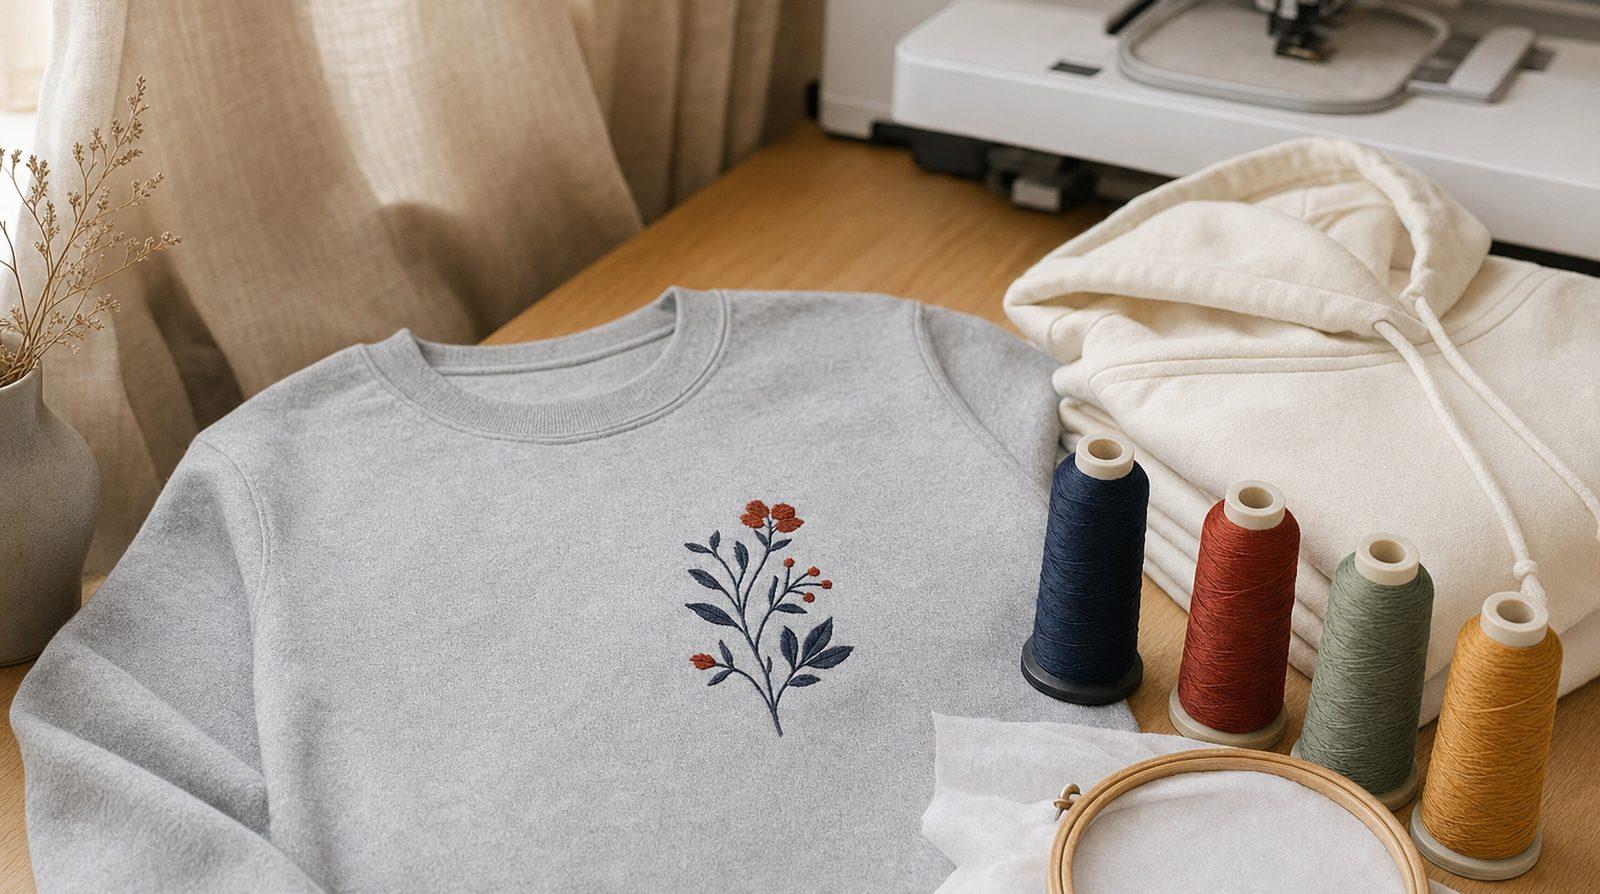
Quick answer: Embroidered sweatshirts sew best with a medium cut-away stabilizer, a ballpoint needle and a design sized for the spot: 75–90 mm for a left chest, 180–250 mm (7–10 in) wide for a center-chest word, 60–80 mm on a sleeve. Choose the fabric setting by the outside of the garment: a smooth face stitches as a knit; a brushed, fuzzy face needs fleece settings plus a water-soluble topping. Float very thick fleece instead of forcing it into the hoop, and keep the back out from under the needle.
Embroidered sweatshirts are one of the most popular home machine projects: a collegiate word across a crewneck, a small icon on the chest, a name down a sleeve. They're friendlier than t-shirts in one way. Sweatshirt fleece is thicker and more stable than jersey, so it puckers less and carries a bigger design.
The hard part is everything else: the garment is heavy, the fleece fights the hoop, the back and sleeves slide under the needle, and hoodies add a pocket, a hood and drawstrings. This guide covers those sweatshirt-specific problems. For knit basics (why knits pucker, why cut-away beats tear-away, how to hoop a knit without stretching it), read our guide to machine embroidery on t-shirts first.
What changes from a t-shirt
| T-shirt | Sweatshirt or hoodie | |
|---|---|---|
| Fabric | Thin single jersey | Fleece-back, French terry or brushed fleece |
| Main risk | Ripples from stretch | Shifting from weight, hoop marks, stitches sinking into fuzz |
| Stabilizer | No-show mesh cut-away | Medium cut-away; topping on fuzzy faces |
| Hooping | Easy to hoop, easy to stretch | Hard to hoop; floating is often easier |
Embroidered sweatshirts: where to put the design and how big
Placement sets the size, and the size decides the hoop. The map shows the usual spots on an adult crewneck and hoodie, drawn roughly to scale.
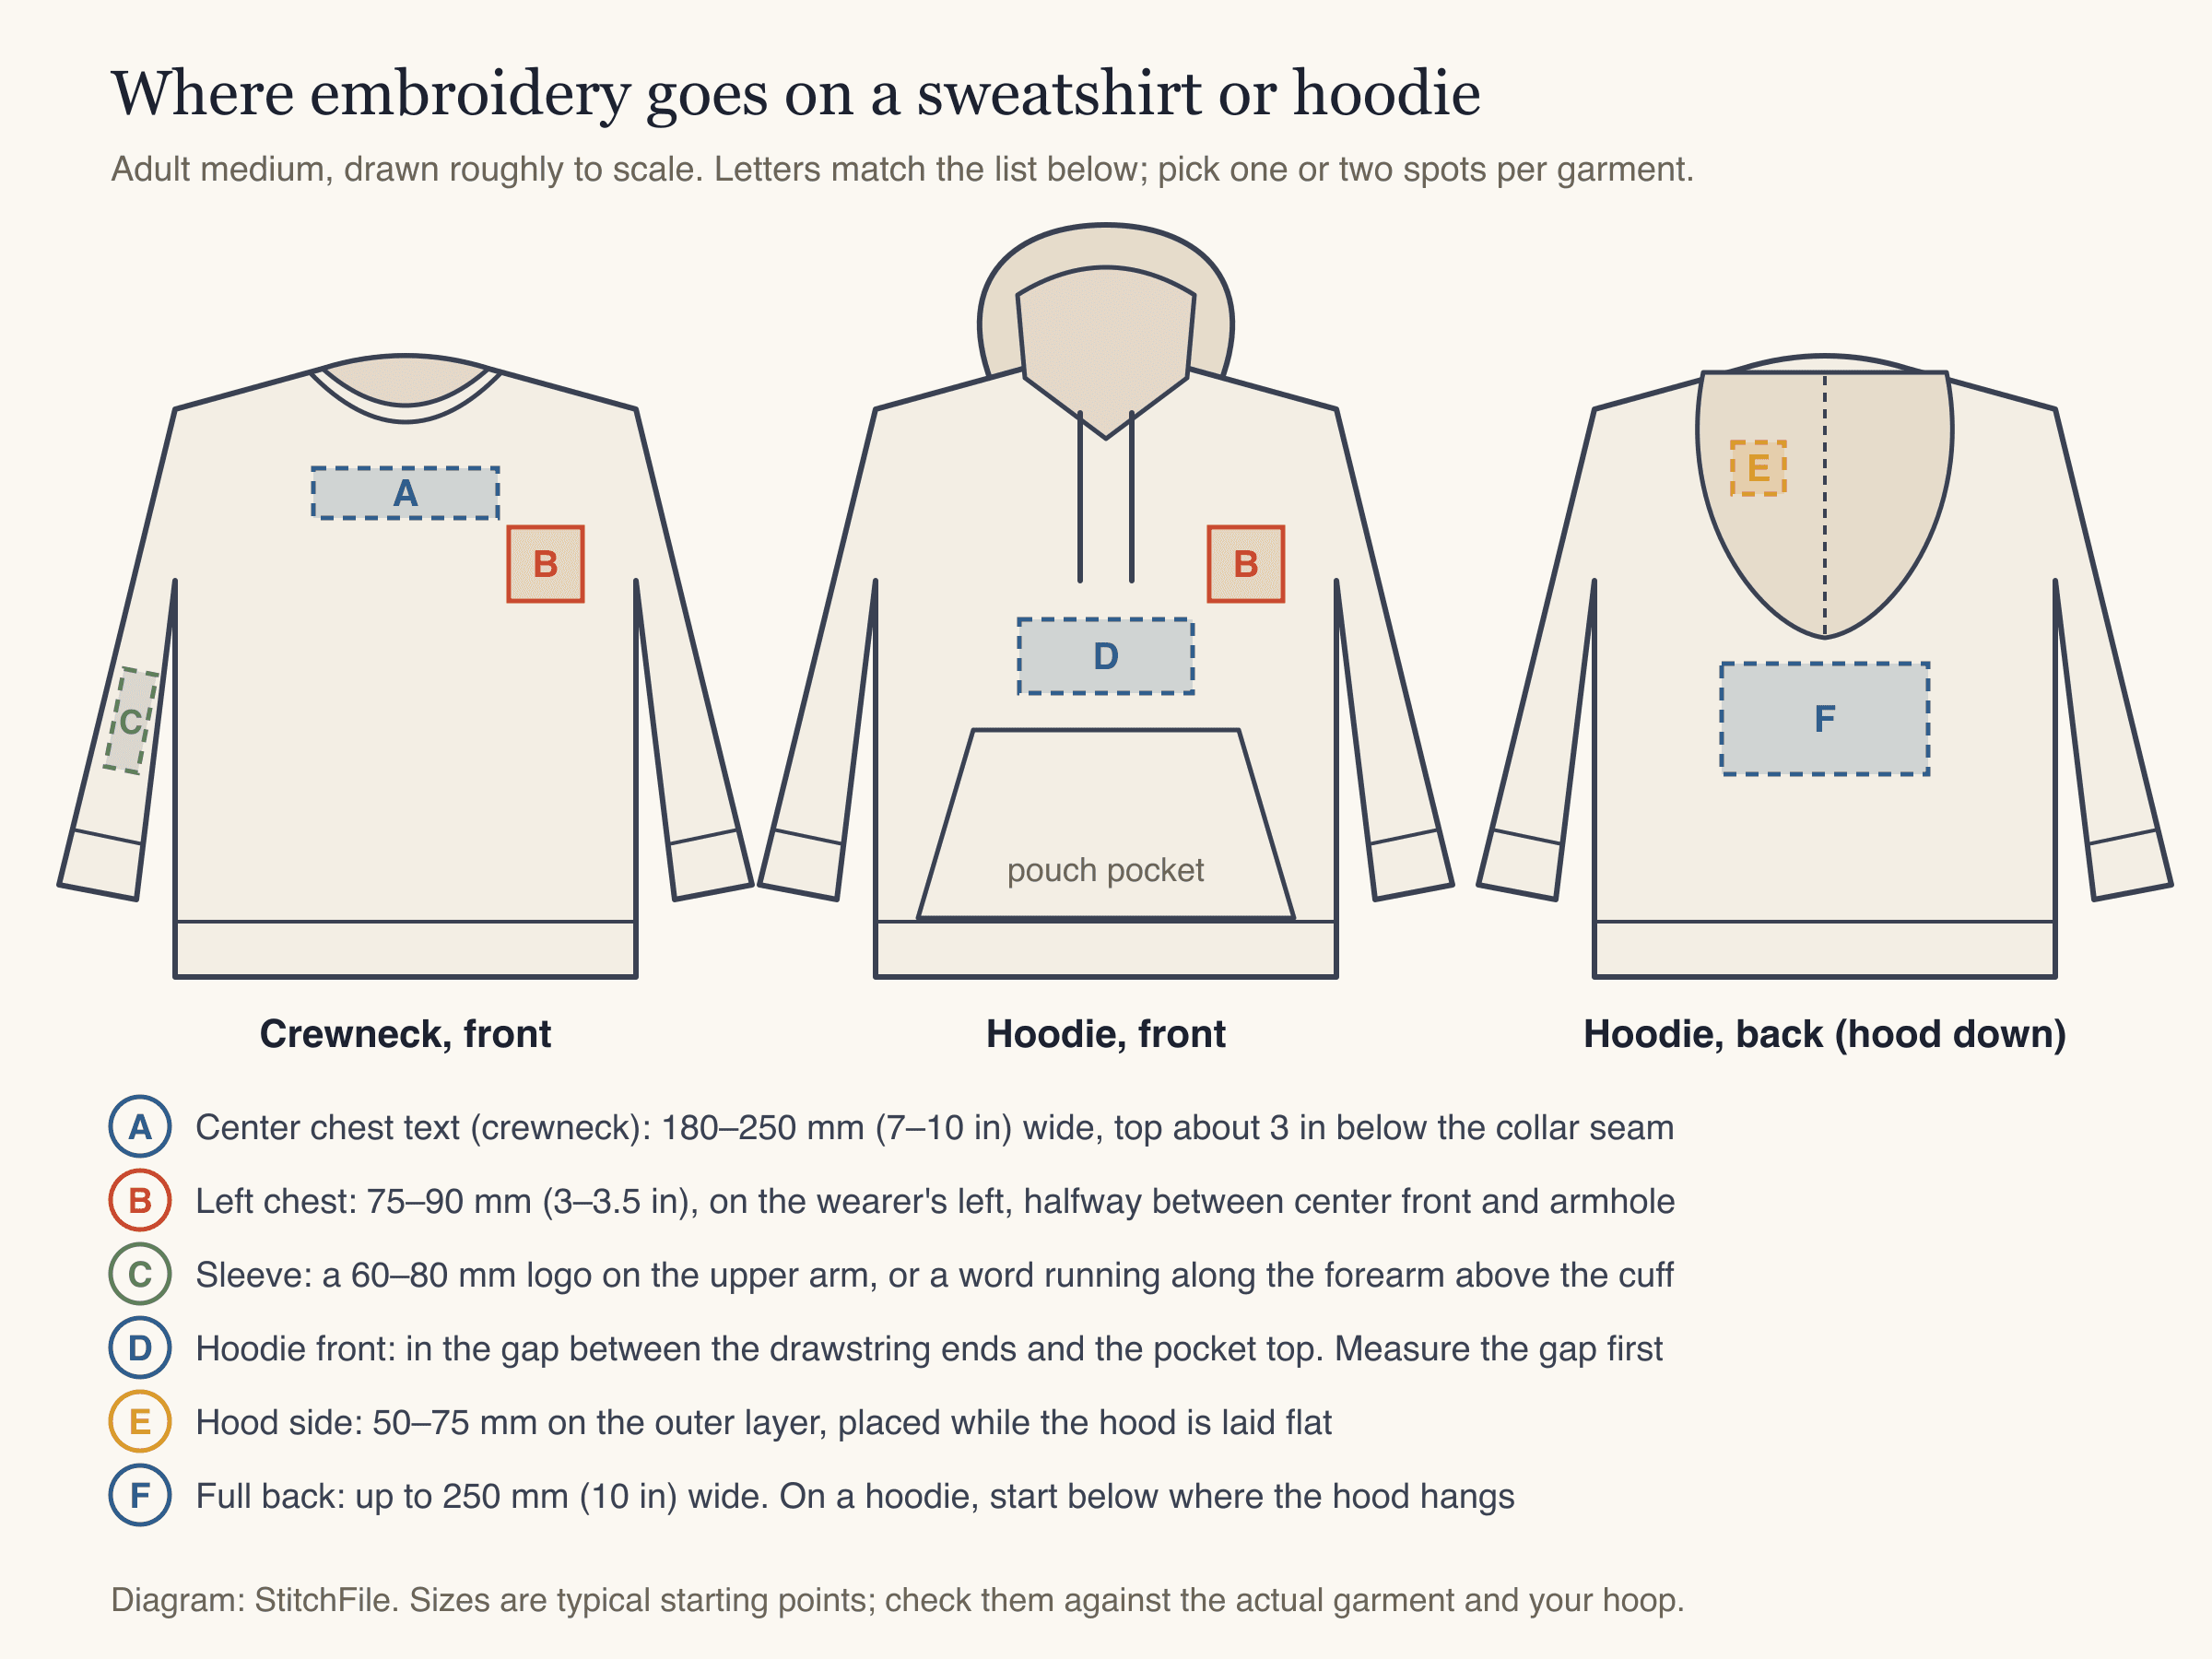
Typical placements on an adult medium. A, D and F are statement spots; B, C and E are small accents.
| Placement | Typical size (longest side) | Where exactly | Hoop |
|---|---|---|---|
| Center chest word (crewneck) | 180–250 mm (7–10 in) wide | Top about 3 in below the collar seam on adults | 6×10 in or larger above 180 mm |
| Center chest motif | 90–130 mm (3.5–5 in) | Same height, centered | 4×4 in up to about 95 mm, else 5×7 |
| Left chest | 75–90 mm (3–3.5 in) | Wearer's left, halfway between center front and armhole | 4×4 in |
| Sleeve, upper arm | 60–80 mm | Outer arm, a few inches below the shoulder seam | 4×4 in |
| Sleeve, forearm word | Up to about 100 mm long | Outer forearm, starting about 1 in above the cuff rib | 4×4 in, seam opened |
| Hoodie front | Fits the gap; often wide and short | Between drawstring ends and pocket top | Depends on the gap |
| Hood side | 50–75 mm | Outer layer of one hood panel | 4×4 in |
| Back neck (crewneck) | 50–75 mm wide | 1–2 in below the collar seam | 4×4 in |
| Full back | Up to 250 mm (10 in) wide | On a hoodie, below where the hood hangs | 8×12 in, turned sideways above 200 mm |
Mark the spot with the sweatshirt on a person or dress form: a center-chest word that looks right flat on the table often sits too low once worn.
Wide words often fit a long hoop only sideways. A 230 mm word won't fit a 5×7 in hoop (130×180 mm) but fits a 6×10 in hoop (160×260 mm) if the hoop's long side runs across the chest, or if you rotate the design 90° on the machine's screen. Our embroidery hoop size chart lists each hoop's sewing field.
Design styles that work on a custom embroidered sweatshirt
Varsity and collegiate lettering. Bold block or slab-serif letters, often arched, are the classic crewneck look. For example, an eight-letter word at 230 mm wide gives letters roughly 25–30 mm wide and, in a typical block font, 35–40 mm tall. Strokes that wide should be sewn as fill, not satin: a satin stitch spanning more than about 7–8 mm leaves long, loose threads that snag. Keep any contrasting outline bold; a hairline border around a big letter is hard to sew cleanly. (Traditional varsity letters are often twill appliqué; this guide means fully stitched letters.)
Small icons. A cherry, a mushroom, a bear: one simple motif at 50–120 mm reads well and sews quickly. Flat colors and clear shapes beat detail, and lines thinner than about 1 mm at the final size sink into fleece.
Names on sleeves. Small letters are where the minimum heights matter:
| Fabric face | Smallest letters that stitch cleanly | Comfortable for a sleeve name |
|---|---|---|
| Smooth fleece-back or French terry | About 6 mm | 10 mm or more |
| Brushed, fuzzy or plush face | About 7 mm | 12 mm or more |
The minimum is where text stops being readable, so go well above it for a name people read from across a room. Script fonts need more height than block letters because their thin joins sink first. See embroidery lettering and fonts for more.
Know your fabric face: fleece-back, French terry or brushed
What matters for embroidery is the outside, the side you stitch on.
- Fleece-back: a smooth knit face with brushed fleece inside. Thick, but the face behaves like a heavy knit.
- French terry: a smooth face with small loops inside. Often lighter and a little stretchier.
- Brushed or sueded faces: napped on the outside, so the surface is soft and fuzzy. Polar fleece and sherpa are the extreme case.
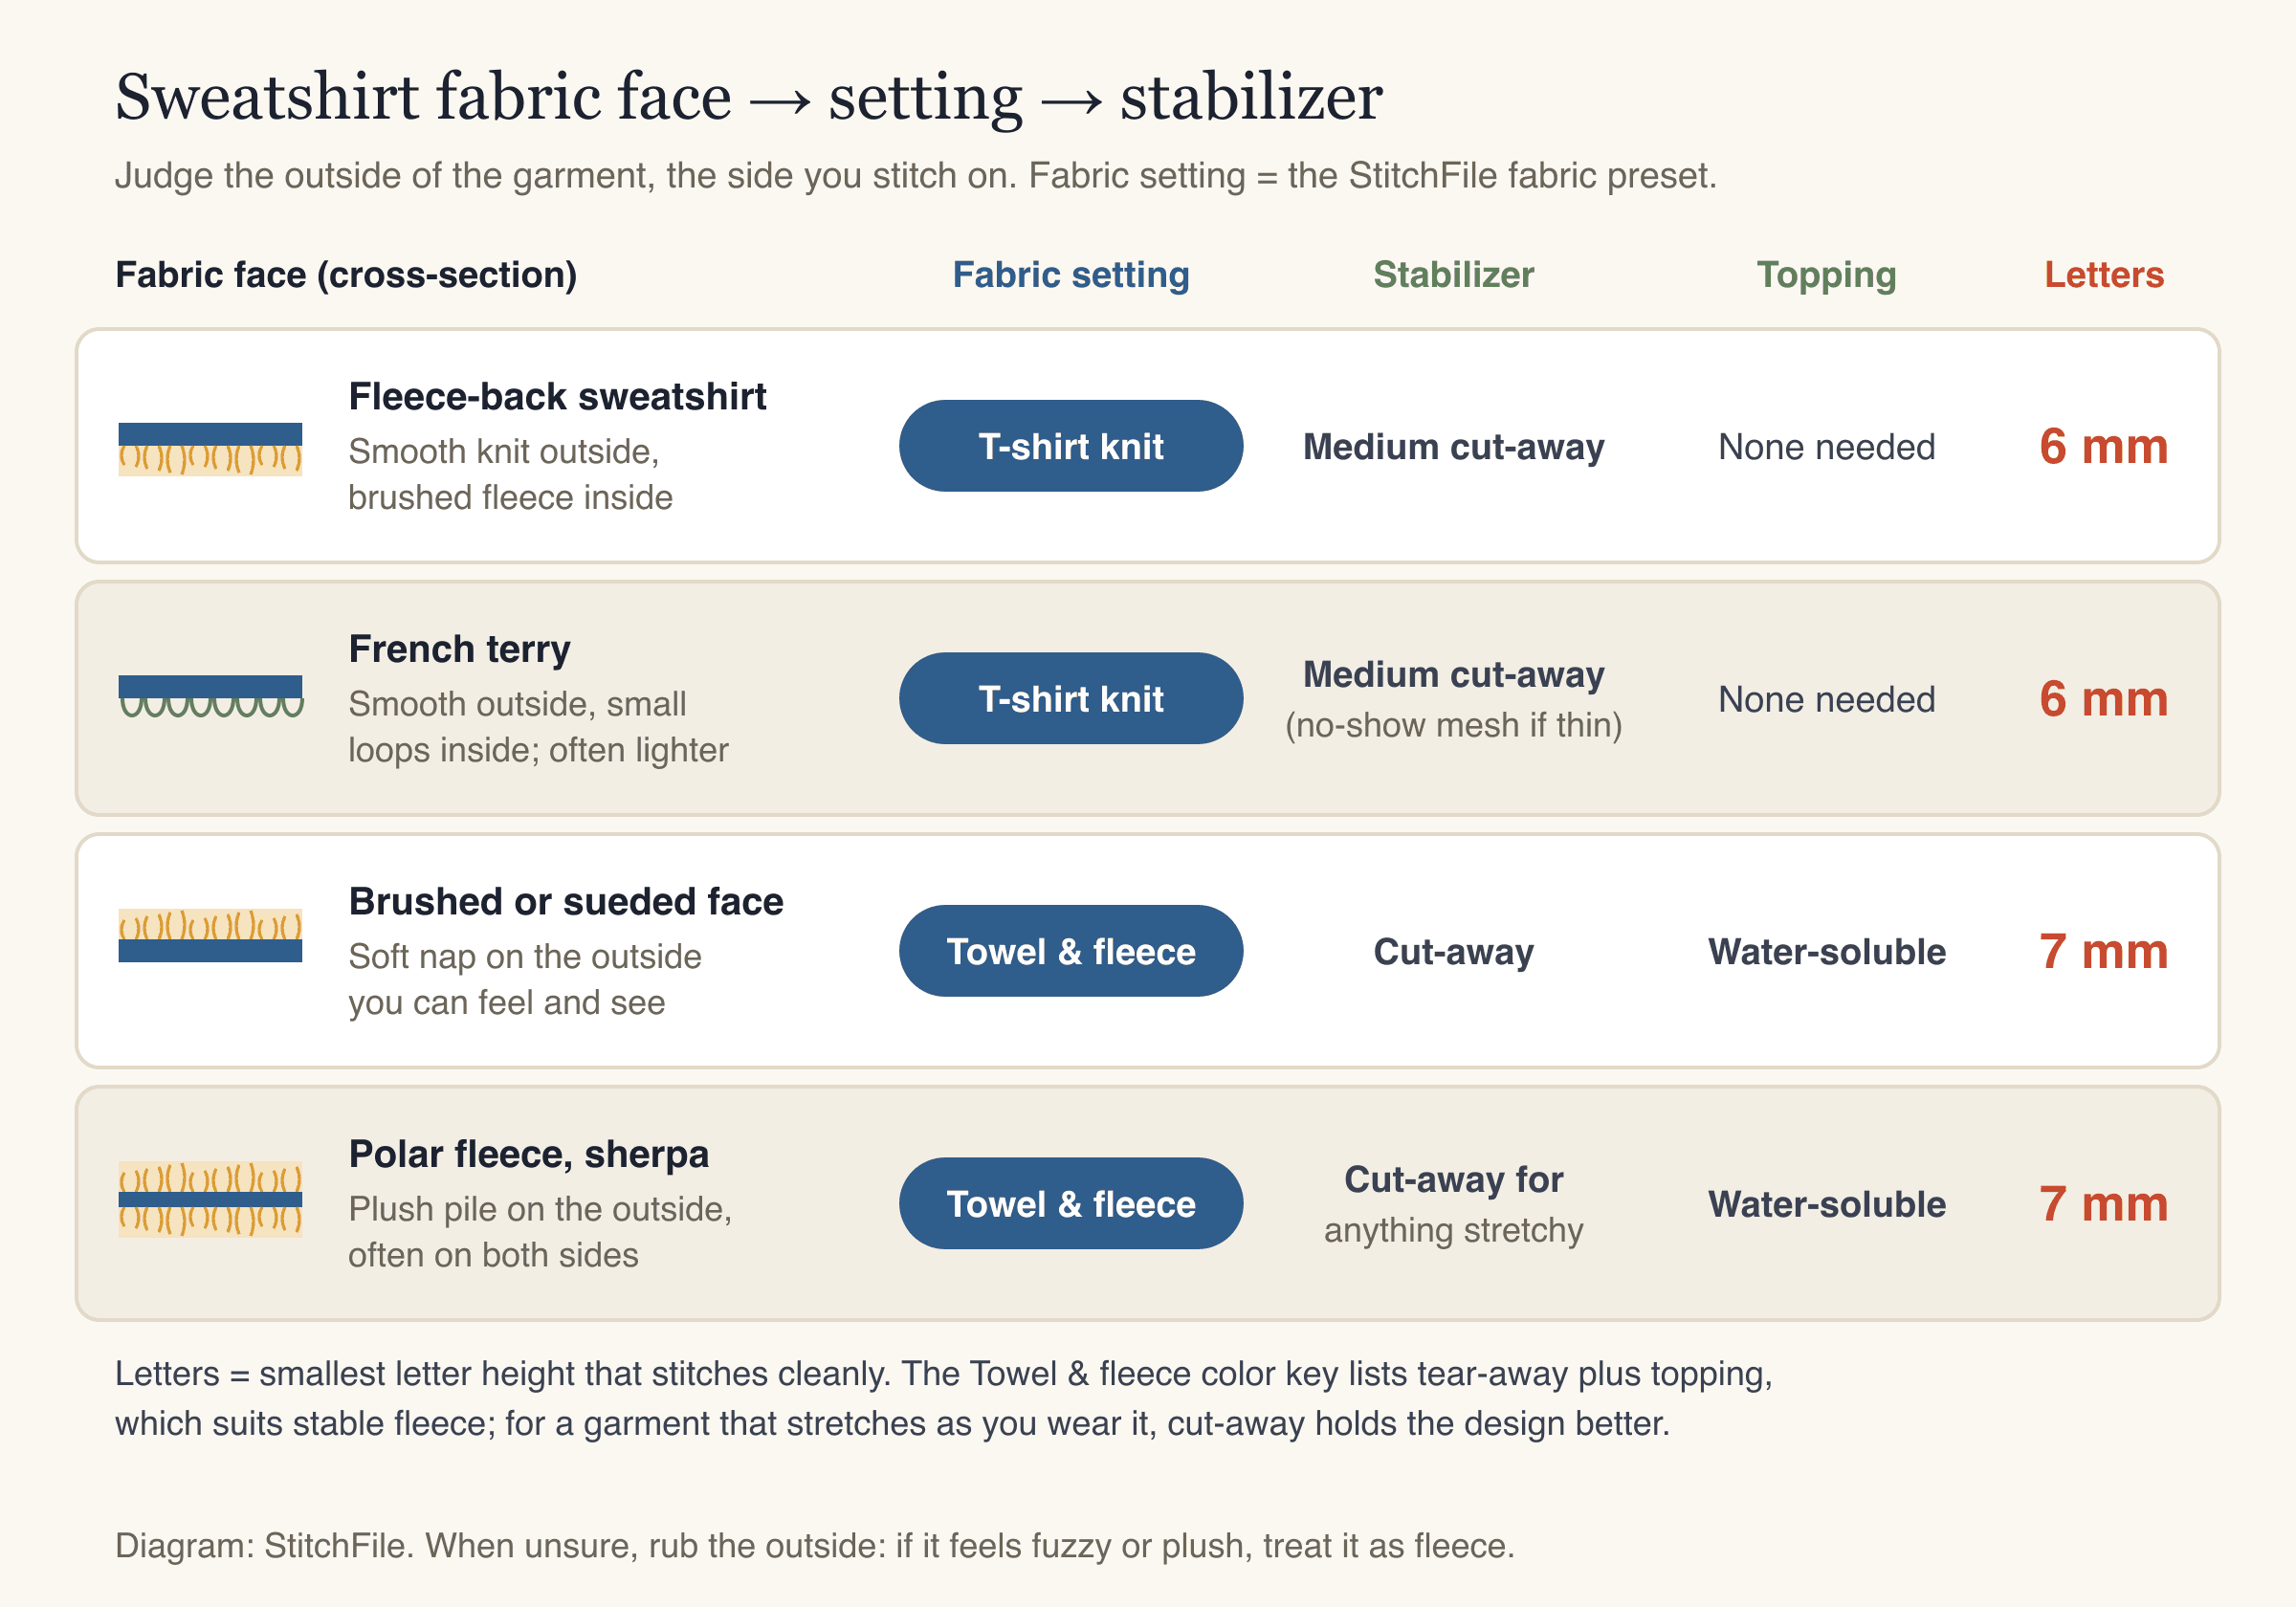
Pick the setting by the face you stitch on. A smooth face stitches like a knit, whatever is inside.
In StitchFile, smooth fleece-back and French terry use the T-shirt knit fabric setting. Brushed and plush faces use Towel & fleece, built for surfaces stitches can sink into. Its color key suggests tear-away plus topping, which suits stable fleece; for a sweatshirt that stretches when worn, cut-away is the safer stabilizer. Topping is a thin water-soluble film laid on top so stitches sit on the surface instead of sinking into the pile.
Garment color matters too. Pale thread on a navy or black sweatshirt needs solid coverage or dark fleece peeks between the rows; heather gray hides small gaps. StitchFile asks for the garment color when you upload, so the thread choices suit it.
Getting a sweatshirt-ready file
If you're turning your own artwork into a custom embroidered sweatshirt, this is the step StitchFile handles. Upload an SVG, PNG or JPG, choose the fabric setting from the chart above and a size (presets include Left chest 90 mm, Sleeve 80 mm and Full back 250 mm; anything from 20 to 300 mm works). In about 20 seconds you get a free stitch preview with the stitch count, colors, sew time and the smallest hoop it fits. Lettering too small for the fabric is flagged with a size that would work, and big letters can be switched to fill (Edit, Lettering, Fill). Every download includes PES, DST, JEF, EXP and VP3, plus a color key that lists the stabilizer.
Here's a crewneck motif made that way: a teddy bear at 110 mm for the center chest, with the T-shirt knit setting.
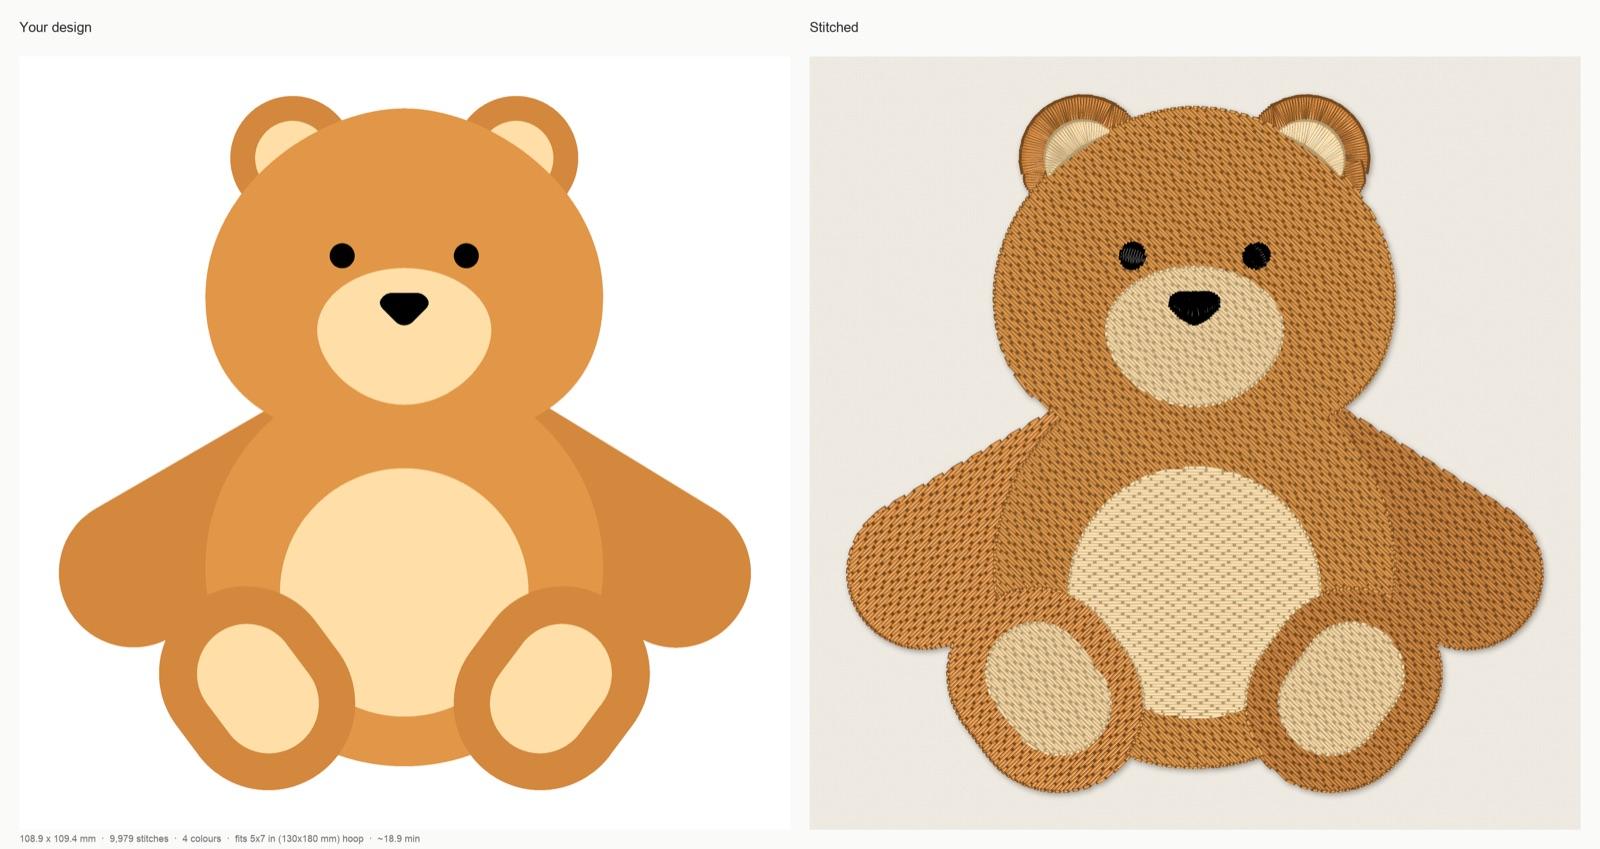
StitchFile stitch preview with the T-shirt knit setting at 110 mm: 108.9 × 109.4 mm, 9,979 stitches, 4 thread colors, 31 trims, about 18.9 minutes at 700 stitches per minute, fits a 5×7 in hoop. The color key recommends cut-away (no-show mesh) stabilizer.
Teddy bear artwork: Microsoft Fluent Emoji, copyright (c) Microsoft Corporation, MIT License. Stitch preview generated by StitchFile from the artwork.
The same bear with Towel & fleece comes out at 12,786 stitches and about 22.9 minutes, because the fill rows sit closer together so pile can't poke through. Match the setting to the face: fleece settings on a smooth sweatshirt add stiffness you don't need.
How to embroider a sweatshirt, step by step
You'll need: medium cut-away stabilizer (fusible, or with temporary spray adhesive), water-soluble topping for fuzzy faces, a fresh ballpoint embroidery needle, embroidery thread, a washable marking pen, a ruler and some clips. A 75/11 ballpoint is the common choice; on heavy fleece, a larger ballpoint such as 90/14 helps with skipped stitches. Our embroidery machine needles guide explains the sizes.
- Pre-wash if it's mostly cotton. Cotton-rich fleece can shrink and gather around the design. Poly blends shrink less.
- Mark the placement. Fold the sweatshirt in half lengthwise to find the center, then mark the center point and a vertical line. Measure a center-chest word down from the collar seam.
- Add stabilizer. Inside out, fuse or spray medium cut-away behind the marked area, at least 1 in bigger than the hoop on every side.
- Hoop it or float it. For medium-weight fleece, loosen the hoop screw well first, press the inner ring in over the marks and smooth the fabric without stretching it. If the fleece is very thick, or a test hooping leaves a shiny ring, float it: hoop sticky stabilizer alone, peel the paper, press the sweatshirt on top and run a basting stitch (a loose outline many machines can add) around the design area.
- Add topping on brushed or fuzzy faces.
- Get the back out of the way. Roll the back, sleeves and hood away from the stitching area and clip them. Slide a hand under the hoop: only the front panel and stabilizer belong there.
- Support the weight. Rest the rolled garment on the table so it can't hang off the hoop and drag it.
- Trace and stitch. Use the machine's trace function, then sew the colors in color-key order. Watch the first color for shifting.
- Finish. Tear off the loose topping and dab the rest away with a damp cloth. Trim the cut-away to about 1/4 in with rounded corners. Steam any hoop mark from a short distance and brush the nap up with your fingers.
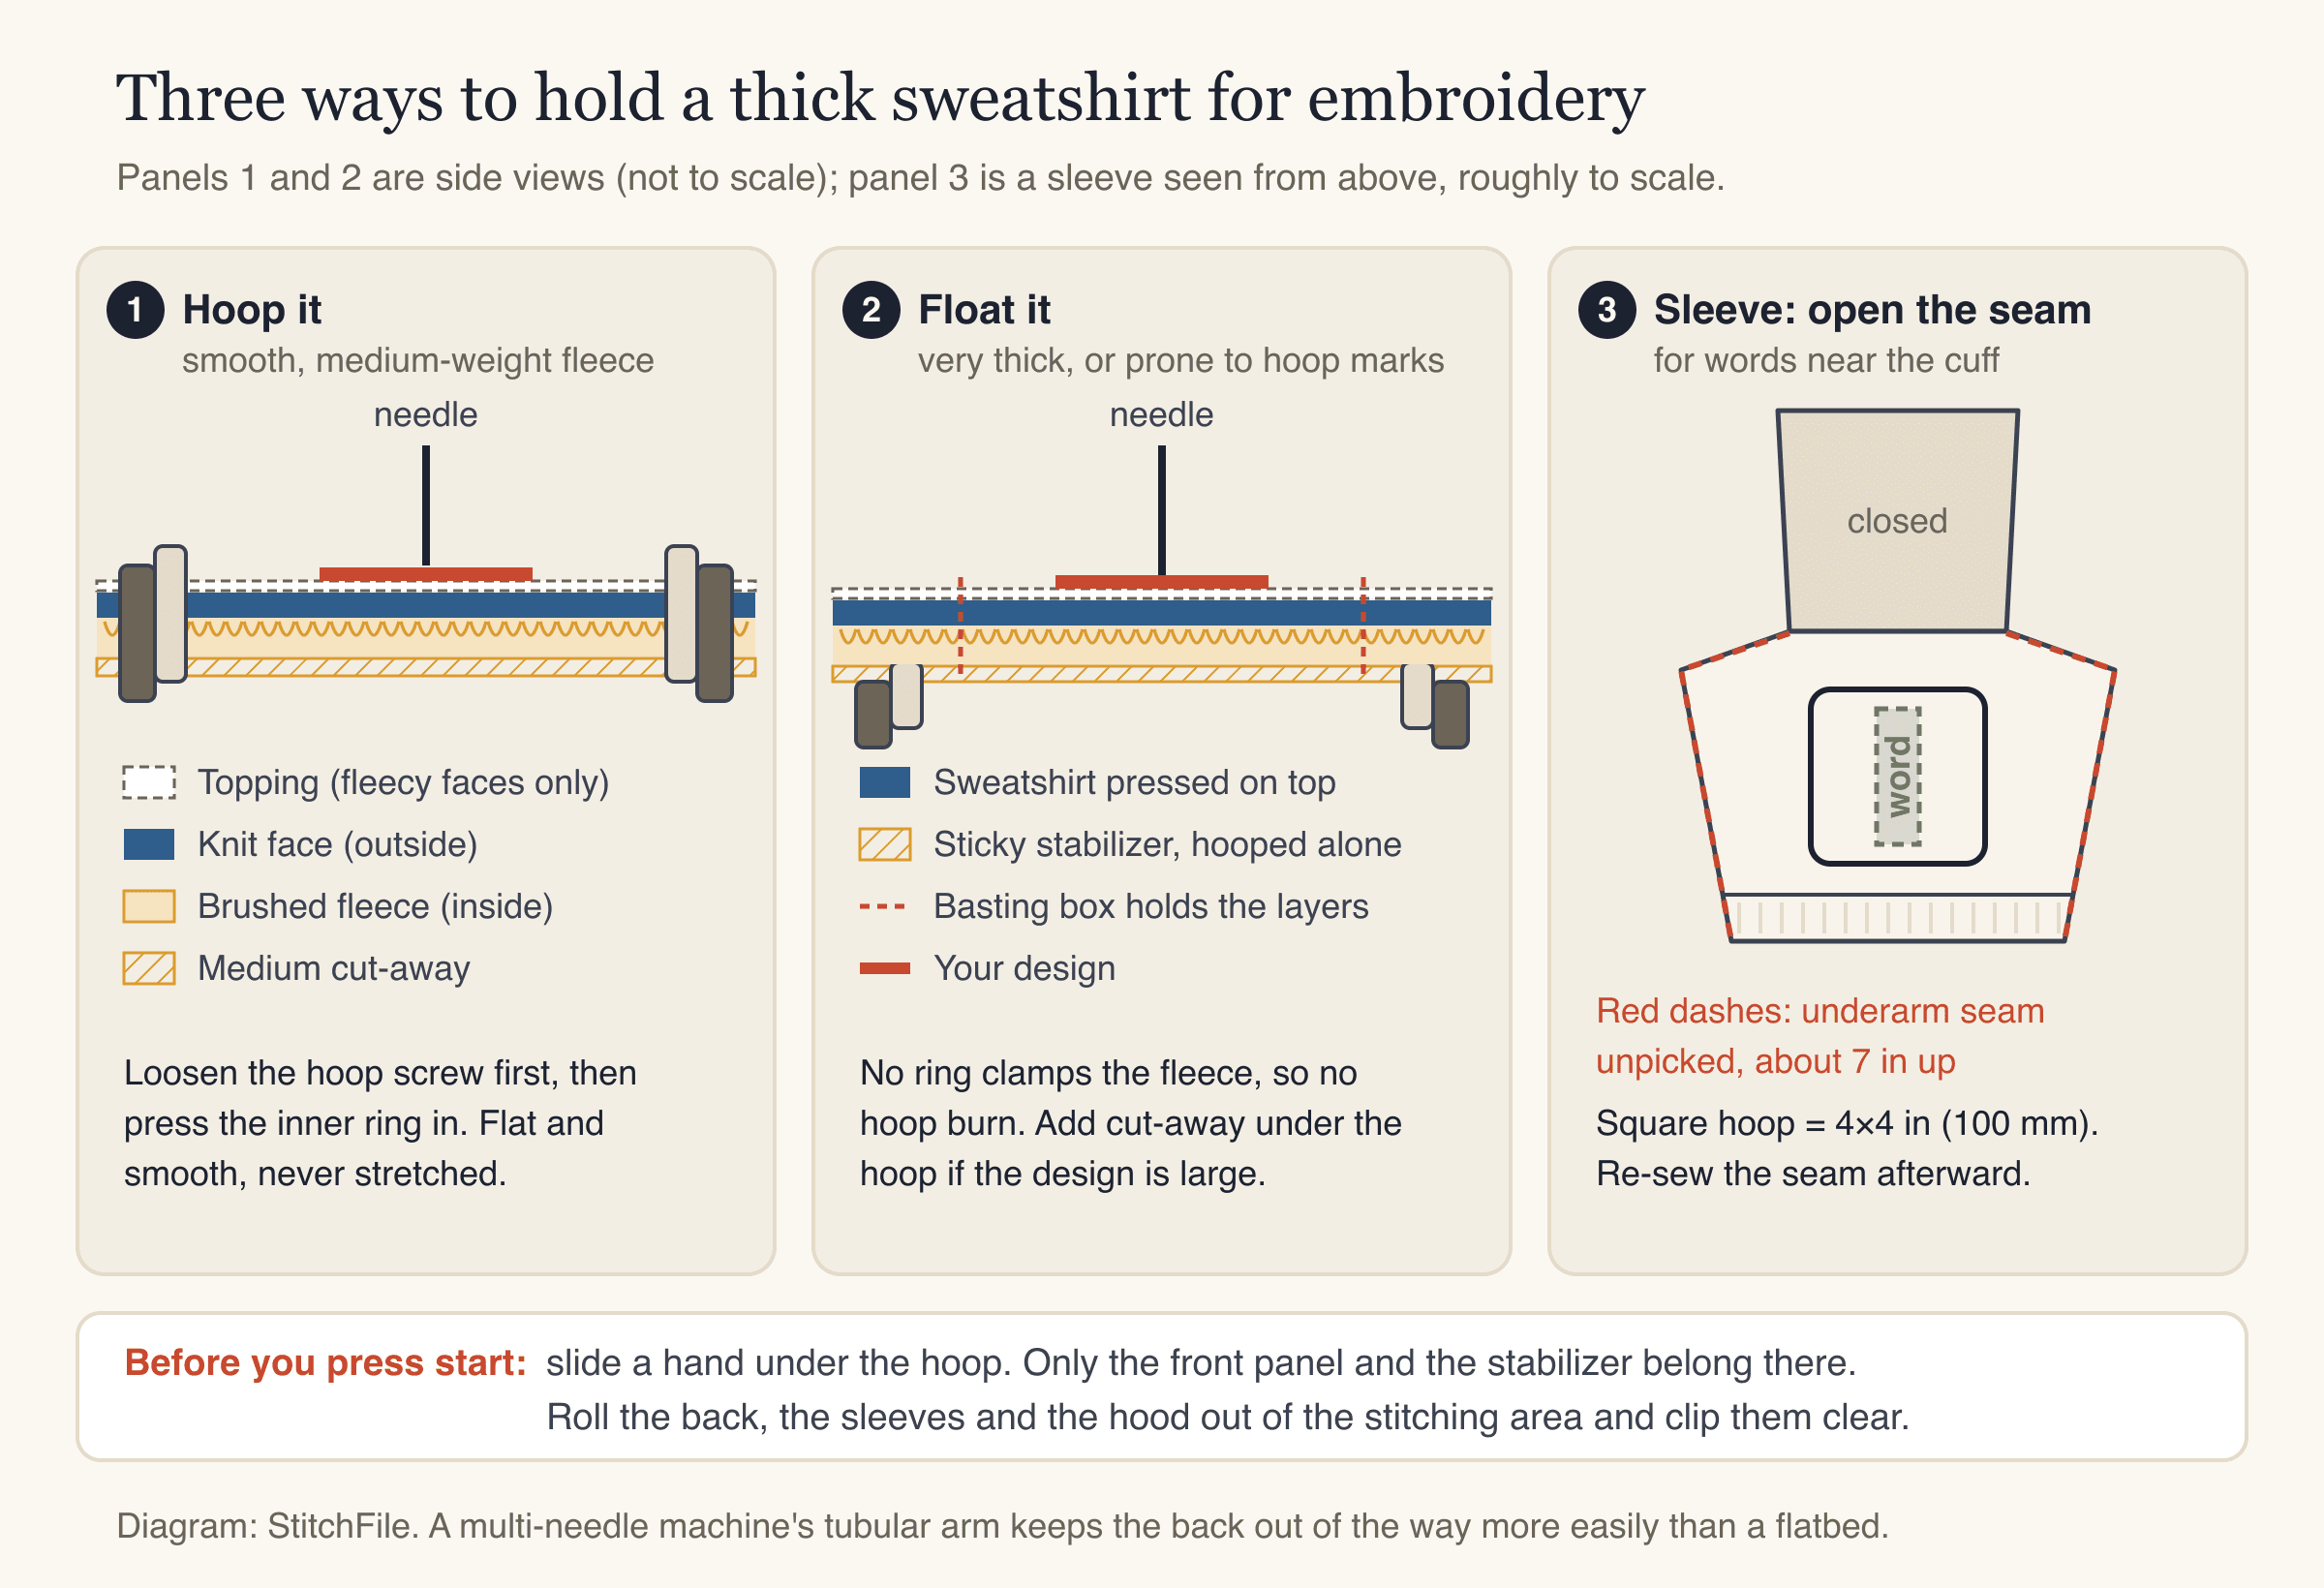
Hoop medium-weight sweatshirts, float the very thick ones, and open the sleeve seam for words near the cuff.
Sleeves and cuff text
A sleeve is a narrow tube, so on a flatbed home machine its underside sits right under the needle. Three ways around it:
- Open the seam. Unpick the underarm seam, through the cuff, for about 7 in, lay the sleeve flat and hoop it in a 4×4 hoop. Re-sew the seam afterward with a stretch stitch or a serger. This is the most reliable way to put a word right above the cuff.
- Float it. For an upper-arm logo, where the sleeve is wider, press the sleeve onto hooped sticky stabilizer and pull the underside away from the stitching area.
- Use a tubular arm. Multi-needle machines have a free arm the sleeve slides over, with small sleeve hoops.
Embroidery on a hoodie
Embroidery on a hoodie follows the same steps, with three parts to work around.
- Front: take out or tie back the drawstrings, then measure the gap between their ends and the pocket top before you size the design. Never hoop across the pocket opening, or you'll stitch it shut.
- Hood: most hoods are two layers. Stitch through both (the bobbin thread shows on the lining, so match it), or unpick a few inches of the hood-to-neckline seam, slip the hoop between the layers and re-sew afterward. Keep hood designs to 50–75 mm.
- Back: with the hood down, check where it hangs and start the design below it.
On zip hoodies, keep designs well away from the zipper; a needle hitting the teeth can break.
How puckering on sweatshirts differs from tees
Tees ripple because thin jersey stretches. Sweatshirts ripple less but have their own problems:
| What you see | Likely cause | Fix |
|---|---|---|
| Shiny, flattened ring around the design | Hoop burn: the rings crushed the nap | Float instead; steam and brush the nap up |
| Gaps between colors, outlines off | The garment's weight dragged the hoop | Support the weight, clip the bulk, fuse the stabilizer |
| Design stiff like a board | Too much dense fill | Smaller size, less fill, T-shirt knit setting on smooth faces |
| Stitches sinking, letters blurry | Fuzzy face without topping | Topping, Towel & fleece setting, bigger letters |
| Loops or skipped stitches | Fabric bouncing with the needle on a loose float | Baste first; larger ballpoint needle |
| Cuff or waistband distorted | Stitched on ribbing | Keep designs off ribs |
Our embroidery stabilizer guide covers how each backing behaves on knits.
Washing and caring for embroidered sweatshirts
- Turn the sweatshirt inside out and wash cold or warm on a gentle cycle.
- Tumble dry low or hang to dry; high heat is hard on fleece and thread.
- Iron on the reverse side or through a cloth, never directly on the stitches.
- If the cut-away feels scratchy, iron a soft fusible backing over the back of the stitches.
Common mistakes
- Choosing the setting by the inside. A fleece lining doesn't make the outside fuzzy.
- Forcing thick fleece into the hoop. Float it instead.
- Stitching through the back. Check under the hoop every time.
- Sizing on the table, not the body. Most first center-chest words sit too low.
- Tiny sleeve names. Under about 6 mm on smooth fleece, or 7 mm on fuzzy fleece, letters blur.
- Huge solid fills. They turn a soft sweatshirt into a stiff panel.
- Skipping the test. Sew the design on scrap fleece with the same stabilizer first.
FAQ
What stabilizer is best for embroidered sweatshirts?
A medium cut-away is the standard choice. It stays in the garment and keeps the design in shape through wear and washing. Add a water-soluble topping if the outside of the sweatshirt is brushed, fuzzy or plush.
How big should embroidery on a sweatshirt be?
A left-chest logo is usually 75–90 mm (3–3.5 in), a center-chest word 180–250 mm (7–10 in) wide, and a sleeve logo 60–80 mm. A center-chest motif often looks best at 90–130 mm. Check your machine's largest hoop before you settle on a size.
How do I embroider on a sweatshirt without hoop burn?
Float it. Hoop a sticky stabilizer on its own, press the sweatshirt onto it and baste around the design, so no ring clamps the fleece. If marks still appear, steam them from a short distance and brush the nap up.
Can I embroider a sweatshirt sleeve on a single-needle machine?
Yes. For a word near the cuff, unpick the underarm seam for a few inches, lay the sleeve flat, hoop it and re-sew the seam afterward. Upper-arm logos can be floated on sticky stabilizer if you keep the underside of the sleeve clear of the needle.
What needle should I use to embroider a sweatshirt?
A ballpoint embroidery needle, commonly 75/11, slips between the knit loops instead of cutting them. On heavy fleece, a larger ballpoint such as 90/14 can stop skipped stitches. Start each project with a fresh needle.
Should I use the knit or fleece setting for a hoodie?
It depends on the outside. A hoodie with a smooth knit face stitches like a knit, so use T-shirt knit. If the outside is brushed, fuzzy or plush, use Towel & fleece and add a water-soluble topping.
Make your sweatshirt design
Pick the spot, measure it on the garment and check the fabric face. Then get a file made for that size and fleece: upload your artwork to StitchFile, choose T-shirt knit or Towel & fleece and your size, and check the free stitch preview, stitch count and smallest hoop before you buy. The download includes all five machine formats and a color key to sew from.