Embroidery guide
Embroidered Blankets: How to Embroider Fleece, Minky and More
How to make an embroidered blanket by machine: placement and sizes, stabilizer and topping for fleece, minky, sherpa and cotton, and handling the weight.
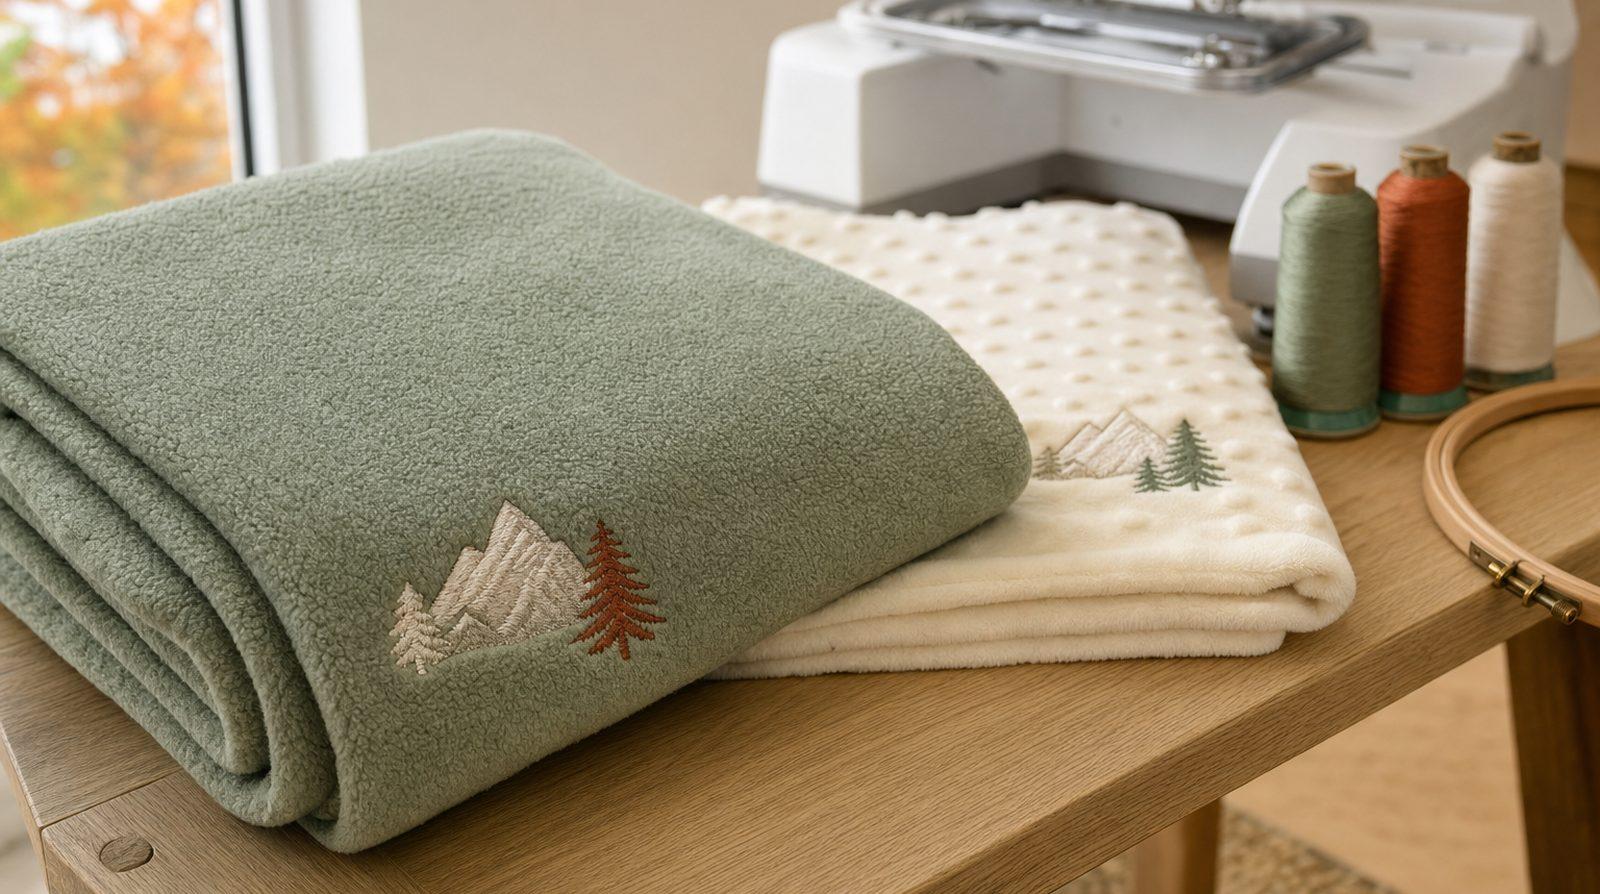
Quick answer: Match the setup to the blanket.
- Fleece, minky, sherpa: a design digitized for plush fabric, cut-away or tear-away underneath, water-soluble topping on top, a 75/11 ballpoint needle.
- Cotton, muslin, quilts: a woven setting, tear-away or a soft cut-away, a 75/11 sharp needle.
- Thick blankets: float them on hooped sticky stabilizer and support the weight on a table so nothing drags the hoop.
- Placement: a corner on the diagonal, about 2–4 in from both edges. Keep designs open so the blanket stays soft.
An embroidered blanket is one of the most satisfying things to make on a home machine: a baby's name on minky, a monogram on a fleece throw, a small moon on a muslin swaddle. It's also the biggest, softest thing most people put under the needle, which brings three problems: stitches sinking into the pile, a hoop dragged off course by the weight, and a stiff patch of thread on a cuddly blanket.
This guide covers what each blanket type needs, where to put the design, how to support the weight, and how to embroider a blanket step by step. Why stitches sink into plush fabric, and how topping fixes it, is explained in our guide to embroidery on towels and fleece, so we won't repeat it here.
Blanket types and what each one needs
Most blankets fall into two groups. Pile fabrics (fleece, minky, sherpa) have a raised surface that swallows stitches, so they need topping and a design digitized for plush fabric. Woven fabrics (cotton, muslin, waffle weave, most quilts) behave like a cotton shirt.
| Blanket | Surface | Stabilizer | Topping | Needle | StitchFile fabric setting |
|---|---|---|---|---|---|
| Polar fleece throw | Brushed knit, low nap, some stretch | Tear-away if thick and stable; cut-away if it stretches | Water-soluble | 75/11 ballpoint | Towel & fleece |
| Minky / plush baby blanket | Short dense pile, stretchy, sheds | Cut-away (no-show mesh), or sticky tear-away when floating | Always | 75/11 ballpoint | Towel & fleece |
| Sherpa | Deep curly pile, smooth back | Cut-away or tear-away | On the pile side | 75/11 ballpoint; 90/14 if thick | Towel & fleece |
| Cotton, muslin, double gauze | Light woven; gauze is loose | Medium tear-away; soft cut-away on gauze | Not needed | 75/11 sharp | Woven |
| Waffle weave | Woven grid of raised cells | Tear-away or soft cut-away | Helps | 75/11 sharp | Woven |
| Quilt | Top, batting, backing | Tear-away; float finished quilts | Usually not | 75/11 sharp; 90/14 if thick | Woven |
| Chunky knit | Big open loops | Not suited to machine embroidery | — | — | Use a patch |
What the table can't show:
- Fleece is the easiest place to start. Most embroidery on fleece blanket throws is done floated rather than hooped, because hoops crush the nap and leave a ring.
- Minky sheds. A cut edge drops fibers everywhere, including into the bobbin area. Shake the edges outside, lint-roll them, and clean the bobbin case afterward. Minky also has a nap direction: stroke it, and one way feels smooth. Decide which way is "down" before marking, so the design is upright when the pile lies smooth.
- Sherpa: embroider the smooth side if the blanket allows it; it sews like fleece. On the curly side, use bold shapes and expect fine detail to disappear.
- Muslin and double gauze are loose, and tearing away stabilizer can pull the threads apart. A soft cut-away, trimmed close, is safer. On waffle weave, topping stops satin edges looking broken by the grid.
- Quilts are easiest to embroider before quilting: stitch the block or top, then layer and quilt. On a finished quilt every stitch goes through the batting and shows on the back, so choose a light design and a bobbin thread that suits the backing.
- Chunky knits don't work: the loops are bigger than a stitch and catch on the presser foot. Stitch a patch and sew it on by hand; our embroidered patches guide shows how.
Where to place the design on an embroidered blanket
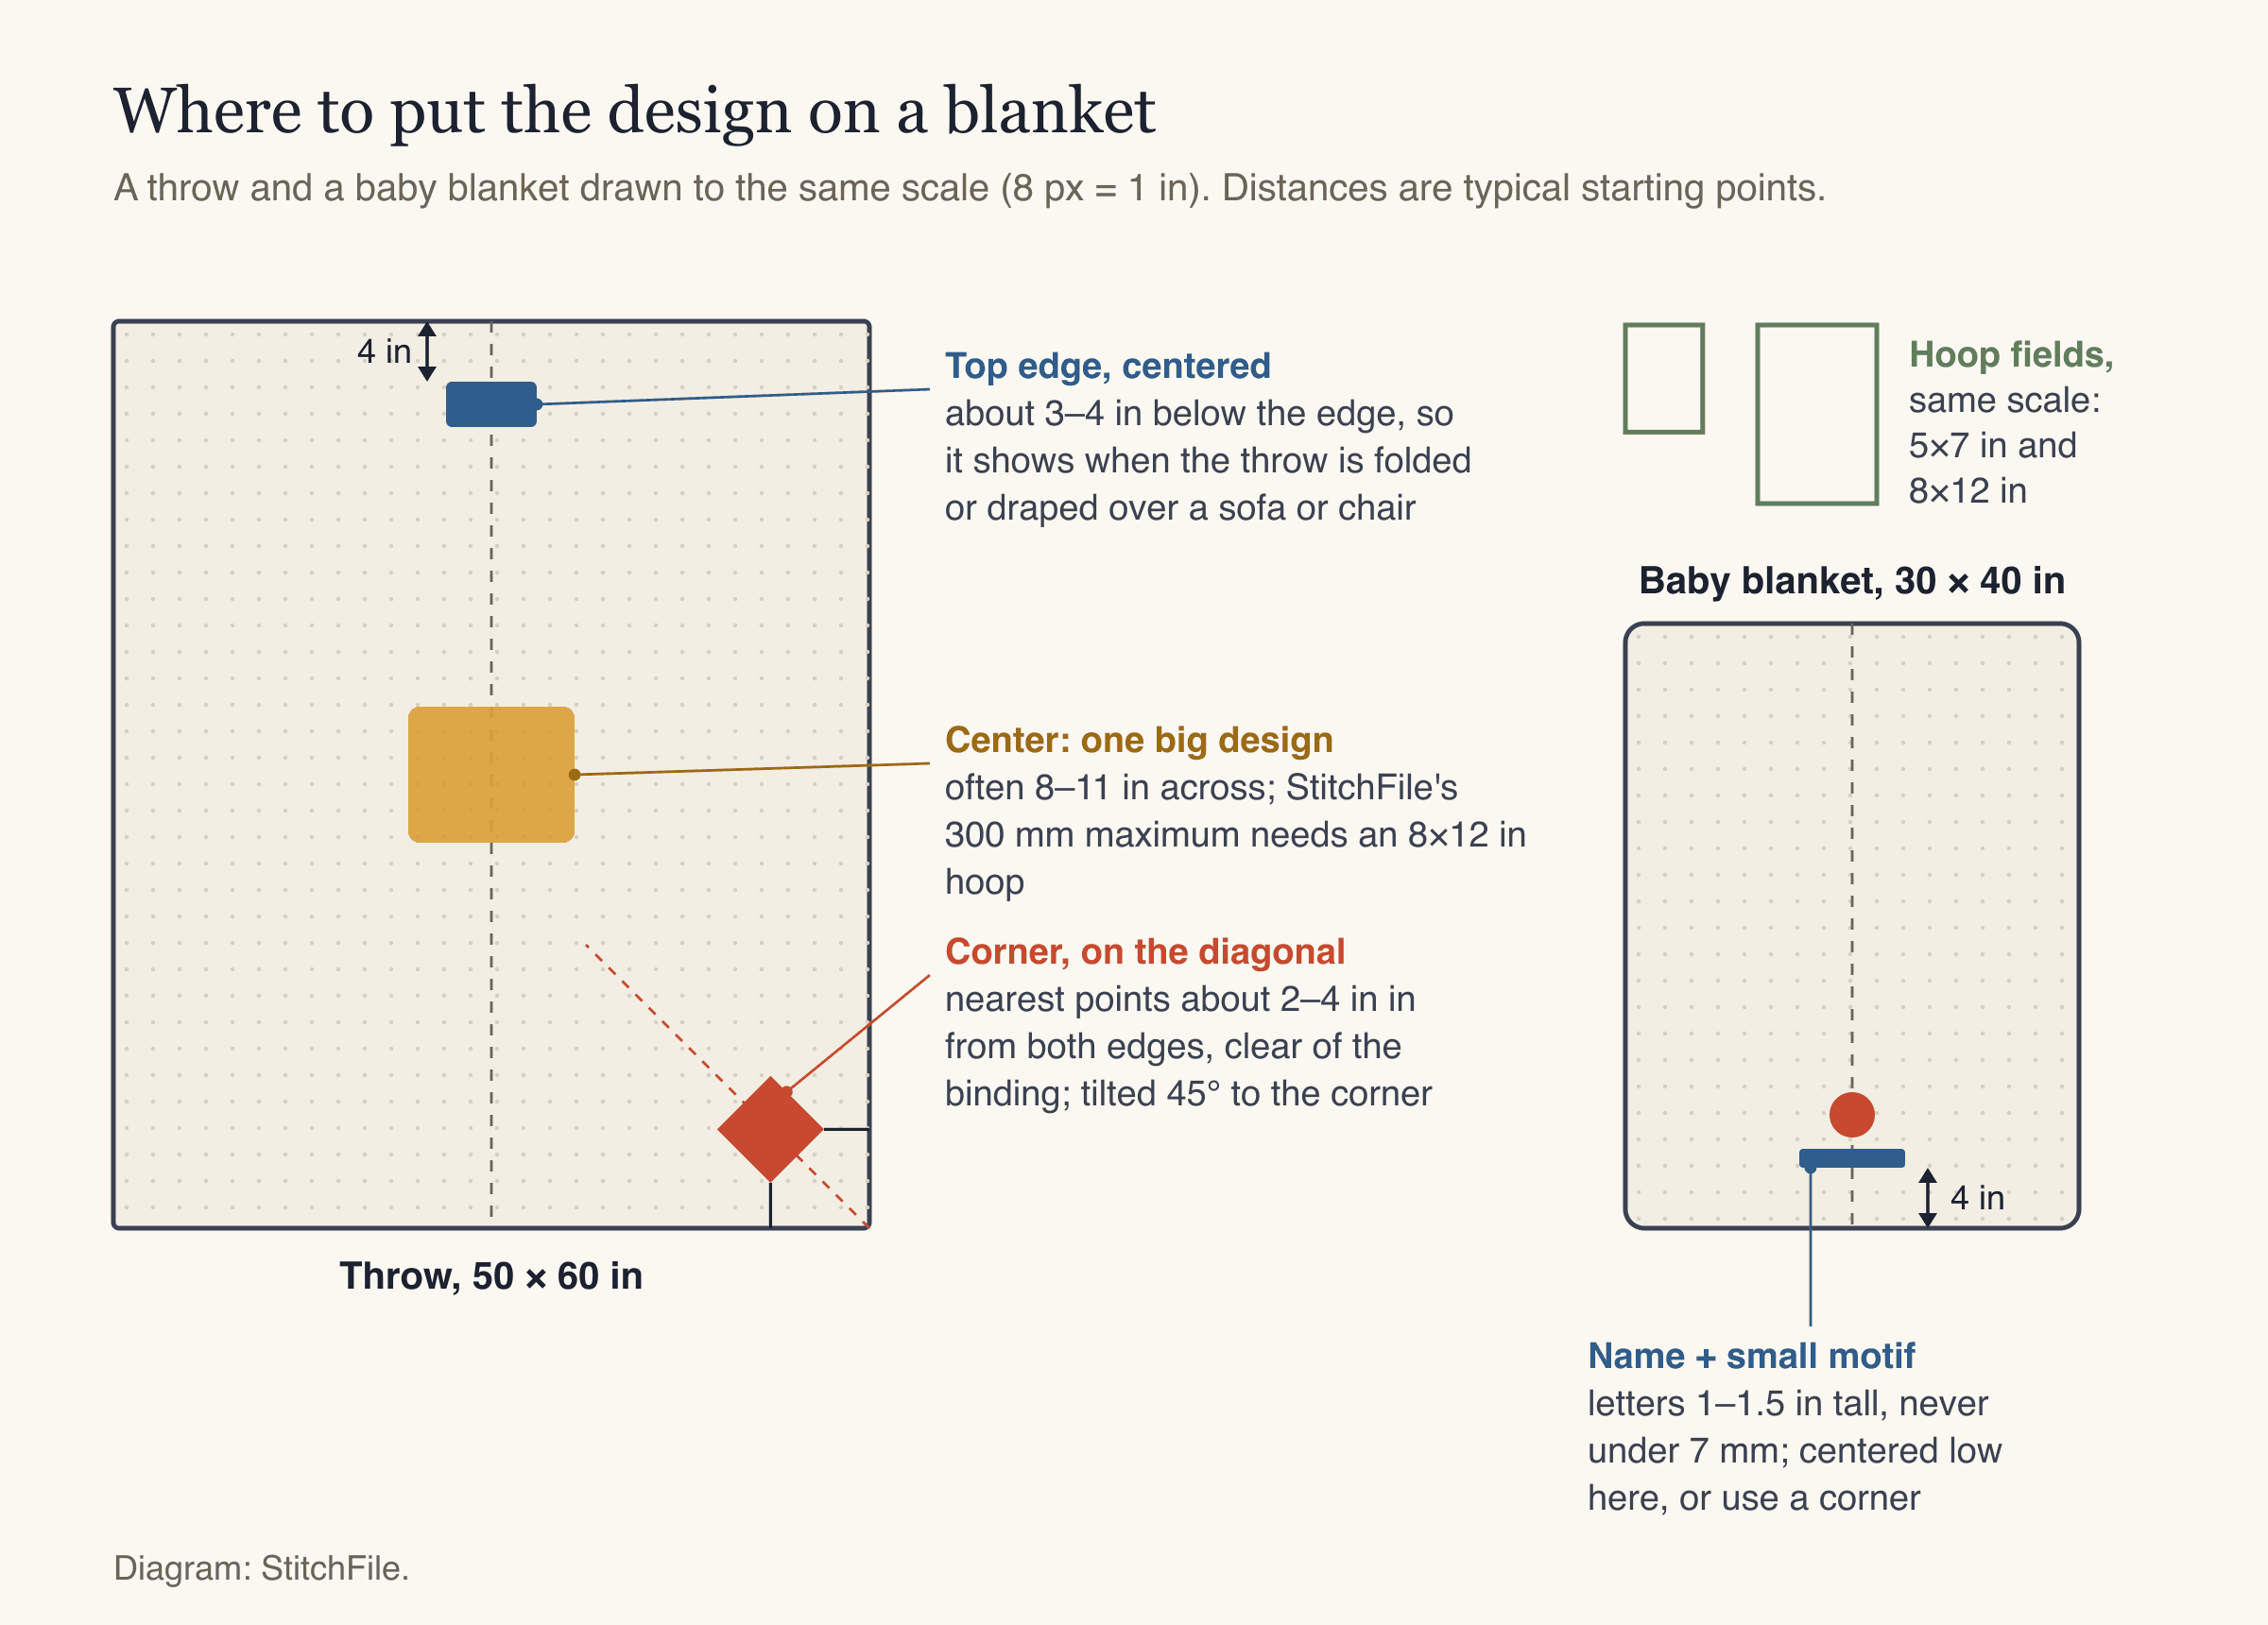
Three classic spots on a throw, plus a name on a baby blanket, drawn to the same scale with 5×7 in and 8×12 in hoop fields for comparison.
| Placement | Typical position | Typical design size | Works for |
|---|---|---|---|
| Corner, on the diagonal | Nearest points about 2–4 in (5–10 cm) from both edges, clear of binding | 4–6 in (100–150 mm) | Throws, baby blankets, gifts |
| Top edge, centered | Top of design about 3–4 in below the edge | 5–8 in wide | Throws folded or draped over a sofa |
| Turned-down top | Centered, 3–4 in below the top edge, stitched upside down | 6–10 in wide | Bed blankets folded back over a duvet |
| Center | Centered on both fold lines | 8–11.8 in (200–300 mm) | One big motif on a throw |
To find the center, fold the blanket and crease it. For a corner, fold the corner in half so the two edges meet: that crease is the diagonal. Mark with a water-soluble pen or chalk.
Blanket sizes vary by brand, so measure yours. Common starting points:
| Blanket | Common size | Design size that usually looks right |
|---|---|---|
| Lovey | 12–16 in square | 3–4 in (75–100 mm) |
| Baby / stroller blanket | about 30 × 40 in | 4–6 in corner motif, or a name 5–7 in wide |
| Muslin swaddle | about 47 × 47 in | 3–5 in corner, kept light |
| Throw | about 50 × 60 in | 5–8 in corner or top edge; up to 300 mm in the center |
| Twin bed blanket and up | 66 × 90 in and larger | 6–10 in at the turned-down top |
Your hoop sets the real limit: a 5×7 in hoop sews about 130 × 180 mm, an 8×12 about 200 × 300 mm. See embroidery hoop sizes.
Names on baby blankets
- Letter height: at least about 7 mm on fleece and minky to stitch cleanly, but that's a floor. For a name you can read across a room, 1–1.5 in (25–40 mm) letters are typical.
- Letter style: bold block letters or a thick script. Hairline scripts sink into the pile. See embroidery lettering and fonts.
- Sibling sets: keep the letter height the same and let each name's width vary.
How to support a heavy blanket while it sews
The embroidery arm is built to move a hoop, not a few pounds of fleece. If the blanket hangs off the table, its weight pulls the hoop, outlines stop lining up, and the hoop can even pop off its mount.
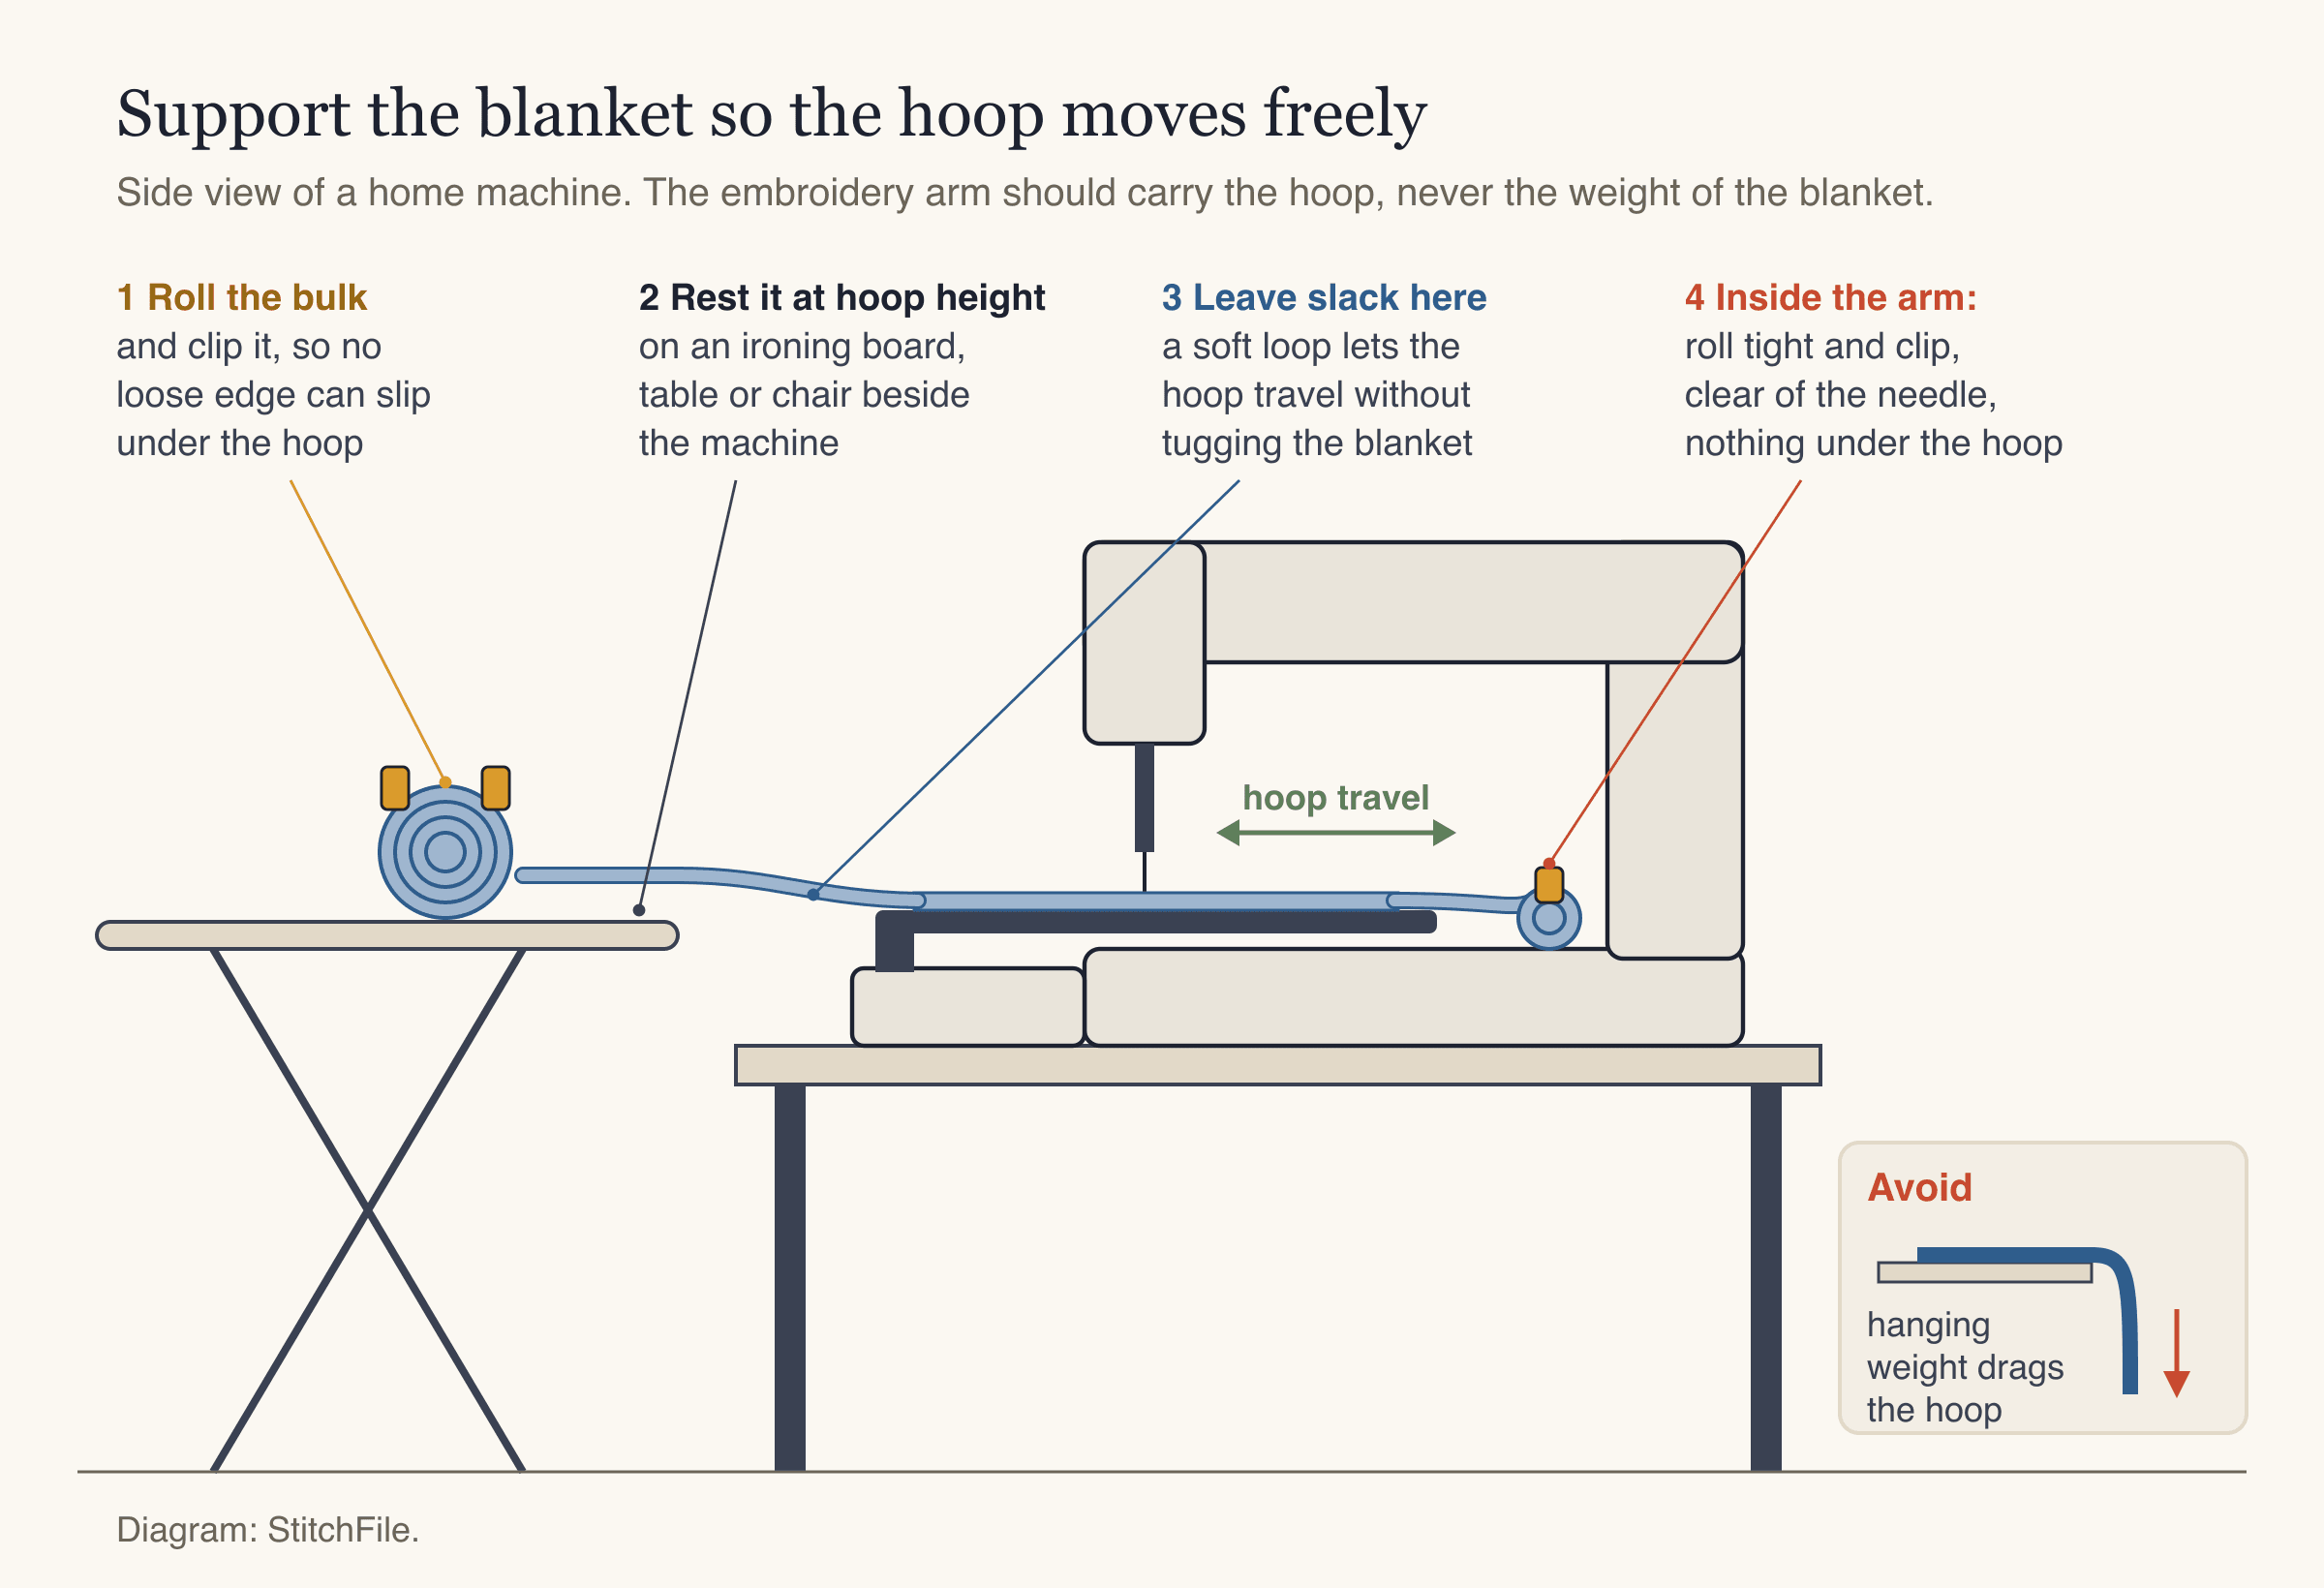
Support the bulk at hoop height and leave a soft loop of slack, so the hoop can travel freely.
- Roll and clip the bulk into tight logs so nothing can flop under the hoop.
- Rest it at hoop height on an ironing board, a second table or a chair beside the machine.
- Leave slack between the support and the hoop; a tight blanket tugs on every hoop move.
- Keep the arm clear: anything inside the machine's arm is rolled tight, clipped and away from the needle.
- Stay close while the first color sews.
Hoop it or float it?
Hooping clamps blanket and stabilizer together between the hoop rings. Floating means you hoop only the stabilizer and attach the blanket on top with sticky stabilizer, temporary spray adhesive or a basting stitch.
| Method | Use it for | Watch out for |
|---|---|---|
| Hoop blanket + stabilizer | Thin cotton, muslin, quilt blocks, thin fleece | Don't stretch it; check the back for folds |
| Float on sticky tear-away | Thick fleece, minky, sherpa, finished quilts, corners | Press down firmly; sew a basting box |
| Float on cut-away + spray adhesive | Stretchy minky and fleece where the stabilizer stays | Spray lightly, away from the machine |
Floating avoids hoop burn (a ring of crushed pile left by the hoop) and makes corners easy, since the corner never has to fit between the rings.
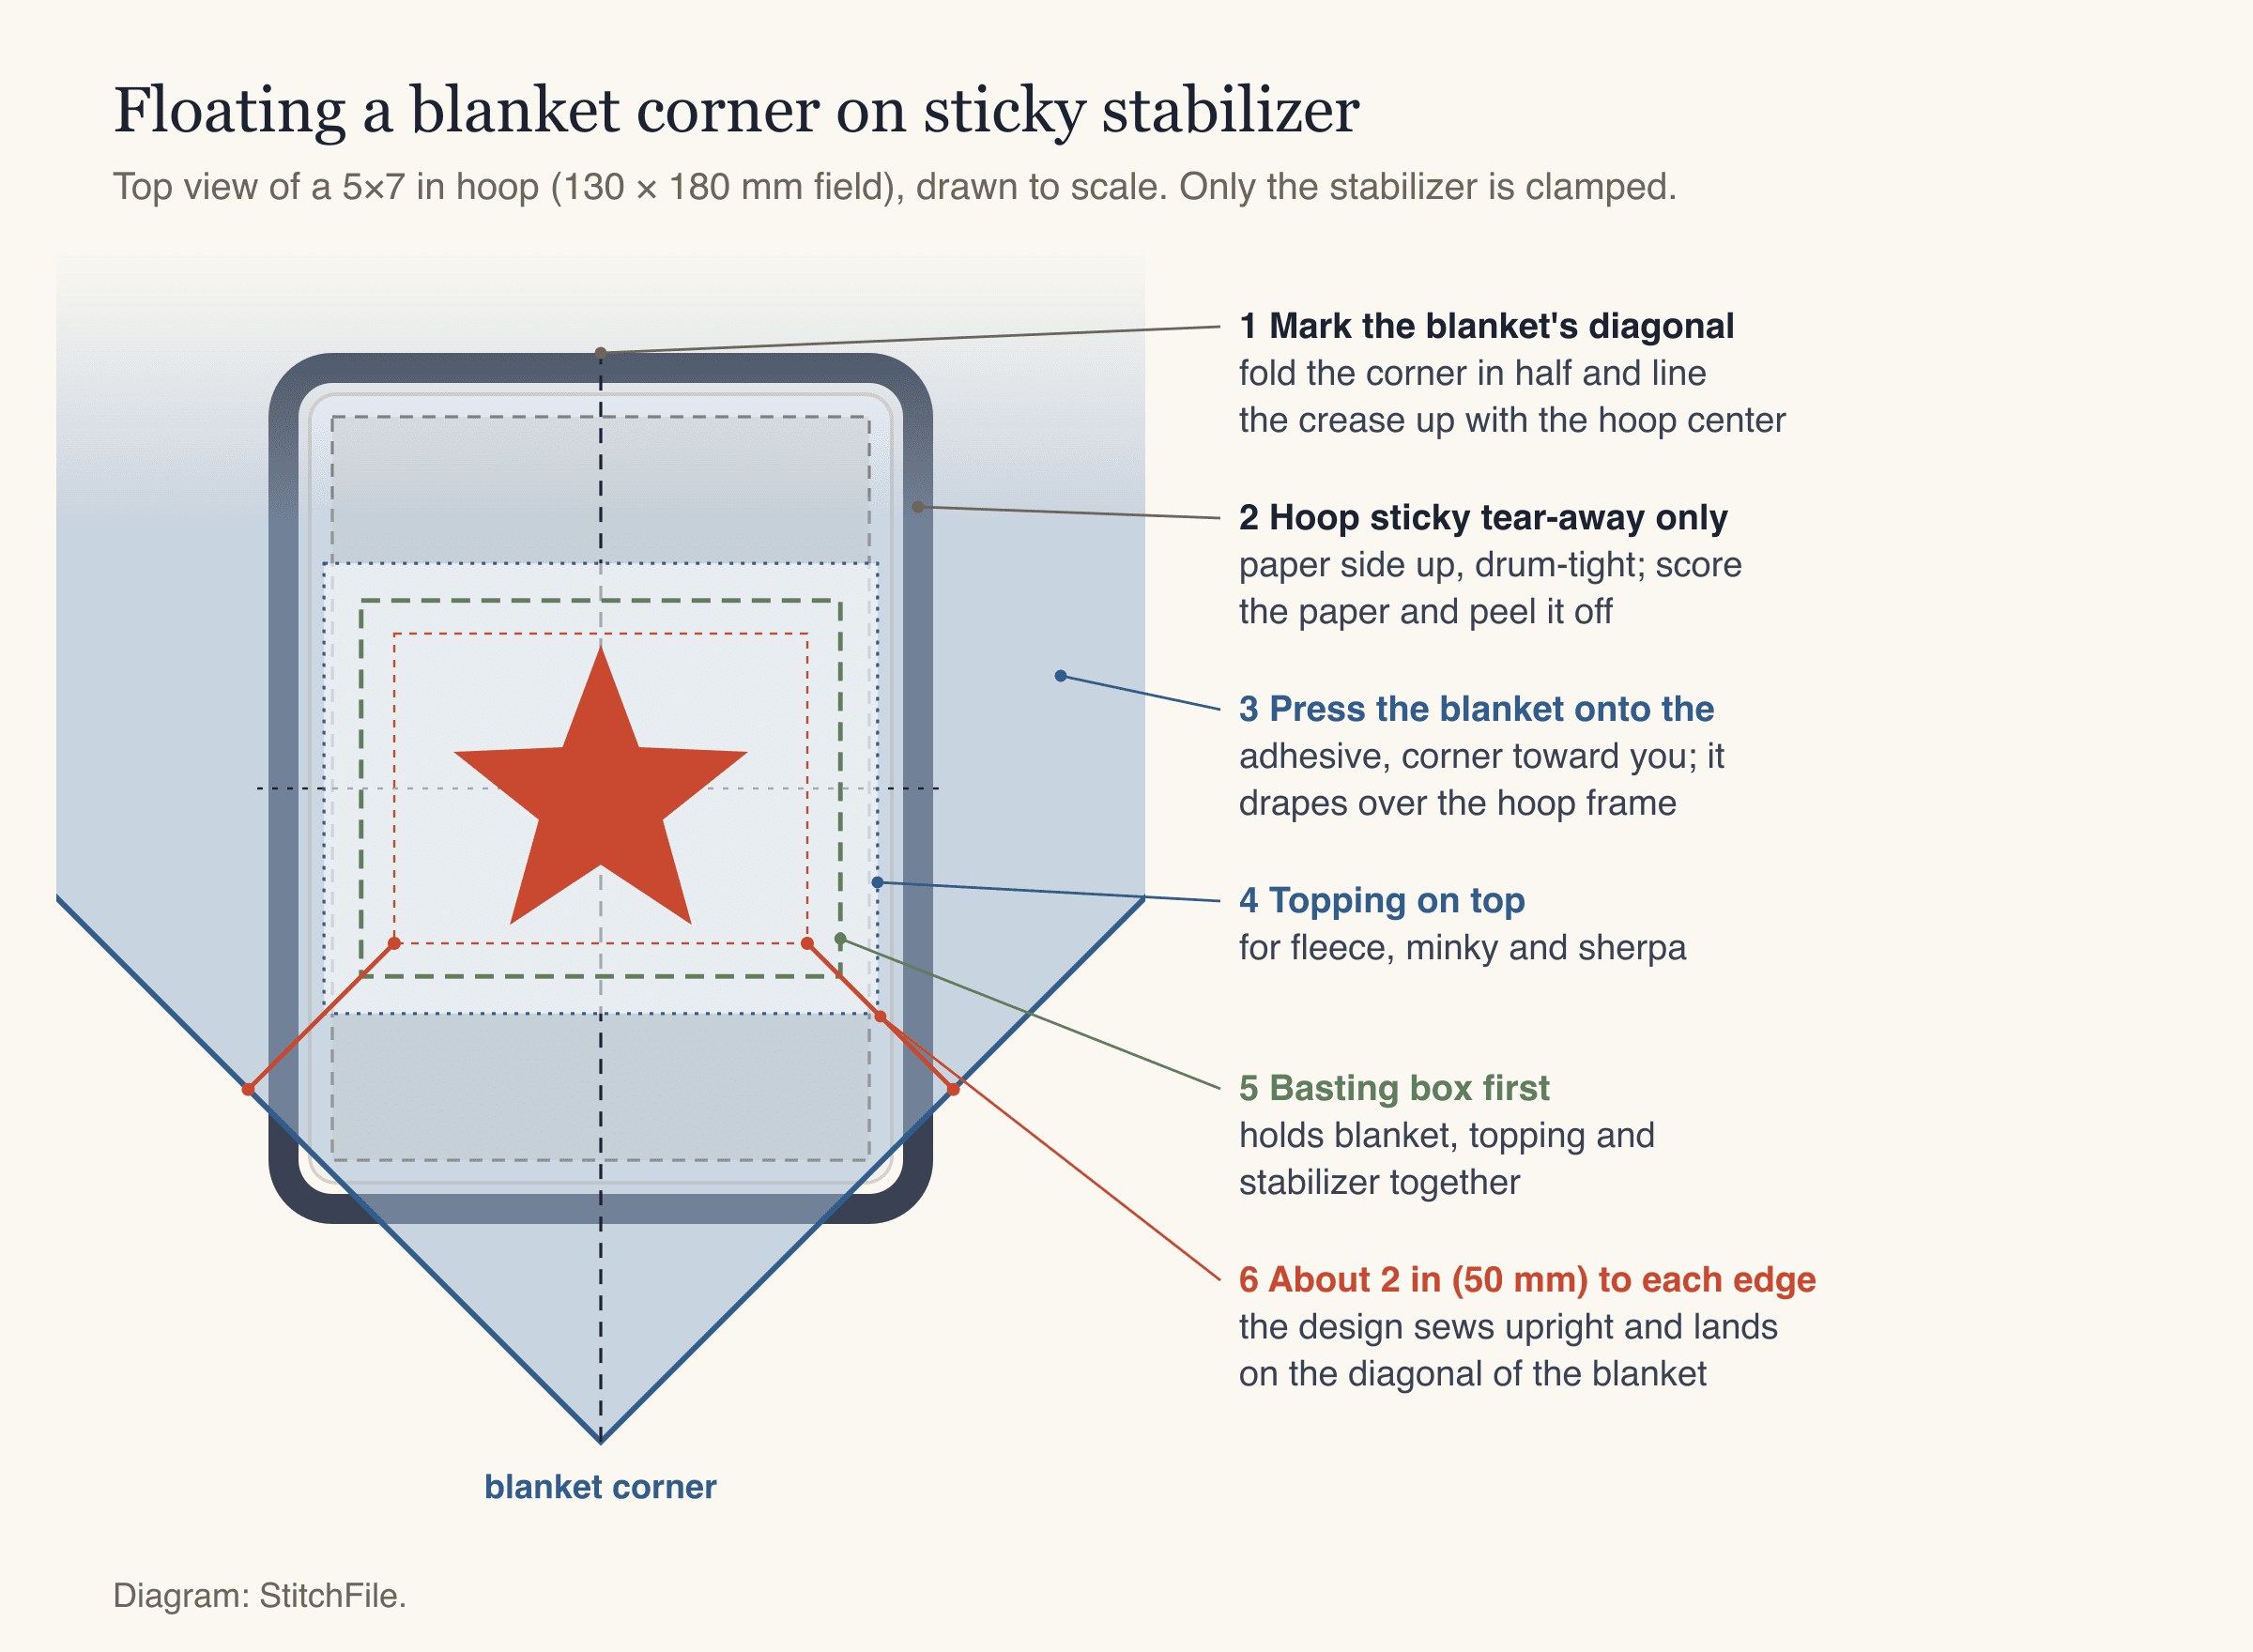
Floating a corner: line the blanket's diagonal up with the hoop's center line and an upright design lands on the diagonal, with no need to rotate the file.
Stabilizer: what goes behind the design
The embroidery stabilizer guide explains each type. For blankets, four questions decide it:
- Does it stretch? Minky and stretchy fleece get cut-away, which keeps supporting the stitches wash after wash. Thick fleece, firm cotton and quilts can use tear-away.
- Is there pile? Then add water-soluble topping on top, every time.
- Will the back show? On a single-layer reversible blanket, use a fibrous wash-away stabilizer that dissolves completely, and a bobbin thread that suits the back. Heat-away stabilizer is removed with an iron, so keep it for cotton; never use it on polyester fleece, minky or sherpa.
- Will it touch a baby's skin? The back of embroidery can feel scratchy. The cleanest fix is a lined blanket: embroider the front panel, then sew it to the backing so the stitches are hidden. On a single layer, trim cut-away to about 1/4 in with rounded corners, or fuse a soft cover-the-back backing on low heat through a press cloth, after testing on scrap.
Choosing a design that keeps the blanket soft
A blanket should drape. A large, dense fill turns into a stiff, heavy patch, and on a baby blanket it's the scratchiest part. Good blanket designs:
- use satin outlines and smaller filled areas, with blanket showing between shapes;
- stay bold, with no hairline running-stitch lines that vanish into pile;
- keep big designs open: a 10 in solid fill on a throw feels like a placemat;
- use few colors, so repeat orders sew quickly.
If a design is mostly one big fill, sew it smaller, or leave that part unstitched on a blanket of a similar color.
Getting a blanket-ready file
In StitchFile, upload your artwork as SVG, PNG or JPG and choose Towel & fleece for fleece, minky and sherpa, or Woven for cotton, muslin and quilts. Towel & fleece tunes density and pull compensation for plush fabric and recommends tear-away plus water-soluble topping. The upload also asks for the blanket color, so thread choices suit it.
Sizes run from 20 to 300 mm on the longest side, and the preview shows the smallest hoop the design fits, up to 8×12 in. If lettering is under the 7 mm minimum for towel and fleece, the preview warns you and suggests a size that works. There's no text tool, so a name has to be part of the artwork you upload: set it in any design program, convert the text to outlines (or save a large, sharp PNG), and place it with the motif. The size you enter is the longest side, which for a name is usually its width.
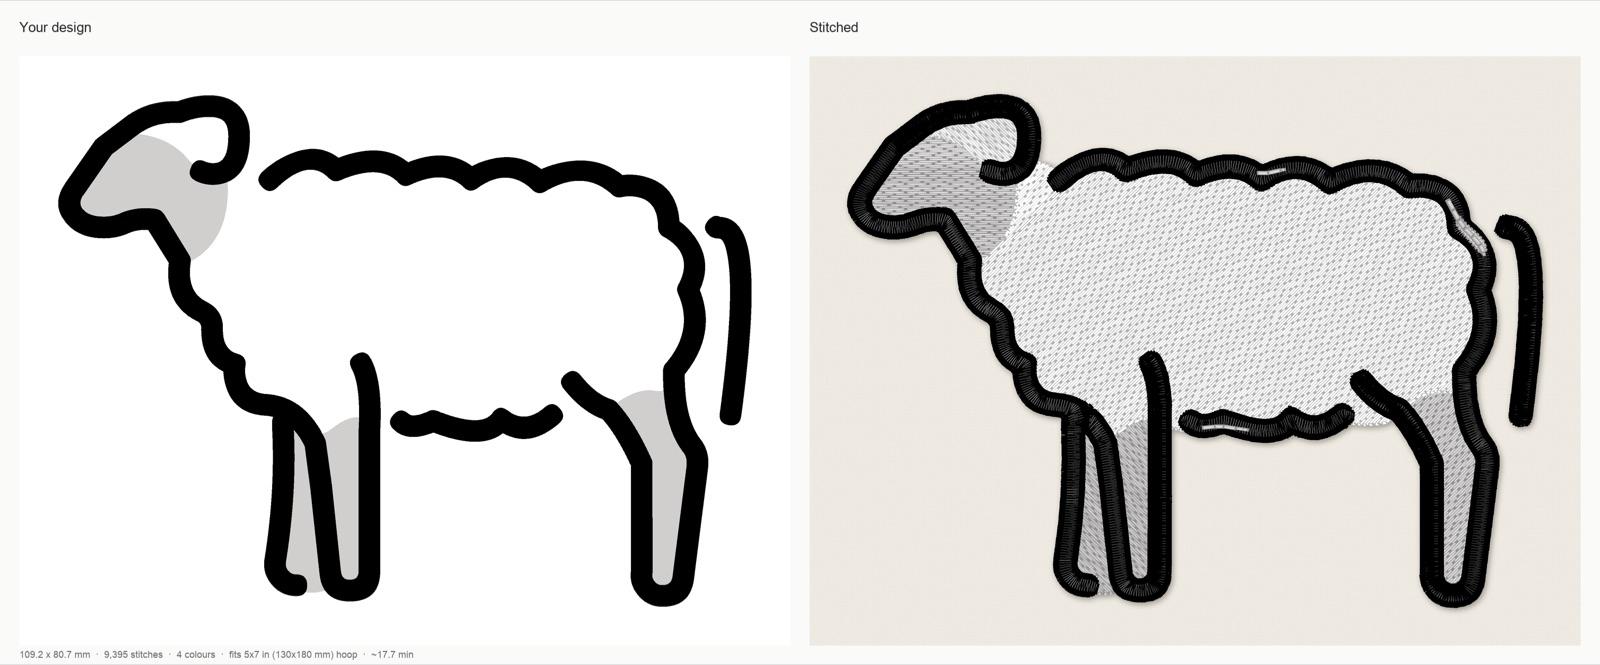
StitchFile stitch preview: a sheep at 110 mm with the Towel & fleece setting. The report for this run: 109.2 × 80.7 mm, 9,395 stitches, 4 colors in sewing order (Warm Gray is used twice), 28 trims, about 17.7 minutes at 700 stitches per minute, fits a 5×7 in (130×180 mm) hoop. Recommended stabilizer: tear-away plus water-soluble topping.
Artwork: OpenMoji ewe, CC BY-SA 4.0. StitchFile converted the artwork into the stitch preview shown here; these adaptations are shared under the same license.
The preview is free; a download includes PES, DST, JEF, EXP and VP3 plus a thread color key, so it runs on Brother, Janome, Husqvarna Viking, Pfaff, Bernina or multi-needle machines.
How to embroider a blanket, step by step
This is the floating method for a corner design on fleece or minky. For cotton or a quilt, skip the topping and use the stabilizer from the table above.
- Pre-wash cotton and muslin if the blanket will be washed, so it shrinks before you stitch.
- Prepare the file. Size it for the blanket and your hoop, load it, and check the orientation on screen.
- Mark the blanket. Find the nap on minky or fleece. Fold the corner in half, crease the diagonal, and mark the design center 2–4 in in from both edges.
- Hoop the stabilizer. Hoop sticky tear-away paper side up, drum-tight, then score and peel the paper. For stretchy minky, hoop cut-away and mist it with temporary adhesive instead.
- Line up the blanket. Corner toward you, crease on the hoop's center line, center mark on the hoop's center. Press it down from the middle outward without stretching.
- Add topping over the design area, a little larger than the design.
- Roll and support the rest at hoop height, with slack near the hoop.
- Fit a fresh needle: 75/11 ballpoint for fleece and minky, 75/11 sharp for cotton. See our embroidery machine needles guide.
- Baste first. Run the machine's basting box to hold blanket, topping and stabilizer together.
- Sew and watch. Slow down a little on thick blankets; stop if the blanket lifts, folds under the hoop or drags.
- Remove the backing. Take out the basting, unhoop, and tear away the stabilizer while holding the stitches with your thumb, or trim cut-away about 1/4 in from the design.
- Remove the topping. Tear off the excess, dab the rest with a damp cloth or rinse it out, and air dry.
Test the setup on a scrap of the same fabric first.
Pressing and care
Never iron fleece, minky or sherpa directly. They're polyester, and heat can flatten or melt the pile for good. If you must press, work from the back on a low synthetic setting through a press cloth, or skip it and fluff the pile with your fingers. Cotton and muslin can be pressed from the back on a towel so the stitches stay raised.
Wash on a gentle cycle and dry on low or air dry, following the blanket's care label. Polyester embroidery thread holds its color well through frequent washing, which matters on baby blankets.
Common mistakes with embroidered blankets
| Mistake | What you see | Fix |
|---|---|---|
| No topping on pile | Pile poking through, sunken letters | Water-soluble topping on fleece, minky and sherpa |
| Blanket hanging off the table | Outlines out of line, hoop knocked loose | Roll, clip and support the bulk at hoop height |
| Stretching minky in the hoop | Puckering once it relaxes | Float it, without stretching |
| Huge solid fill | A stiff, heavy patch | Open design, smaller fills or a smaller size |
| Thin script name | Unreadable name | Bold letters, 1–1.5 in tall, never under 7 mm |
FAQ
What stabilizer should I use for an embroidered fleece blanket?
Thick, stable fleece works with a medium tear-away; thinner or stretchy fleece needs cut-away so the design doesn't distort in the wash. Use water-soluble topping on top either way. Floating the fleece on sticky stabilizer avoids hoop burn on the nap.
Do I need topping when embroidering minky?
Yes. Minky's pile pushes up between the stitches and hides edges and small lettering. Water-soluble topping holds the pile down while the design sews, then tears off and rinses away.
Where do you put embroidery on a blanket?
The classic spot is a corner, on the diagonal, with the design about 2–4 in from both edges. Throws also suit a design centered 3–4 in below the top edge, and big motifs can go in the center. Bed blankets that fold back get the design upside down at the top so it reads correctly when turned down.
How big should a name be on a baby blanket?
Letters about 1–1.5 in (25–40 mm) tall read well, which usually makes the name 5–7 in wide. Never go below about 7 mm letter height on fleece or minky, and choose bold letters over thin scripts.
How do you embroider a thick blanket without hooping it?
Float it. Hoop sticky tear-away on its own, peel off the paper, press the blanket onto it, add topping and sew a basting box before the design. Roll and support the rest so its weight doesn't pull on the hoop.
Can you machine embroider a chunky knit blanket?
Not reliably. The loops are bigger than a stitch, they catch on the presser foot, and there's no solid surface for the design. Stitch an embroidered patch on stable fabric and sew it on by hand instead.
Make your blanket design
Pick the blanket, decide the placement, then get a file that suits the fabric. Upload your motif or name artwork at stitchfile.app/convert, choose Towel & fleece for fleece, minky and sherpa or Woven for cotton and quilts, and set the size. In about 20 seconds you'll see a free stitch preview, the hoop it needs and any lettering that's too small, with PES, DST, JEF, EXP and VP3 included if you download.