Embroidery guide
Embroidery Machine Needles: Sizes, Types and When to Change
Embroidery machine needles explained: what sizes like 75/11 and 90/14 mean, sharp vs ballpoint points, titanium needles and when to change them.
Quick answer:
- Start with a 75/11 embroidery needle for 40 weight thread on most fabrics. Go up to 90/14 for denim, canvas and structured caps, and down to 65/9 for fine fabric and 60 weight thread.
- Use a ballpoint for knits (t-shirts, polos, sweatshirts) and a sharp point for tightly woven fabric.
- Change the needle about every 8–10 hours of stitching, and right away if it hits the hoop, bends, or you see shredding, skipped stitches or holes, or hear a punching sound.
- Home machines take flat-shank needles; many commercial multi-needle machines take round-shank needles. Your manual says which.
Embroidery machine needles are the cheapest part of the setup and the cause of a surprising share of problems. A worn or wrong needle shreds thread, skips stitches, punches holes in knits and thumps its way through heavy fabric. Get the size, the point and the timing right, and most of those problems go away before you start chasing tension or blaming the file.
Hand embroidery needles vs machine embroidery needles
A search for "embroidery needles" turns up two different products. Hand embroidery needles (crewel, chenille and tapestry) have the eye at the top, and a higher size number means a finer needle. Machine embroidery needles have the eye just above the point and a thick shank that clamps into the machine. They aren't interchangeable. The rest of this guide is about machine needles.
How embroidery machine needles differ from sewing needles
Every machine needle has the same parts, from top to bottom:
- Shank: the thick top that goes into the needle clamp. On home machines it has one flat side.
- Shaft (blade): the long, thin body. Its diameter is the needle size.
- Long groove: a channel down the front that shelters the thread as the needle goes down.
- Scarf: a scooped-out area on the back, just above the eye, that lets the machine's hook pass close and catch the thread loop.
- Eye: the hole the thread runs through.
- Point: the tip, sharp or rounded.
Our machine embroidery for beginners guide has a labelled drawing of these parts.
Embroidery needles change a few of them. The eye is larger and the groove deeper, because fine, slippery embroidery thread runs through the needle hundreds of times a minute, often for an hour or more. Less friction means less shredding. The scarf is shaped so the hook picks up the loop reliably while the hoop moves in every direction, which cuts skipped stitches. Many embroidery needles also have a slightly rounded point that suits both wovens and knits, and some have a wear-resistant coating.
A regular sewing needle will stitch embroidery, but expect more thread breaks.
Embroidery needle sizes: what 75/11 means
75/11 means metric size 75 and US size 11. The metric number is the shaft diameter in hundredths of a millimeter, so a 75 is 0.75 mm across and a 90 is 0.90 mm. The US number is an older scale that rises with it. Both describe the same needle.
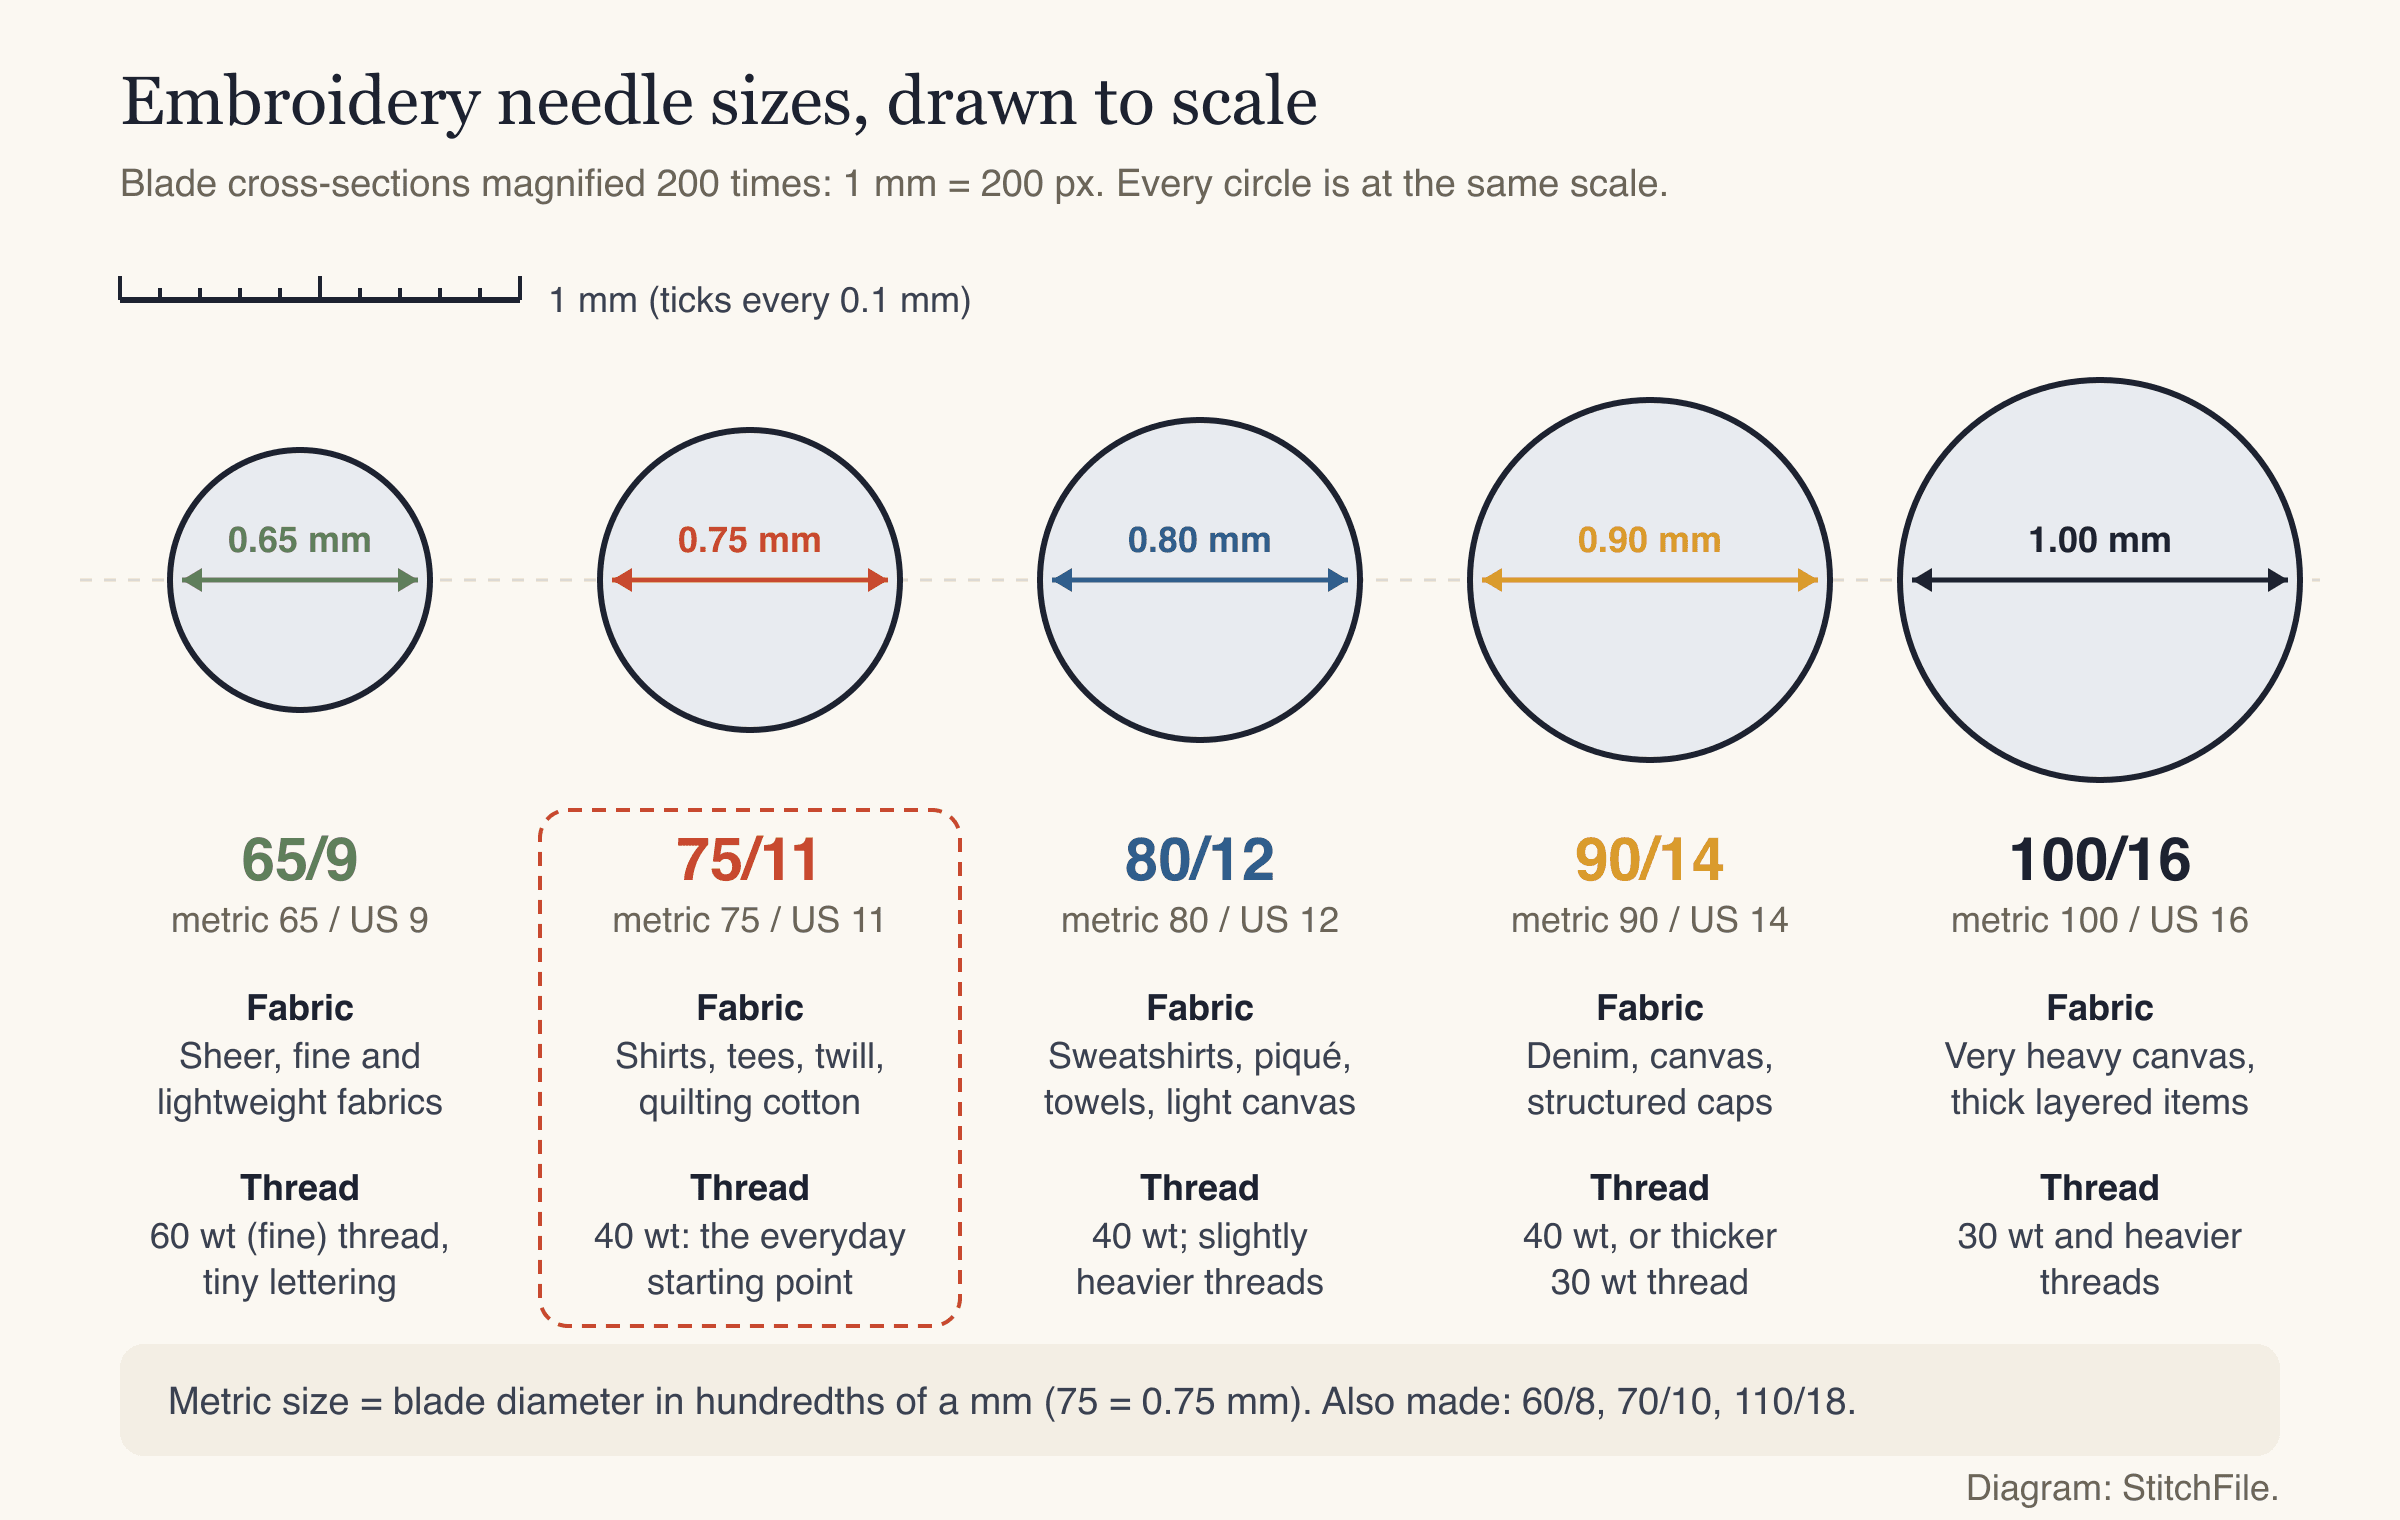
Five common embroidery needle sizes at the same scale. A 90/14 is 20% thicker than a 75/11, which shows on a fine knit.
Two things decide the embroidery needle size you need:
- The thread. The eye has to let the thread run freely. Standard 40 weight embroidery thread runs well in a 75/11. Thicker thread (a lower weight number, such as 30 wt) needs a bigger needle; fine 60 wt thread for tiny lettering suits a smaller one. Metallic thread is happier in a metallic needle or one size up. The machine embroidery thread guide covers thread weights.
- The fabric. Heavy, dense fabric needs a stiffer needle that won't deflect or break. Fine fabric needs a thinner one that leaves a smaller hole.
| Size (metric/US) | Diameter | Typical fabrics | Typical thread |
|---|---|---|---|
| 65/9 | 0.65 mm | Sheer and fine wovens, lightweight knits | 60 wt; fine 40 wt |
| 70/10 | 0.70 mm | Fine jersey, lightweight shirting | 40 wt or 60 wt |
| 75/11 | 0.75 mm | Most shirts, t-shirts, polos, quilting cotton, twill, soft caps | 40 wt (the usual starting point) |
| 80/12 | 0.80 mm | Heavier knits, sweatshirts, piqué, towels, light canvas | 40 wt; slightly heavier threads |
| 90/14 | 0.90 mm | Denim, canvas, structured caps, heavy jackets | 40 wt or 30 wt |
| 100/16 | 1.00 mm | Very heavy canvas, thick layered items | 30 wt and heavier |
Treat the table as a starting point. If 75/11 shreds thread on a dense design, try 80/12. If 90/14 leaves visible holes around the stitches, go down a size.
Point types: sharp, light ballpoint, medium ballpoint
The point decides what happens when the needle meets the fabric. A woven is threads crossing over and under each other, packed tight. A knit is rows of loops. They want different points.
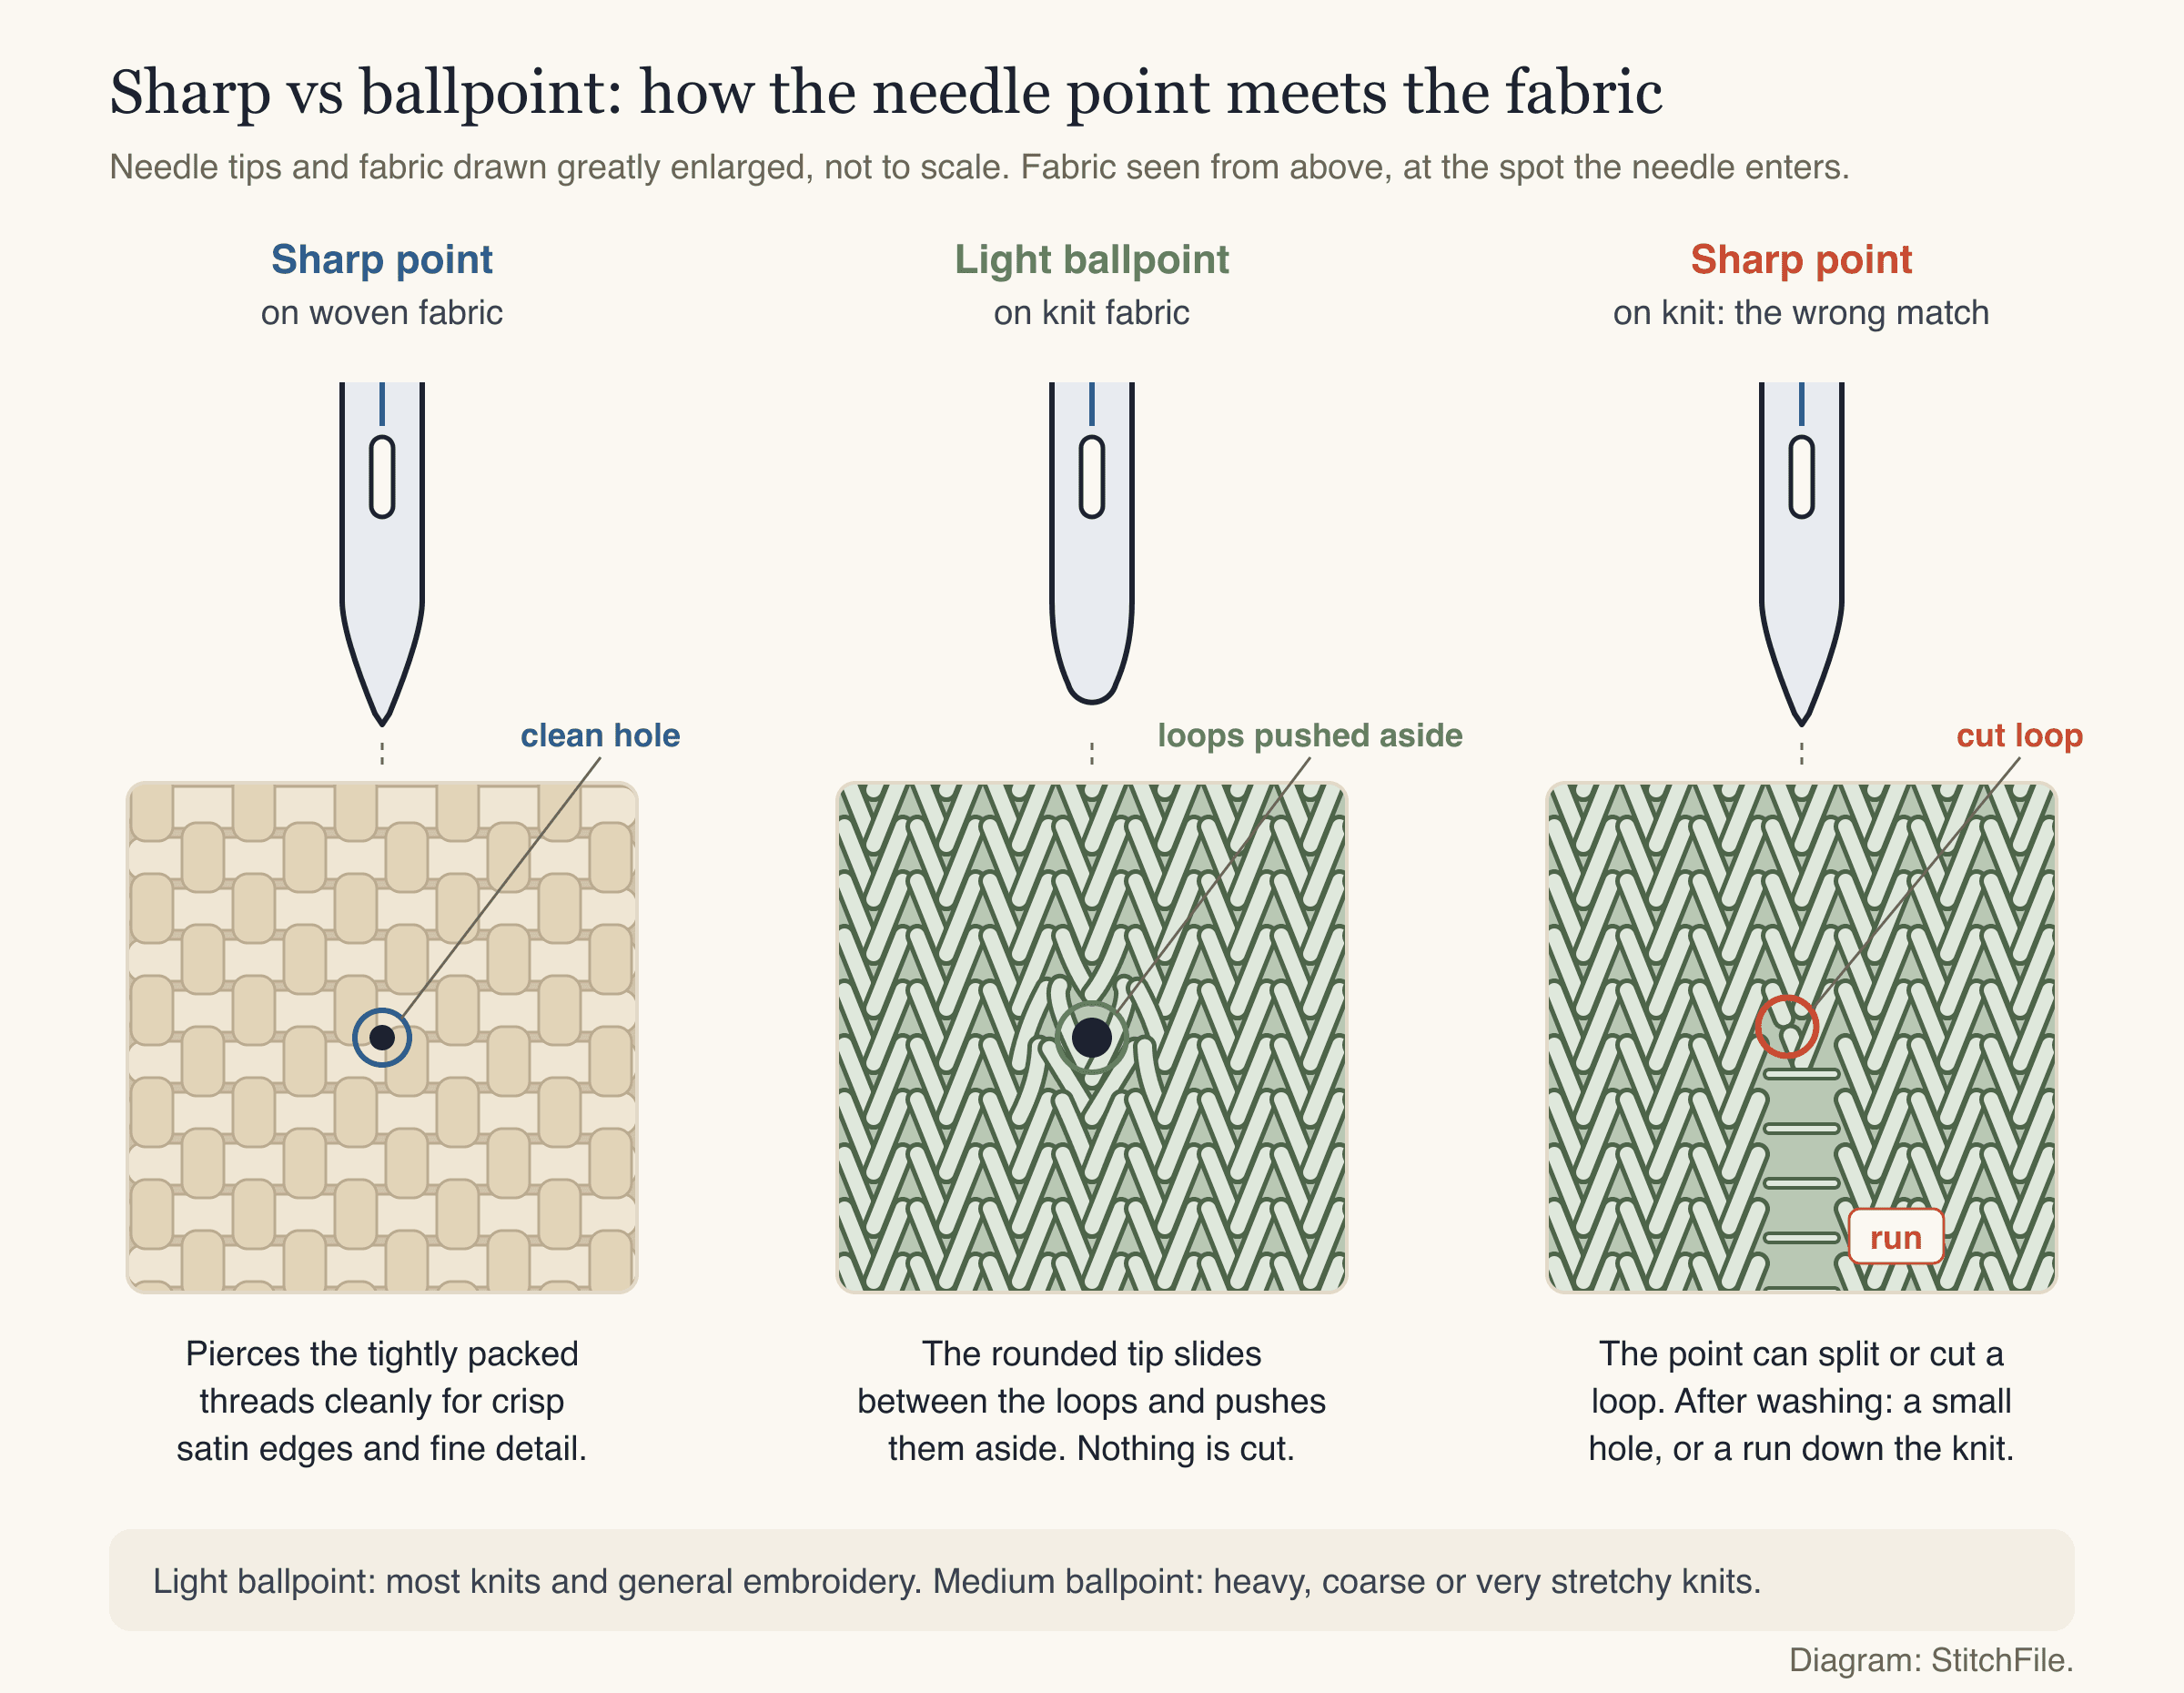
Left and center: the right match. Right: a sharp point on jersey can cut a loop, and the damage often shows only after washing.
| Point | What it does | Use it for |
|---|---|---|
| Sharp | Pierces the fabric cleanly | Tightly woven cotton, twill, poplin, canvas, denim; crisp small lettering |
| Light ballpoint | Slightly rounded tip slides between fibers and loops | T-shirts, jersey, piqué and most knits; a good all-rounder on many wovens |
| Medium ballpoint | More rounded tip pushes loops aside further | Heavy or coarse knits, very stretchy fabrics, sweater knits |
A ballpoint embroidery needle is the standard choice for t-shirts. It pushes the knit loops aside instead of cutting them, which prevents the small holes and runs that appear around a design after a few washes. Our guide to machine embroidery on t-shirts covers the rest of the knit setup.
Many needles sold simply as "embroidery needles" already have a light ballpoint; check the packet. Keep a few sharps for crisp small lettering on tightly woven fabric.
Match the needle to the fabric (and to the file)
The fabric decides your stabilizer, your design settings and your needle, so choose them together. If you make your files with StitchFile, you already pick a fabric when you upload your artwork: Woven, T-shirt knit, Polo piqué, Denim or Towel & fleece. That choice sets stitch density and pull compensation (the extra width that stops shapes shrinking as the thread pulls), and the thread color key in your download names the fabric and the stabilizer to use. The needle follows from the same choice:
| StitchFile fabric | Stabilizer on the color key | Needle to start with |
|---|---|---|
| Woven (cotton, twill, canvas, caps) | Tear-away, medium | 75/11 sharp or light ballpoint; 90/14 for structured caps |
| T-shirt knit | Cut-away (no-show mesh) | 75/11 ballpoint; 70/10 on very fine jersey |
| Polo piqué | Cut-away + water-soluble topping | 75/11 ballpoint; 80/12 on heavy piqué |
| Denim (jeans, jackets, heavy canvas) | Tear-away, heavy | 90/14 sharp; 80/12 on lightweight denim |
| Towel & fleece | Tear-away + topping | 75/11 or 80/12; ballpoint on knit fleece |
The embroidery stabilizer guide explains each stabilizer type.
Here's a design run through the T-shirt knit setting at the 90 mm left-chest size. On a tee, you'd stitch it with a fresh 75/11 ballpoint over no-show mesh.
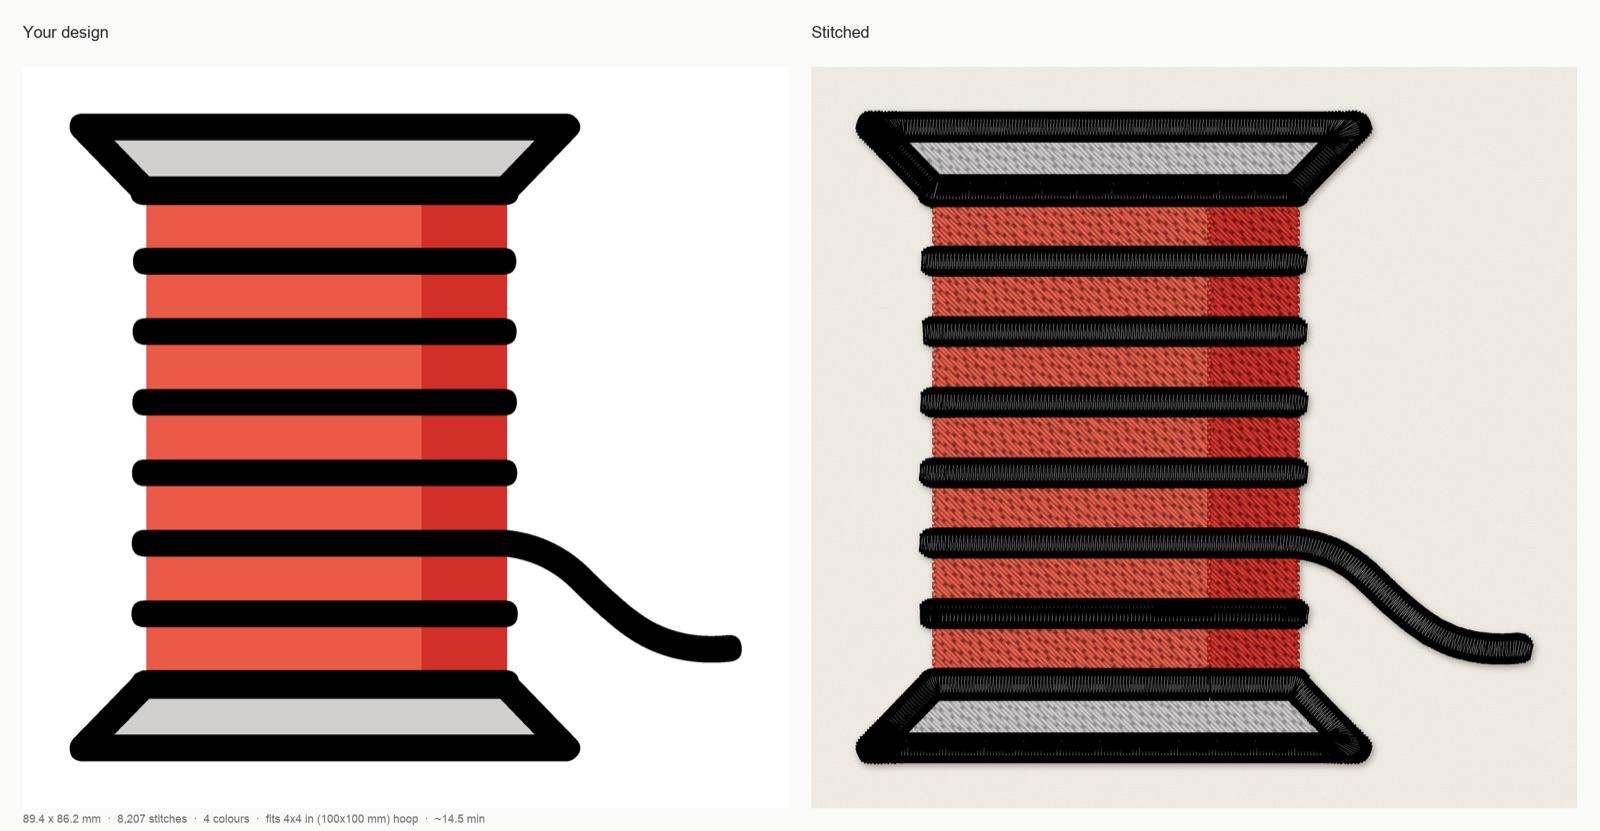
StitchFile stitch preview with the T-shirt knit setting at 90 mm: 89.4 × 86.2 mm, 8,207 stitches, 4 thread colors, 13 trims, about 14.5 minutes at 700 stitches per minute, fits a 4×4 in hoop. The color key recommends cut-away (no-show mesh) stabilizer.
Artwork: OpenMoji thread, CC BY-SA 4.0. StitchFile converted the artwork into the stitch preview shown here; these adaptations are shared under the same license.
The stitch count also measures needle work: this design puts the needle through the shirt 8,207 times.
Titanium embroidery needles and other coatings
Titanium embroidery needles have a thin titanium nitride coating that gives them a gold color. It's harder than the chrome finish on standard needles, so the point and eye resist wear for longer. That helps where needles wear fastest:
- Long production runs and dense, high-stitch-count designs.
- Adhesive stabilizers and spray adhesive, which build up on the needle and make it drag. Some needles also come with non-stick finishes for this.
- Abrasive fabrics and threads, such as denim, canvas and metallics.
A coating doesn't change the size or the point, doesn't fix threading or tension, and doesn't make a bent or burred needle safe to use. How much longer it lasts varies, so keep to the 8–10 hour rule and stretch it only while the needle sews cleanly. For occasional home embroidery, standard needles changed on time work fine; for a shop running all day, coated needles are worth testing.
Home machine needle systems vs multi-needle machines
The needle also has to fit the machine. That's the needle system: the shank shape, the length and where the eye sits.
| Household (flat shank) | Industrial (round shank) | |
|---|---|---|
| Typical machines | Home sewing machines and single-needle embroidery machines | Many commercial multi-needle embroidery machines |
| Common system name | 130/705 H (also labelled HAx1 or 15x1); embroidery versions often marked H-E | DBxK5 is the most common embroidery type |
| Shank | One flat side | Fully round |
| How it goes in | Flat side to the back, pushed up as far as it goes | Groove and scarf lined up by eye, as the manual shows |
| Sizes | Same metric/US sizes | Same metric/US sizes |
They aren't interchangeable: in the wrong clamp, the eye and scarf end up in the wrong place for the hook. Some multi-needle machines made for home and small-shop use take a flat-shank needle, so don't go by the number of needles. Check your manual for the exact system before buying a box of 100. If you're weighing up a bigger machine, see single vs multi-needle embroidery machines.
When to change your embroidery needle
The common rule of thumb is every 8–10 hours of stitching time: hours the machine is actually sewing, not hours the project sits on the table. Change sooner if a warning sign appears.
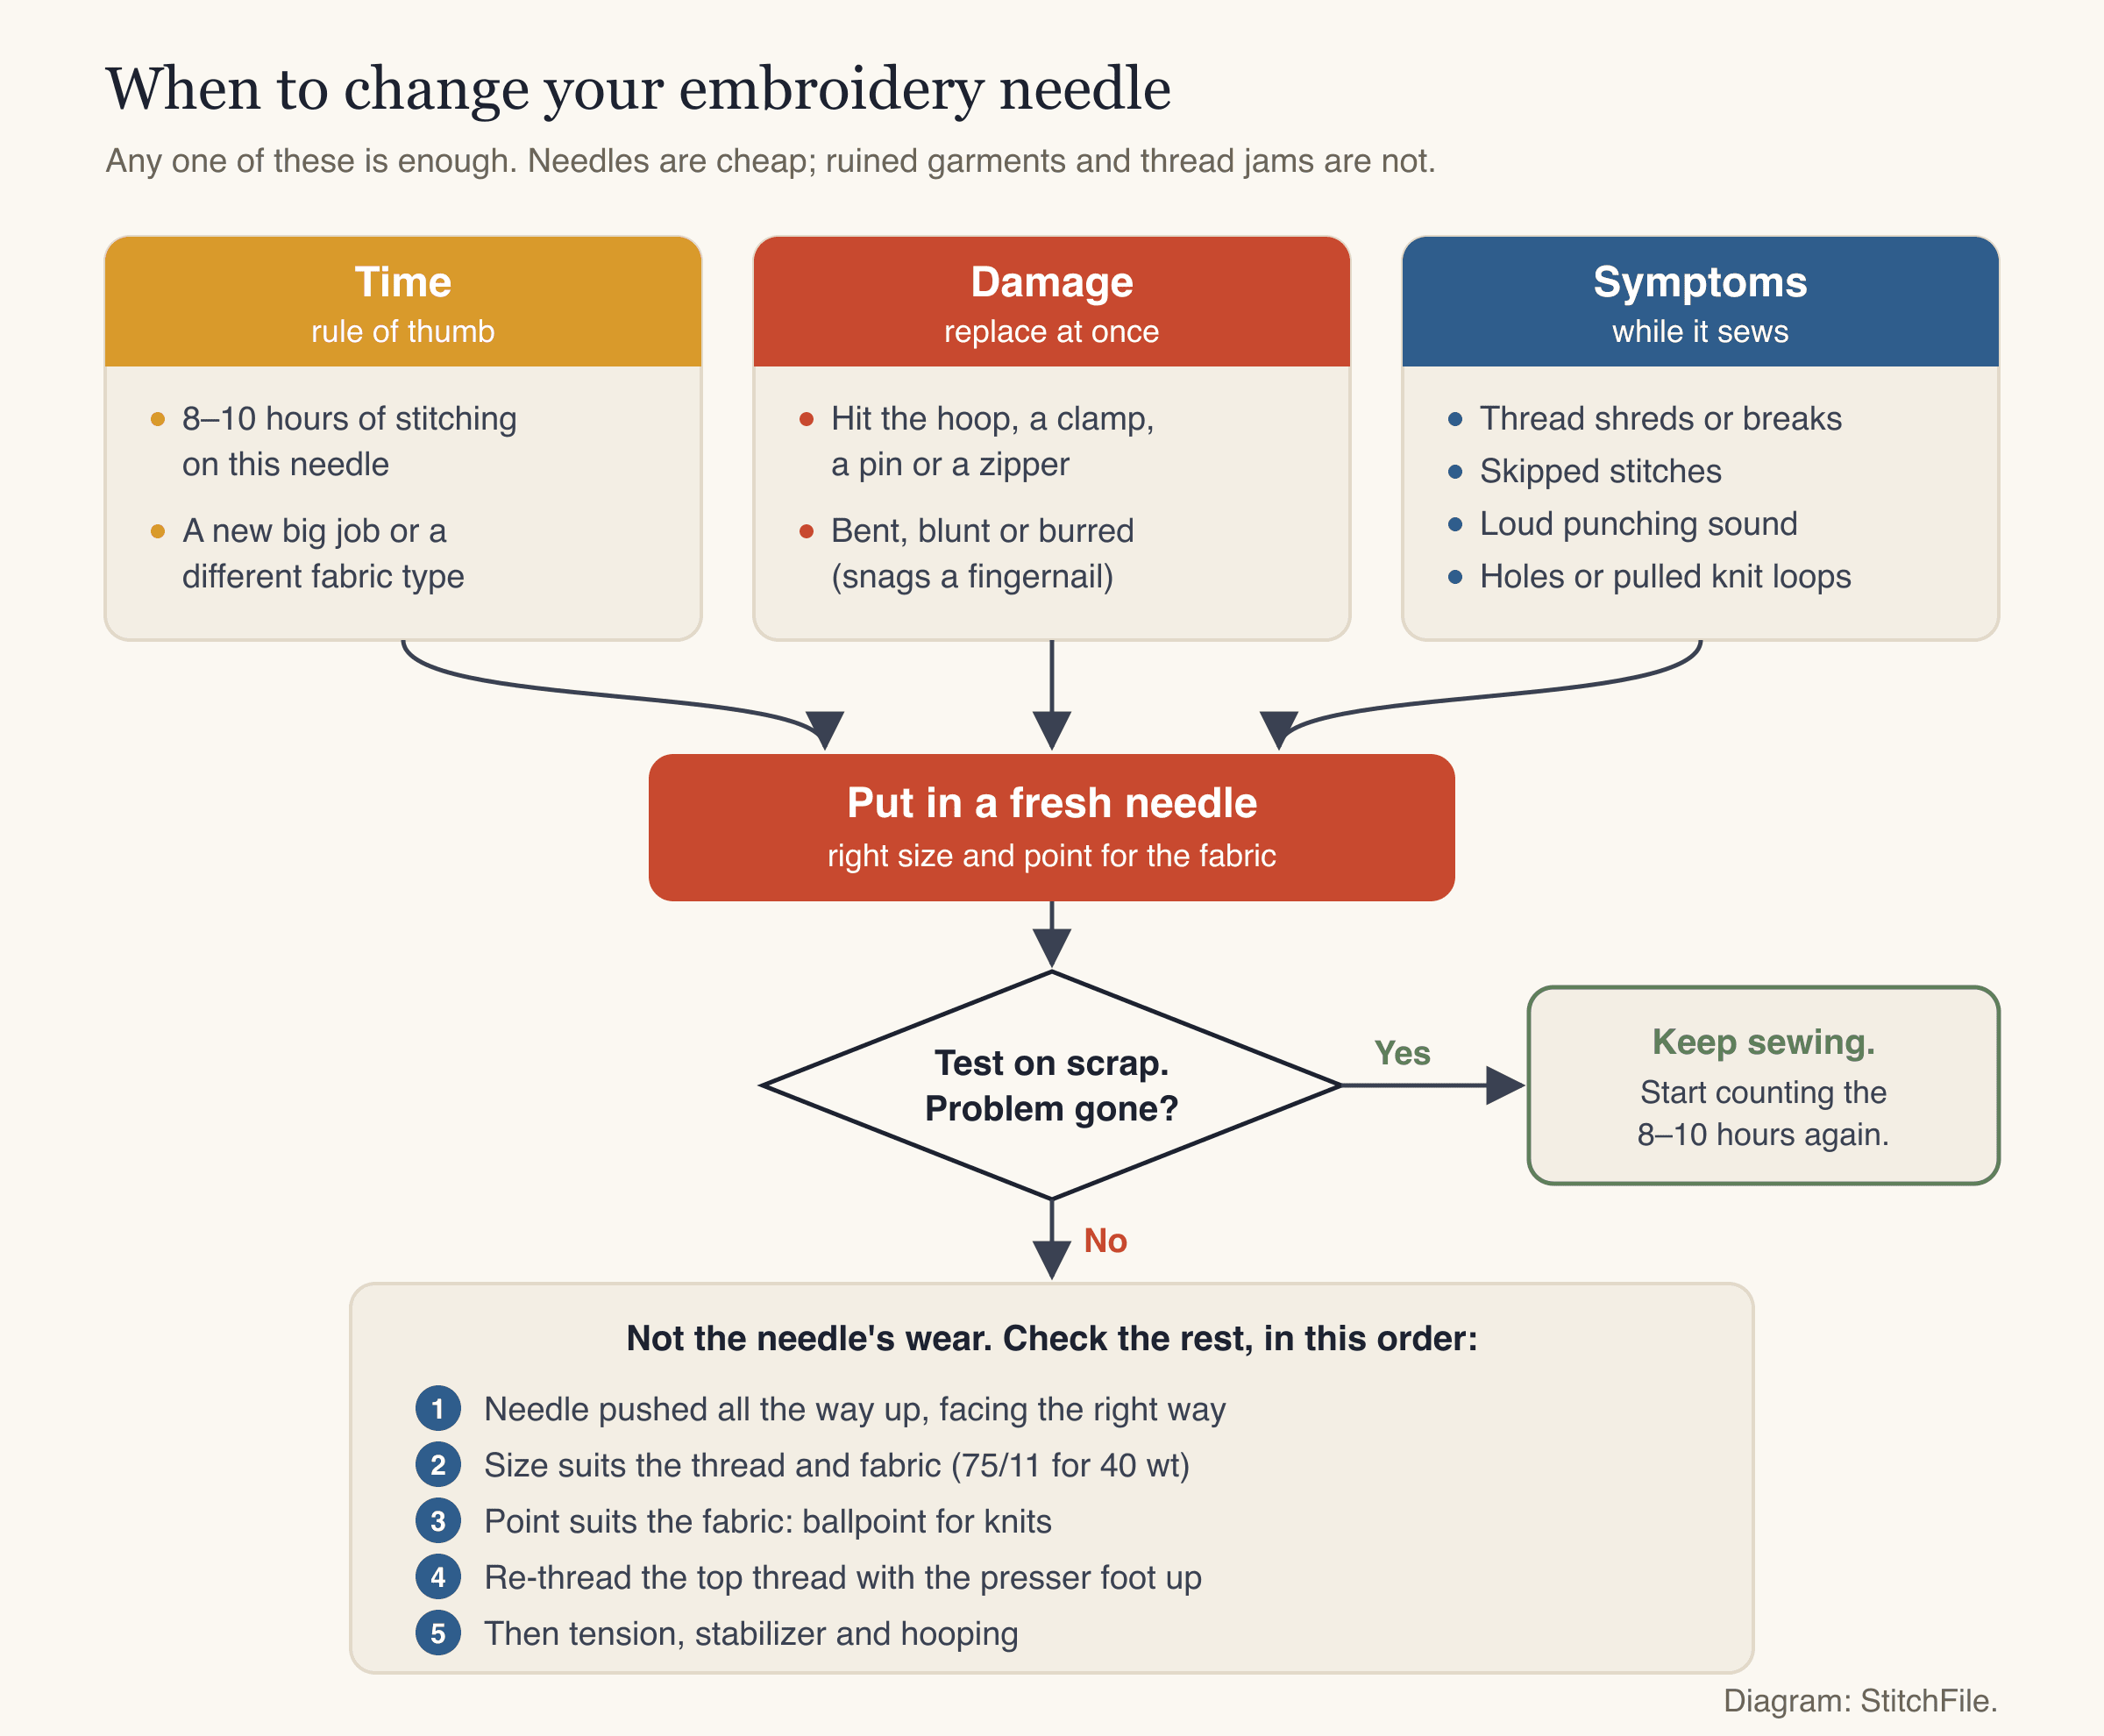
Any trigger at the top means a fresh needle. If the problem stays after a new needle, it wasn't the needle's wear.
Signs a needle is worn or damaged:
- Thread shreds or breaks more often than usual.
- Skipped stitches, especially in satin columns.
- A loud punching or popping sound. A sharp needle goes in quietly; a dull one forces its way through.
- Holes, pulled threads or snagged loops around the design.
- A burr. Run a fingernail gently down the tip; if it catches, the needle is done.
- A bent shaft. Roll the needle on a flat table; if it wobbles, throw it out.
Change it immediately if it hit the hoop, a hoop clamp, a pin, a snap or a zipper, even if it looks fine.
Worked example: the spool design above takes about 14.5 minutes at 700 stitches per minute, so 8–10 hours is roughly 33 to 41 stitch-outs per needle. A large, dense design uses up those hours much faster. On a multi-needle machine each needle wears separately, and the one carrying your most-used color wears out first.
How to change an embroidery machine needle
These steps are for a home machine with a flat-shank needle. Your manual has the exact version for your model.
- Raise the needle to its highest position with the needle up/down button or by turning the handwheel toward you.
- Turn the machine off so it can't start while your fingers are near the needle.
- Make room. Remove the hoop if it's in the way. Many manuals say to lower the presser foot and slide paper or fabric under it, so a dropped needle can't fall into the bobbin area.
- Remove the old needle. Hold it and loosen the needle clamp screw with the machine's small screwdriver (toward you, counterclockwise). Pull the needle straight down.
- Check the new needle: right system, size and point. Roll it on the table to make sure it's straight.
- Insert it flat side to the back (on most home machines) and push it up until it stops. A needle that isn't fully up sits too low for the hook and skips stitches.
- Hold it there and tighten the clamp screw firmly, without forcing it.
- Thread the needle. Many built-in threaders only work within a certain size range, so very fine needles may need threading by hand.
- Test-stitch on scrap of the same fabric, and note the date or the stitch counter reading.
- Dispose of the old needle safely in a closed container, not loose in the trash.
On a multi-needle machine, loosen the set screw on that needle bar, push the round-shank needle all the way up, and line up the groove and scarf as the manual shows before tightening. A few degrees off can cause skipped stitches or breaks, so follow it exactly.
Needle troubleshooting table
The needle is the cheapest thing to rule out, so check it first. If a fresh, correct needle doesn't help, move to the last column.
| Symptom | Needle-related cause | Needle fix | If that doesn't fix it |
|---|---|---|---|
| Thread shredding or breaking | Worn or burred eye or point; eye too small for the thread; needle not fully up | New needle, fully inserted; size up for thick or metallic thread | Re-thread with the presser foot up, check the spool, ease top tension, slow down |
| Skipped stitches | Bent or dull needle; needle too low or turned; wrong point | New needle, inserted correctly; ballpoint on knits | Hoop tighter so the fabric doesn't bounce; firmer stabilizer |
| Holes or runs in knits | Sharp or burred point cutting loops; needle too large | 75/11 ballpoint (70/10 on very fine jersey) | Cut-away stabilizer; a design set up for knit |
| Loud punching sound | Dull point; needle too fine for heavy fabric | New needle; 90/14 for denim, canvas and structured caps | Slow down on very thick areas |
| Needle breaks | Hit the hoop, a clamp or a thick seam; bent; too fine for the fabric | New needle, a size up on heavy fabric | Check the design fits the hoop's sewing area; keep seams and zippers clear |
For tension, bird nests and puckering, see the machine embroidery troubleshooting guide.
Common mistakes
- Using one needle until it breaks. By then it has been shredding thread and damaging fabric for hours.
- Using a sharp needle on t-shirts. The holes often appear only after the first wash.
- Choosing size by habit. A 90/14 left in from a denim job leaves visible holes in a fine tee; a 65/9 with 40 wt thread shreds it.
- Not pushing the needle all the way up. The usual reason a brand-new needle still skips stitches.
- Assuming titanium needles never wear out. They last longer, not forever.
- Buying the wrong needle system. Flat-shank and round-shank needles don't swap.
FAQ
What size needle is best for machine embroidery?
A 75/11 embroidery needle is the usual starting point for 40 weight thread on most fabrics. Use 90/14 for denim, canvas and structured caps, and 65/9 or 70/10 for fine fabrics or 60 weight thread.
Can I use regular sewing needles in an embroidery machine?
Yes, if they're the right system for your machine, but expect more thread breaks. Embroidery needles have a larger eye, a deeper groove and an embroidery-shaped scarf that reduce friction on fine embroidery thread.
When should I use a ballpoint embroidery needle?
On knits: t-shirts, jersey, polo piqué, sweatshirts and other stretchy fabrics. The rounded tip pushes the loops aside instead of cutting them, which prevents holes and runs.
Are titanium embroidery needles worth it?
For heavy use, yes. The hard coating resists wear on long runs, with adhesive stabilizers and on abrasive fabrics like denim. For occasional home embroidery, standard needles changed on time work just as well.
How often should you change embroidery machine needles?
A common rule of thumb is every 8–10 hours of actual stitching. Change it straight away if it hits the hoop or a pin, or if you see shredding, skipped stitches or holes, or hear a loud punching sound.
Do multi-needle machines use the same needles as home machines?
Often not. Home machines take flat-shank household needles, while many commercial multi-needle machines take round-shank needles such as DBxK5. Some multi-needle machines for home use take flat-shank needles, so check your manual.
Start with the fabric
Needle, stabilizer and design settings all come from one question: what are you stitching on? If you're turning your own logo or artwork into a stitch file, upload it to StitchFile, pick your fabric and size, and check the free stitch preview, with the stitch count, sew time and stabilizer, before you put a fresh needle in. Every download includes PES, DST, JEF, EXP and VP3, for home and multi-needle machines alike.