Embroidery guide
Tote Bag Embroidery: How to Embroider a Canvas Tote Bag
Tote bag embroidery step by step: pick the canvas, size and place the design, hoop a finished bag, choose stabilizer and needle, and cover the back.
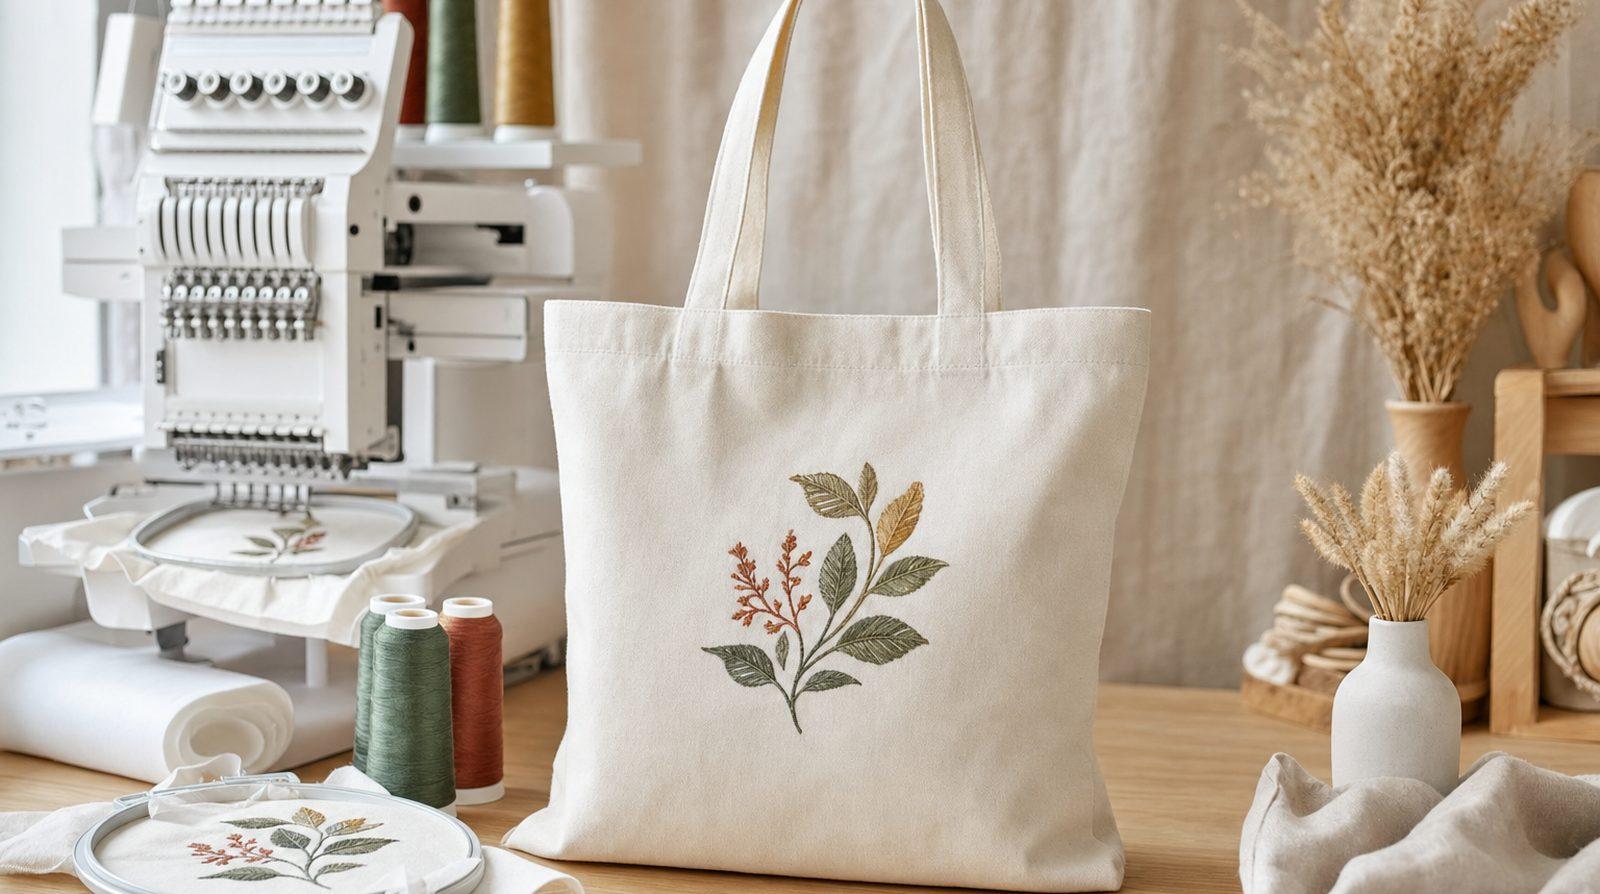
Quick answer: For tote bag embroidery, use a medium-weight cotton canvas tote and a sharp needle (75/11, or 90/14 for heavy canvas).
- Size: on a typical 15 × 16 in tote, a main design of about 125–180 mm (5–7 in) fits a 5×7 hoop and looks right.
- Placement: centered side to side, with the design's center 1–2 in above the middle of the panel.
- Hooping: slide the hoop in through the open top so only the front panel and stabilizer are clamped; keep the back panel and handles out of the hoop and away from the needle.
- Stabilizer: medium tear-away for canvas, cut-away for thin or loosely woven bags. Iron a soft cover over the back so things in the bag don't snag.
Tote bag embroidery is one of the friendliest projects for a home embroidery machine. Canvas is stable, doesn't stretch like a T-shirt, and gives you a big flat panel. An embroidered tote bag also makes a good market product, branded shop bag or personalized gift.
The tricky part is the bag itself: two panels sewn together, handles in the way, and a hoop that must clamp one layer without catching the other. Here's how to choose the bag, size and place the design, hoop a finished tote and finish the back.
Choosing a tote for embroidery
Fabric weight (in ounces per square yard). Thin giveaway totes pucker under dense stitching unless well backed. Standard cotton canvas is easiest. Heavy canvas and duck hold big designs but need a larger needle and are harder to clamp.
| Bag fabric | Typical weight (rough guide) | Stabilizer | Needle | StitchFile fabric setting |
|---|---|---|---|---|
| Thin cotton tote | about 4–6 oz | Medium cut-away | 75/11 sharp | Woven |
| Standard cotton canvas | about 8–12 oz | Medium tear-away | 75/11 sharp | Woven |
| Heavy canvas or duck | about 12 oz and up | Heavy tear-away | 90/14 sharp | Denim (made for jeans, jackets and heavy canvas) |
| Loose or open weave | varies | Cut-away | 75/11 sharp | Woven |
Natural or dyed. Natural (unbleached) canvas is a warm off-white that shows almost any thread color. Dyed canvas suits light or bright thread, but light thread on a dark bag can let canvas peek between stitch rows, so the design may need a fuller fill.
Flat or gusseted. A flat tote lies flat, hoops easily and gives you the whole front panel. A gusseted tote has extra fabric at the bottom (sometimes the sides) for depth; it's harder to lay flat and its visible front face is smaller than the bag, so measure the face before you pick a design size.
Finished bag or sew your own. Embroidering a flat panel first and sewing the bag afterwards is the easiest way to do canvas tote embroidery: you hoop it like any fabric, there's no back panel to avoid, and placement is exact. Cut the panel 1–2 in bigger than needed on every side, embroider it, then trim it to size measuring out from the design's center. A lining added afterwards hides the back of the embroidery.
Ready-made blanks are faster for volume, and most embroidery bags at craft fairs start that way. The rest of this guide assumes a finished bag.
Tote bag embroidery size and placement
Don't put the design in the exact middle. A full tote sags at the bottom, so a dead-center design looks low once the bag is carried.
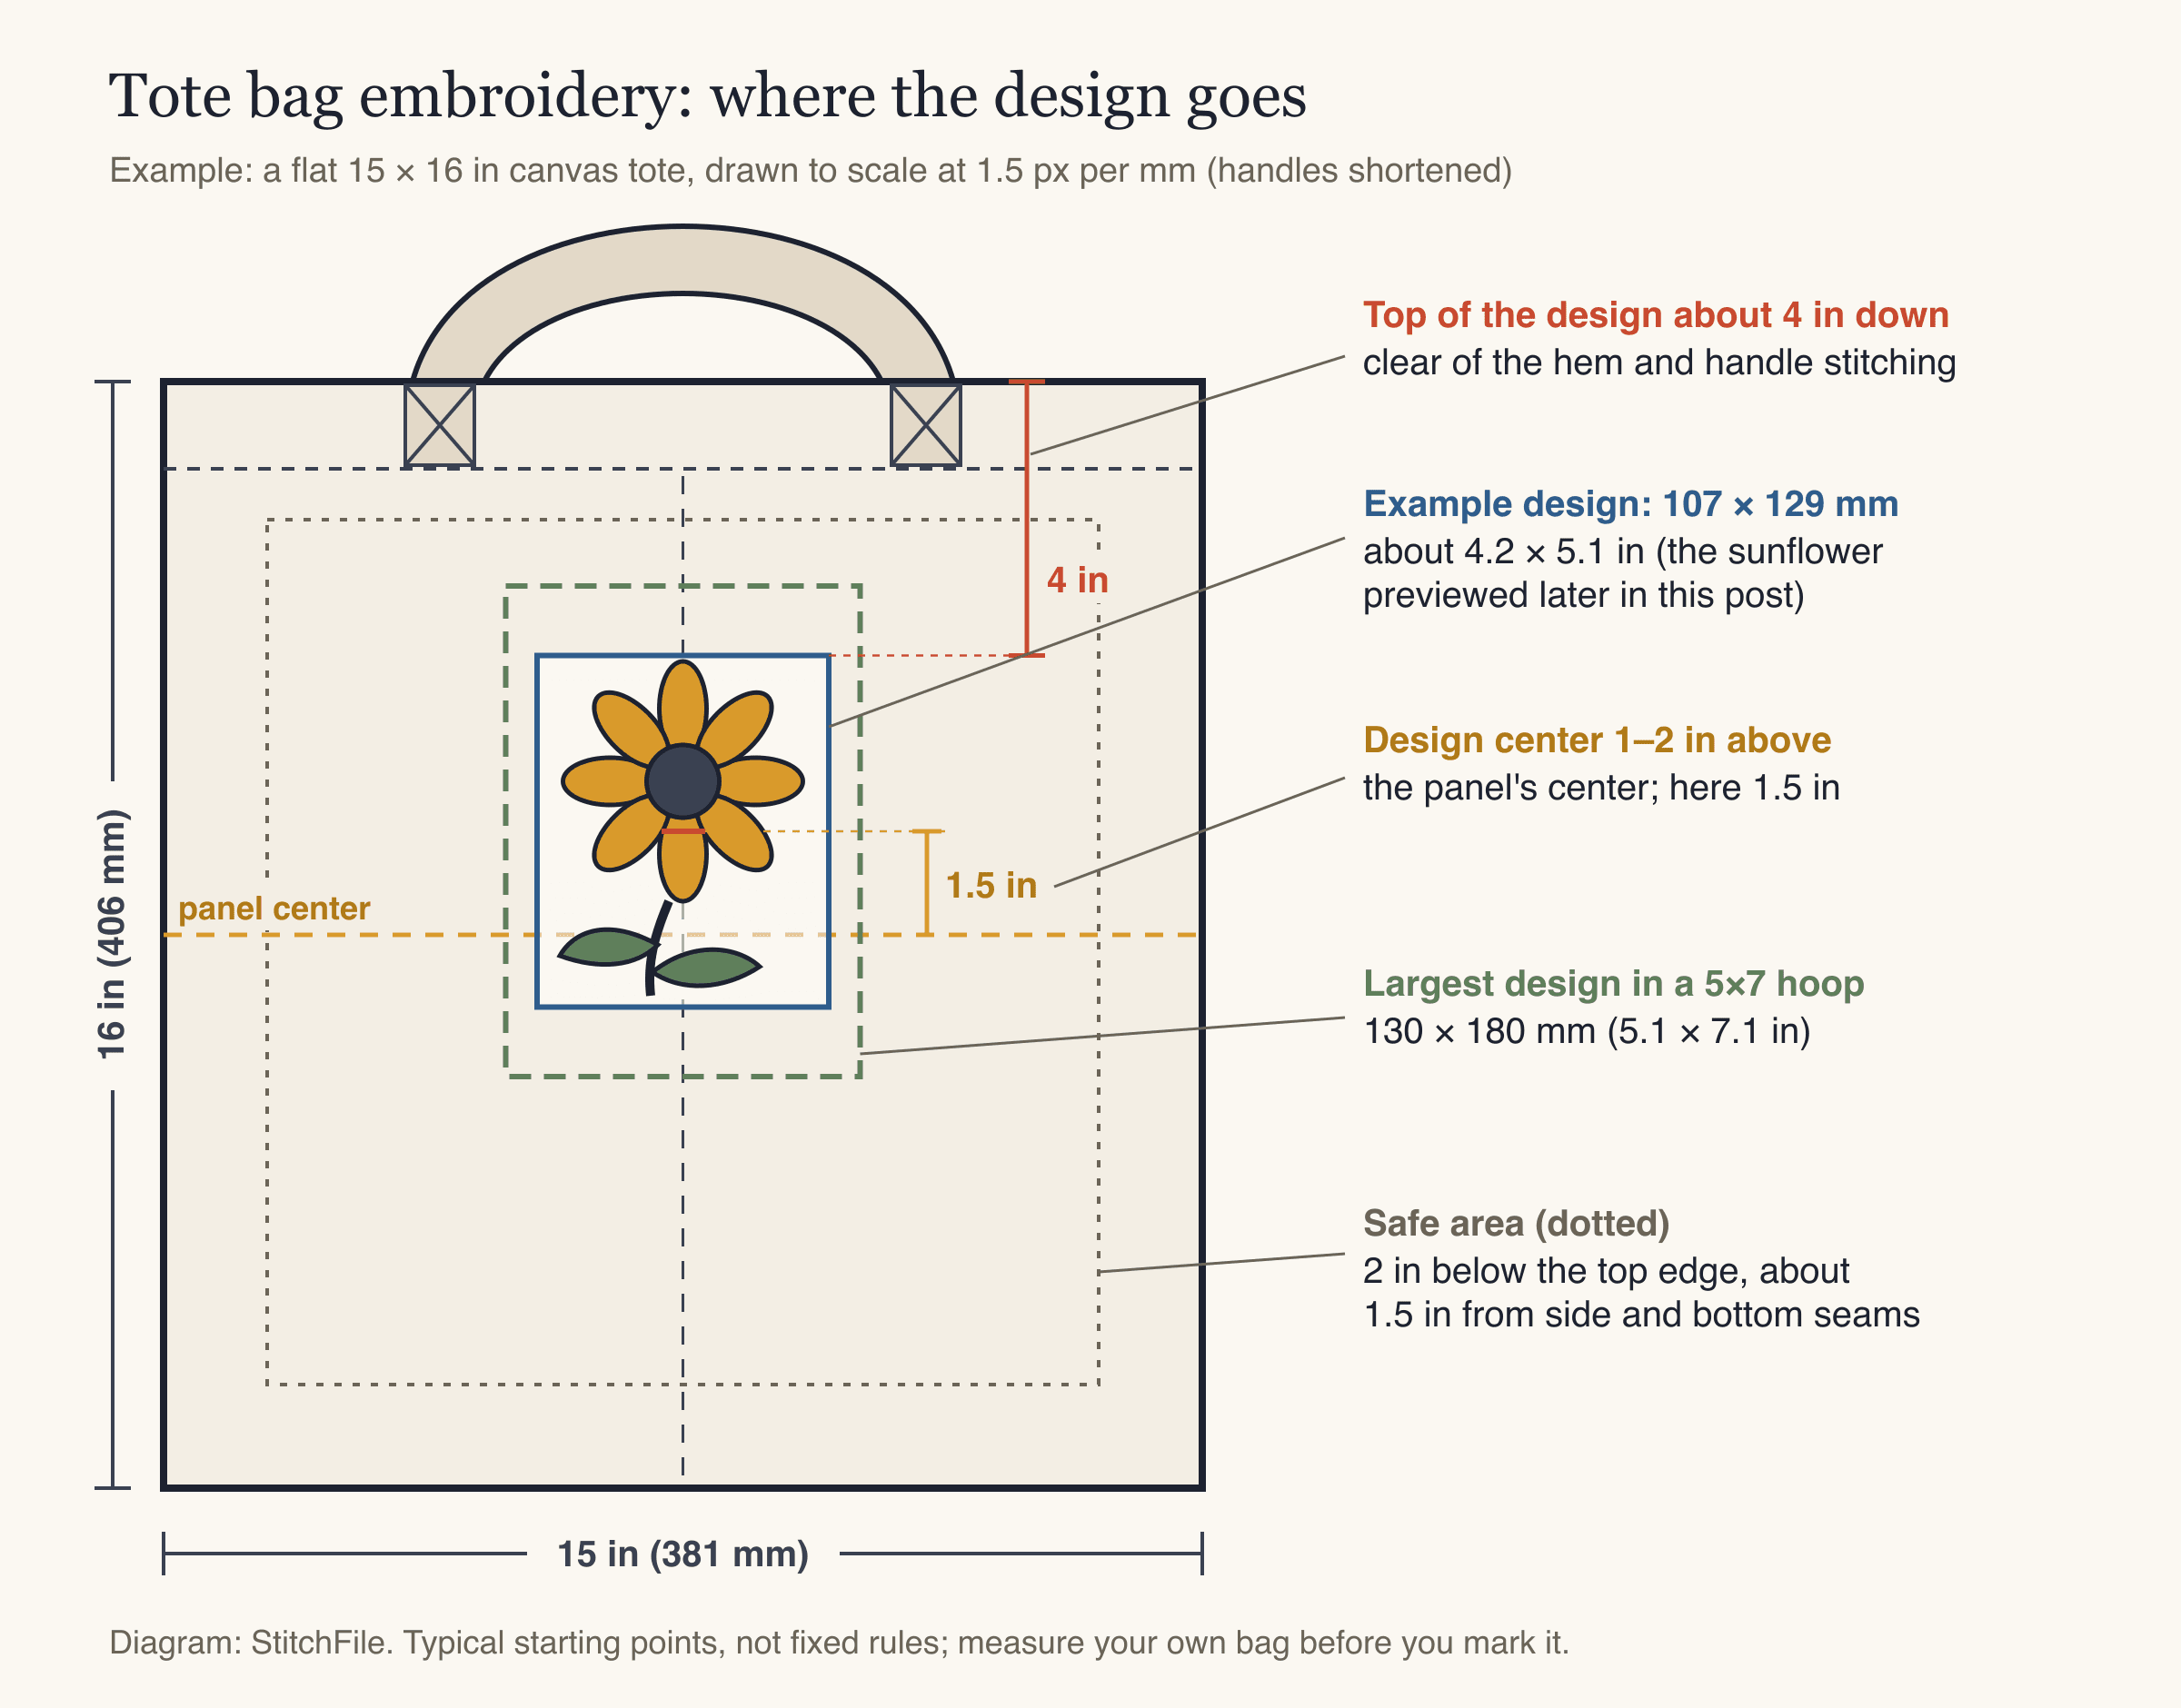
Example: a flat 15 × 16 in tote drawn to scale. The design is centered side to side and sits a little above the middle of the panel.
- Center it side to side. Fold the bag in half lengthwise and crease it lightly, or measure from both side seams.
- Raise it slightly. Put the design's center about 1–2 in above the center of the front panel: about 6–7 in below the top edge on a 16 in tall bag.
- Stay clear of the edges. Leave about 2 in between the top of the design and the top edge (away from the hem and handle stitching), and about 1.5 in from the side seams and the bottom seam or gusset fold.
- Don't hoop over seams. Thick seams stop the hoop clamping evenly and can deflect the needle.
How big should a tote bag design be?
A common rule of thumb is one-third to one-half of the bag's width: roughly 5 to 7.5 in on a 15 in wide bag. In practice, your hoop usually sets the upper limit.
| Design | Typical size (longest side) | Smallest hoop it needs |
|---|---|---|
| Small maker's mark or shop logo | 50–90 mm (2–3.5 in) | 4×4 in (100×100 mm) |
| Name or one line of text | 100–180 mm wide (4–7 in) | 5×7 in (130×180 mm) |
| Main design on a 15 × 16 in tote | 125–180 mm (5–7 in) | 5×7 in |
| Large statement design on a big tote | 180–250 mm (7–10 in) | 6×10, 8×8 or 8×12 in |
These are starting points. A small logo can sit low on the front or near a corner, which suits branded bags for shops and events. Very large designs are easier on a flat panel, because the hoop has to fit inside the bag. Our embroidery hoop size chart lists the real sewing area of each common hoop.
Text designs. Names, short phrases and monograms are the most popular tote designs. Letters need to be at least about 5 mm tall on canvas to stitch cleanly; for a name meant to be read across a market stall, go much bigger. See embroidery lettering and fonts.
What you need
A tote (plus a spare or scrap of the same canvas to test on), stabilizer from the table above (the embroidery stabilizer guide explains each type), a new sharp needle (see our embroidery machine needles guide), 40 weight polyester embroidery thread, an iron-on embroidery cover (often sold as fusible tricot), a ruler, a water-soluble or air-erase pen, clips, temporary spray adhesive, and a design file made at your size.
How to embroider a tote bag that's already sewn
Don't turn the bag inside out. Hoop it through the open top: the outer ring sits inside the bag, between the front and back panels, and the inner ring presses down from the outside. Only the front panel and the stabilizer end up in the hoop.
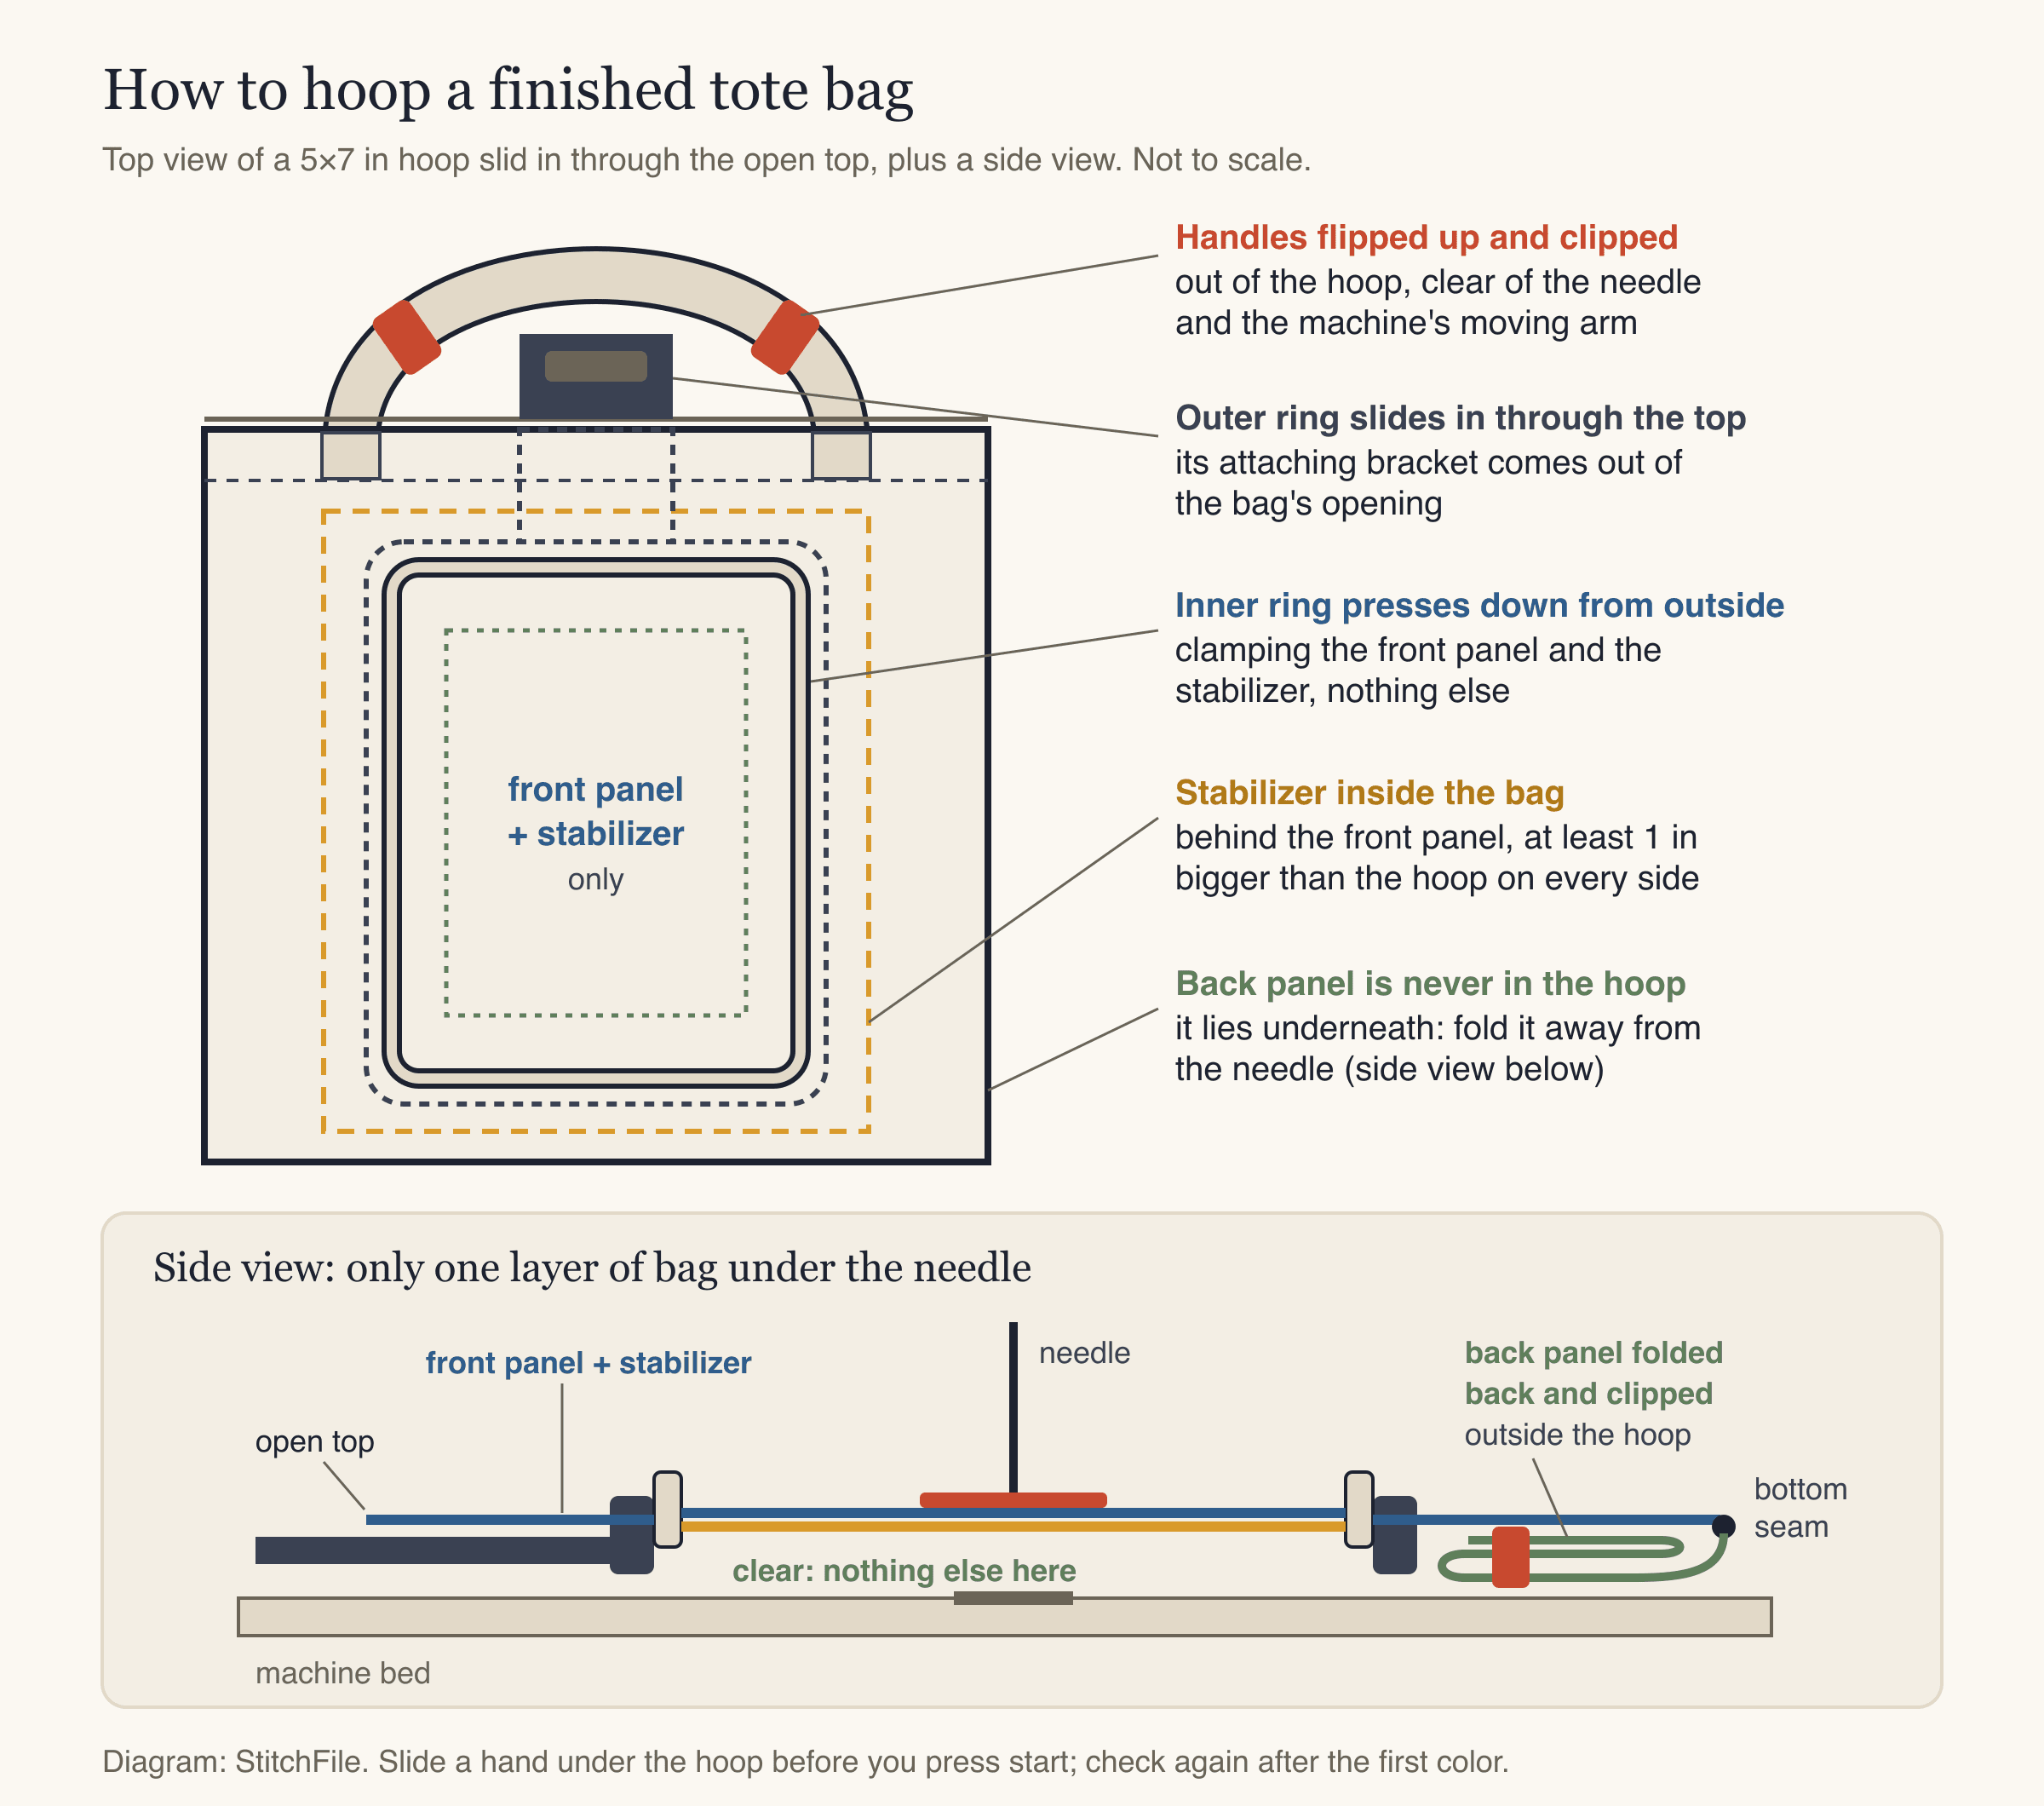
Hooping a finished tote: the outer ring goes in through the opening, the handles are clipped out of the way, and the back panel is folded away from the needle.
- Pre-wash and press. Cotton canvas can shrink in its first wash. If the bag will ever be washed, wash and dry it once first; shrinkage after embroidery gathers the canvas around the design.
- Mark the placement. Crease the vertical center, measure down from the top edge, and mark a small crosshair where the design's center goes.
- Put the stabilizer inside. Cut it at least 1 in bigger than the hoop on every side, mist it with spray adhesive, and smooth it onto the inside of the front panel behind your mark.
- Clip the handles up so they can't fall into the hoop or swing under the needle.
- Slide the outer ring in through the top. On most home-machine hoops the attaching bracket is part of the outer ring, so turn it so the bracket comes out of the bag's opening. The whole hoop frame must fit inside the bag with room to spare.
- Press the inner ring in from outside. Line the crosshair up with the hoop's center marks, press the ring in, and tighten. The canvas should be flat and firm, with no ripples.
- Check the orientation. With the bag's top toward the bracket, the design may need rotating on screen to sew upright. Trace it to confirm.
- Clear the back panel. Attach the hoop, then fold the back panel away from the sewing area and clip it outside the hoop. Slide a hand underneath: only the front panel and stabilizer should be there.
- Sew. Slow down for heavy canvas and check under the hoop again after the first color.
- Finish. Tear the stabilizer away close to the stitching (or trim cut-away to about 1/4 in), trim jump threads, and cover the back (see below).
If the bag won't hoop, float it. Heavy canvas, a deep gusset or a nearby seam can make clamping impossible. Hoop only a sticky tear-away, paper side up, score and peel the paper, slide the hoop into the bag as above, and press the front panel onto it from outside. If your machine can sew a basting box (a loose outline around the design), run it first so the canvas can't creep.
On a multi-needle machine with a tubular arm, the bag slides over the arm and the back panel hangs below it. Lined totes: stitch through both layers (the back shows on the lining), or open a lining seam, embroider, and sew it closed.
Needle and dense designs on canvas
Use a sharp point, not a ballpoint (ballpoints are for knits); it pierces woven canvas cleanly for crisper edges. A 75/11 struggles through heavy canvas and can deflect or break, so step up to 90/14. Change the needle when you hear a loud punching sound or see skipped stitches.
Canvas carries heavy fill without puckering like a T-shirt would, but a big block of solid fill turns part of the bag into a stiff board. Bold outlines, lettering and open designs stay softer. And never enlarge a design on the machine: that spreads the stitch rows apart and lets canvas show through. Make a new file at the new size.
Getting a tote-sized design file
StitchFile makes the file from your logo or artwork. Upload an SVG, PNG or JPG, choose the Woven fabric (cotton, twill and canvas; Denim for heavy canvas), and type the size you measured, for example 130 mm. The size presets are made for garments, so for a tote you'll usually type your own; the 4×4 hoop preset (95 mm) suits a smaller design. The upload asks for the bag color so thread choices suit it. In about 20 seconds you get a free stitch preview with stitch count, sew time, thread colors and the smallest hoop it fits; lettering under about 5 mm is flagged with a size that would work.
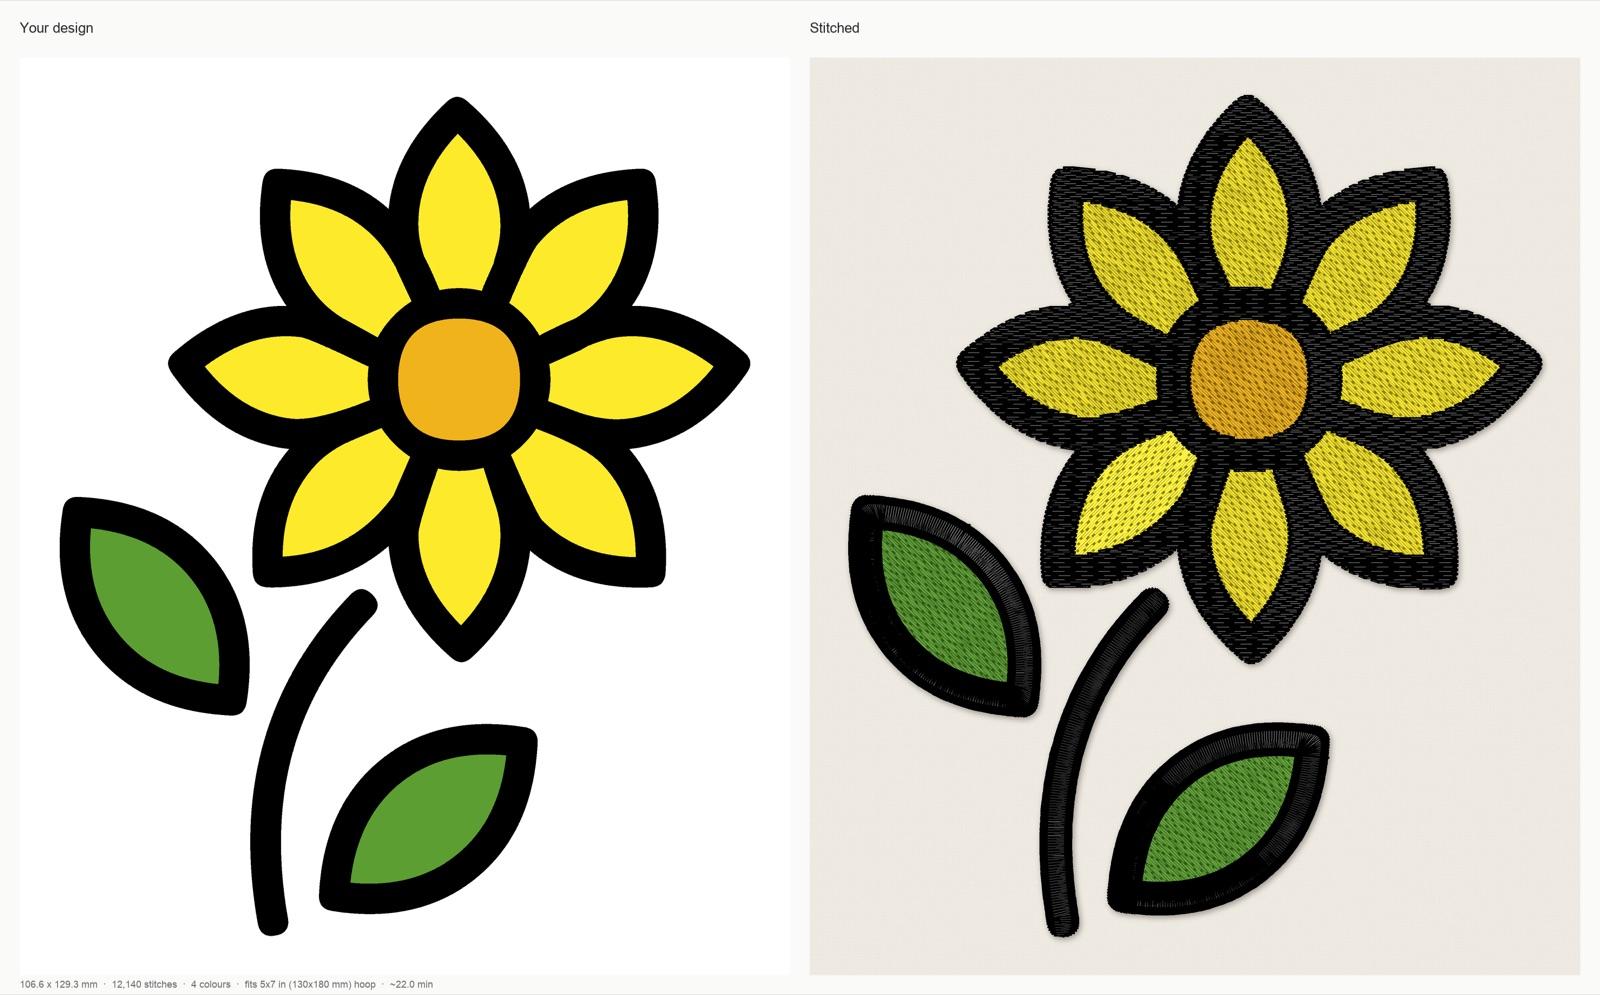
StitchFile stitch preview with the Woven setting at 130 mm: 106.6 × 129.3 mm, 12,140 stitches, 4 thread colors, 32 trims, about 22 minutes at 700 stitches per minute, fits a 5×7 in hoop. The color key recommends medium tear-away stabilizer.
Artwork: OpenMoji sunflower, CC BY-SA 4.0. StitchFile converted the artwork into the stitch preview shown here; these adaptations are shared under the same license.
Every purchase includes PES, DST, JEF, EXP and VP3, for Brother and Baby Lock, Janome, Husqvarna Viking and Pfaff, Bernina and Melco, and multi-needle machines (the file formats guide explains which is which). You also get a thread color key with the stabilizer to use, paid designs can be emailed to you, and re-sizing is free for 7 days after you buy.
Selling your bags needs a Pro ($19 a month, 25 designs) or Shop ($49 a month, 100 designs) plan; single designs and 10-packs are for personal use. Either way, you need to own the artwork or have permission to use it.
Cover the back of the embroidery
Keys, pens and zippers catch on the bobbin thread and trimmed ends on the back of the design and slowly pull stitches loose. A soft iron-on cover prevents that and makes the inside look finished.
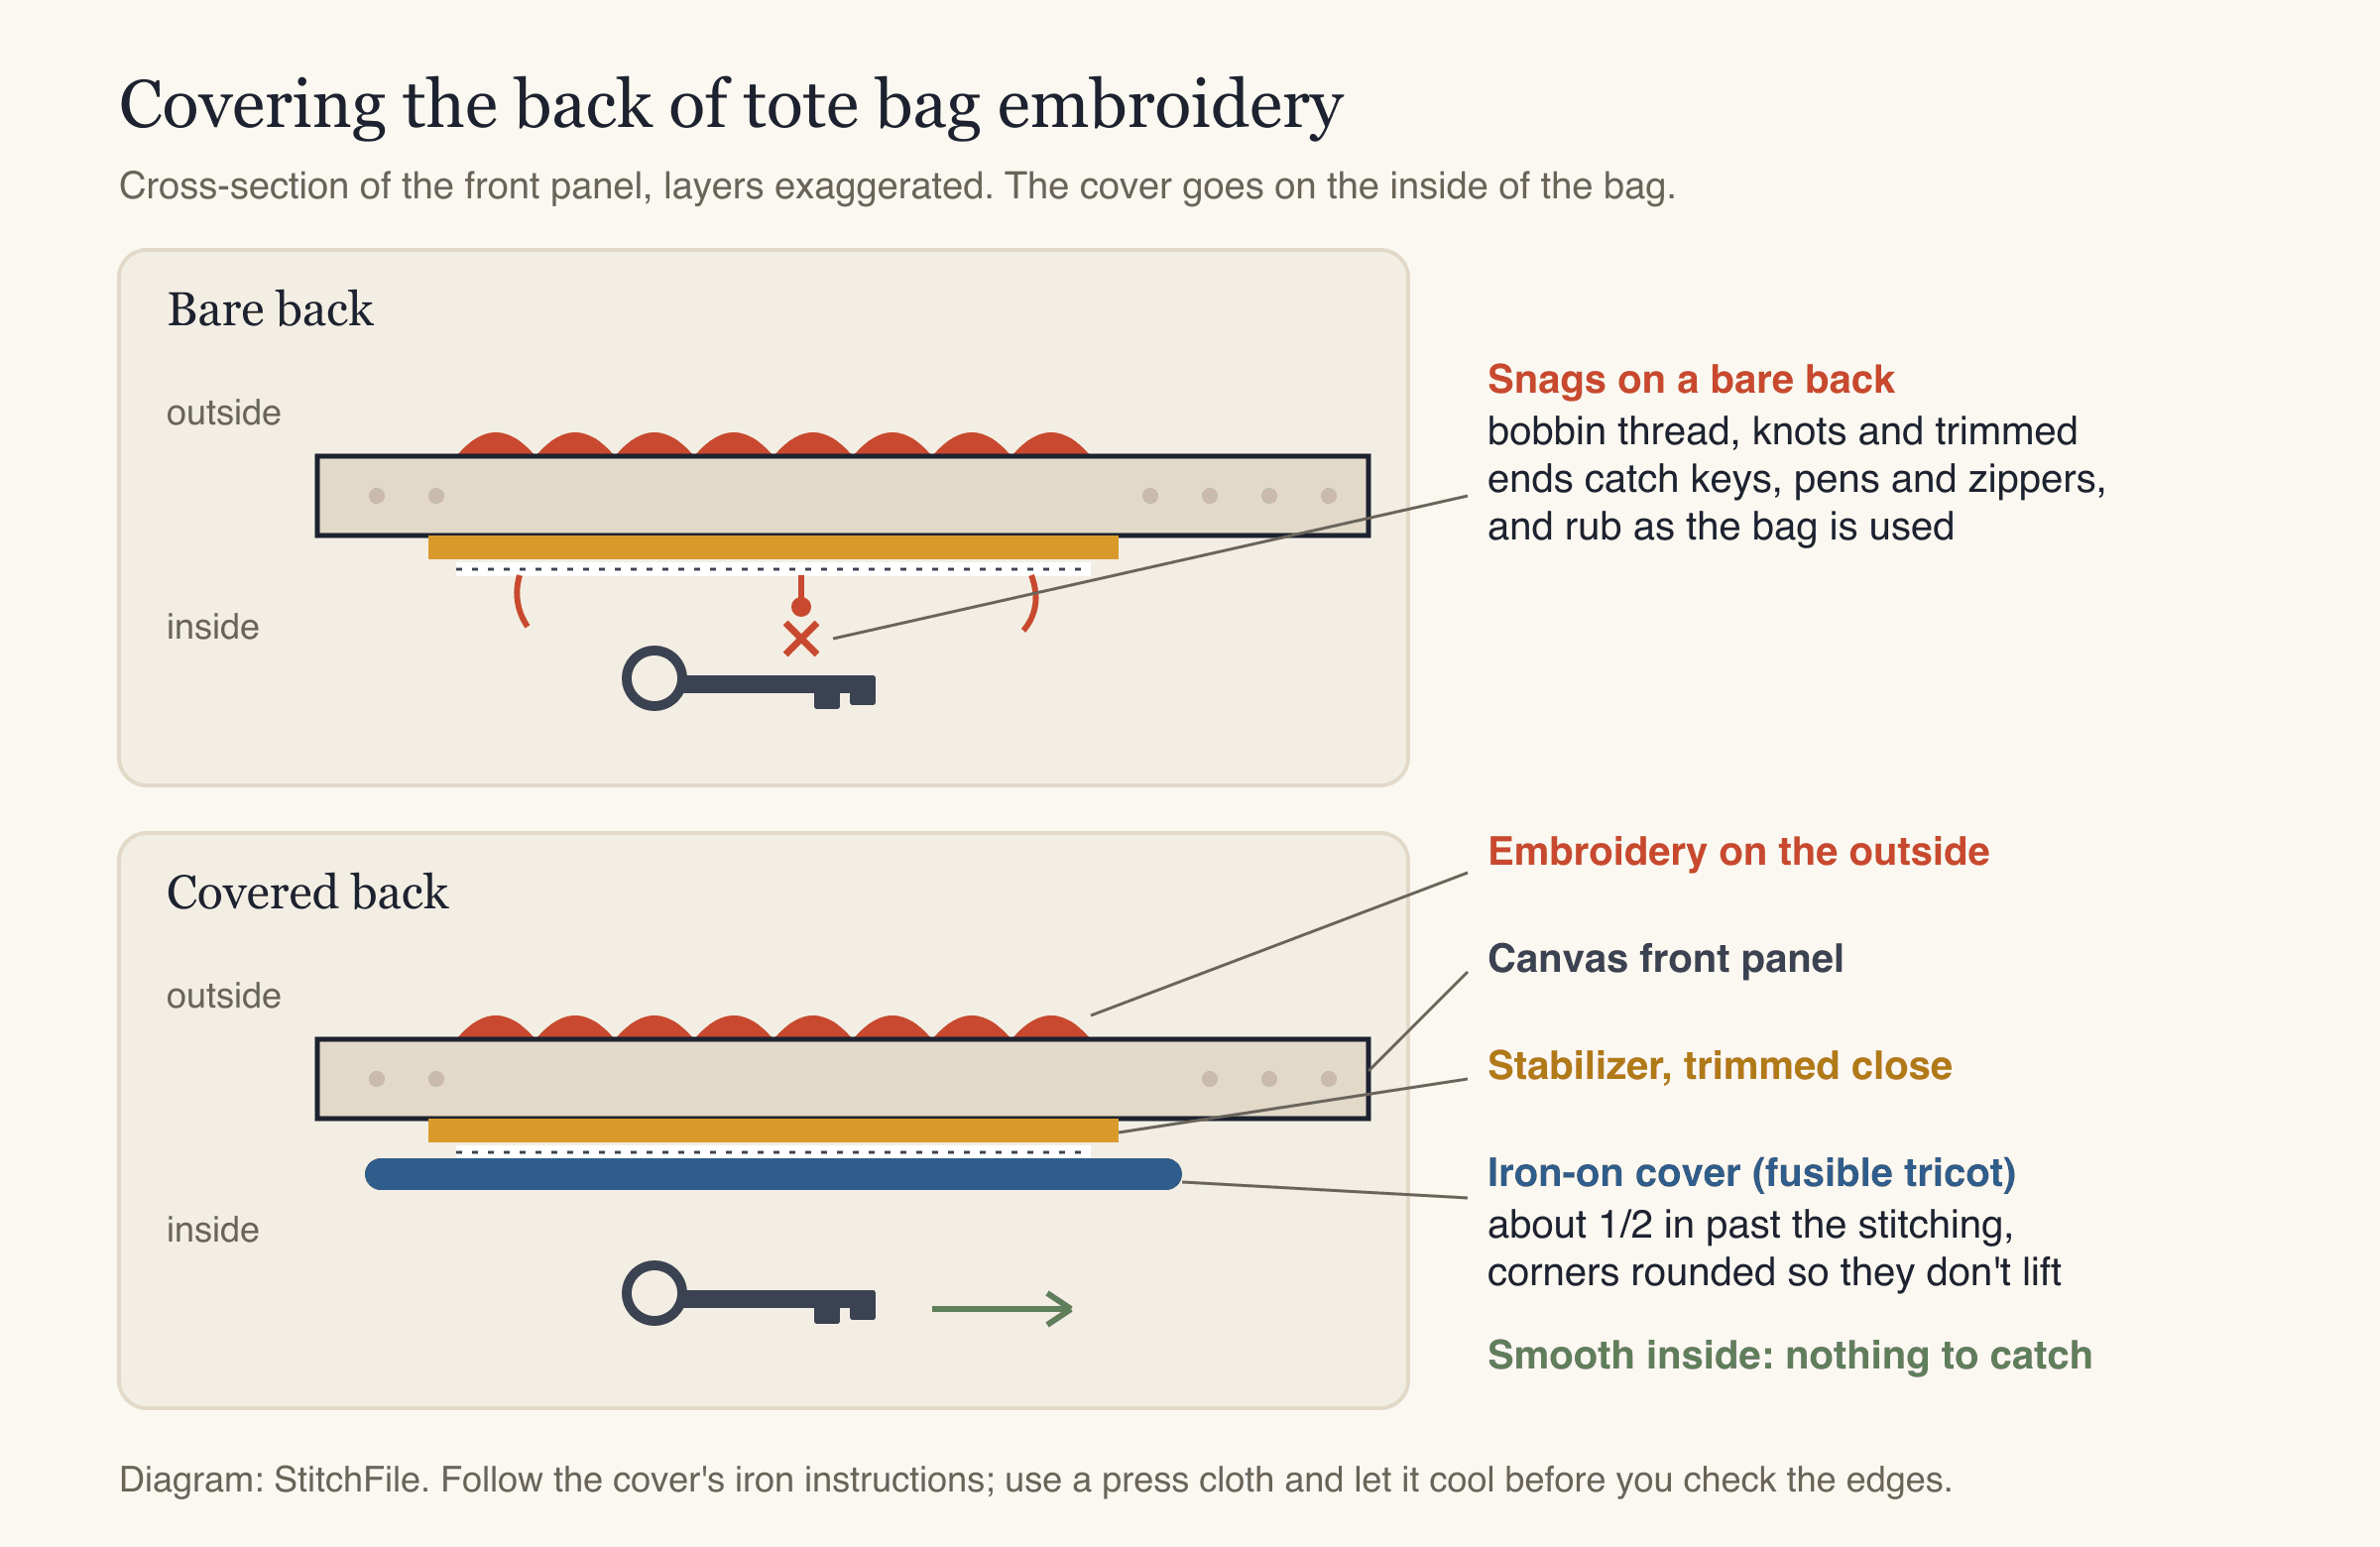
Left bare, the back of the stitching snags on things in the bag. An iron-on cover keeps the inside smooth.
- Remove the stabilizer and trim thread ends on the back, leaving no long tails.
- Cut the cover about 1/2 in bigger than the stitching on every side, with rounded corners (square corners tend to lift).
- Turn the bag inside out, lay the cover glue side down over the back of the design, and fuse it following its instructions, with a press cloth.
- Let it cool, check the edges, and re-press any that lift.
Batch production tips for sellers
- Measure the blanks. The "same" bag can vary between batches and suppliers.
- Make a placement template. Cut card or clear plastic the width of the bag with a small hole at the design center, line it up with the top edge and side seams, and mark through the hole. Or measure every bag from the same two references: top edge and center crease.
- Prep in batches. Cut all stabilizer pieces and covers before you start.
- Use two identical hoops if you have them: hoop the next bag while one sews.
- Keep one file and one orientation saved on the machine. Do personalized names last.
- Sew a test bag first and keep it as the reference for placement and color.
- Do the time math. A 22-minute design is more than 7 hours of machine time for 20 bags, before hooping and finishing. See how much to charge for embroidery.
Common mistakes
- Sewing through the back panel. Check under the hoop before you start and after the first color.
- Dead-center placement. It looks low once the bag is carried.
- Tear-away on a thin promotional tote. It puckers once the stabilizer is gone.
- A ballpoint or worn needle on canvas. Skipped stitches and ragged edges.
- Leaving the back bare. Things in the bag snag on it.
Caring for an embroidered tote bag
Spot-clean when you can. For a full wash, turn the bag inside out, wash cold on a gentle cycle, and air dry or tumble dry on low. No bleach. Iron from the inside or through a press cloth, never directly on the stitches. Sellers: add a care card.
FAQ
What size should embroidery on a tote bag be?
On a standard 15 × 16 in tote, a main design of about 125–180 mm (5–7 in) on its longest side looks balanced and fits a 5×7 hoop. A small shop logo can be 50–90 mm. A rule of thumb is one-third to one-half of the bag's width, limited by the largest hoop that fits inside the bag.
Can you embroider a tote bag that's already sewn?
Yes. Slide the hoop's outer ring in through the open top so only the front panel and stabilizer are clamped. Clip the handles up, fold the back panel away from the needle, and check under the hoop before you start. If the bag won't clamp, float it on sticky stabilizer.
What stabilizer is best for canvas tote embroidery?
Medium tear-away suits most cotton canvas totes, because canvas is stable on its own. Use cut-away for thin or loosely woven bags and heavy tear-away for very heavy canvas or duck.
What needle should I use to embroider a canvas tote?
A new sharp embroidery needle: 75/11 for light and medium canvas, 90/14 for heavy canvas. Ballpoints are meant for knits. Change the needle often, because canvas dulls it quickly.
Do I need to cover the back of embroidery on a tote bag?
It isn't required, but it's a good idea. Keys, pens and zippers catch on the exposed back of the stitching. An iron-on cover such as fusible tricot, cut 1/2 in past the stitching with rounded corners, keeps it smooth and protects the stitches.
Can I sell embroidered tote bags made with StitchFile designs?
Yes, with a Pro or Shop plan, which include commercial use. Single designs and 10-packs are for personal use only. You also need to own the artwork you upload or have the owner's permission.
Make your tote bag design
Measure the front panel of your tote and pick a size that fits both the bag and your hoop. Then upload your artwork to StitchFile, choose the Woven fabric and your size, and check the free stitch preview, stitch count and hoop fit before you sew your first bag.