Embroidery guide
Photo to Embroidery: How to Turn a Pet Photo Into Stitches
Photo to embroidery, honestly explained: pick a good photo, simplify it into flat colors, size it right and turn your pet picture into a machine file.
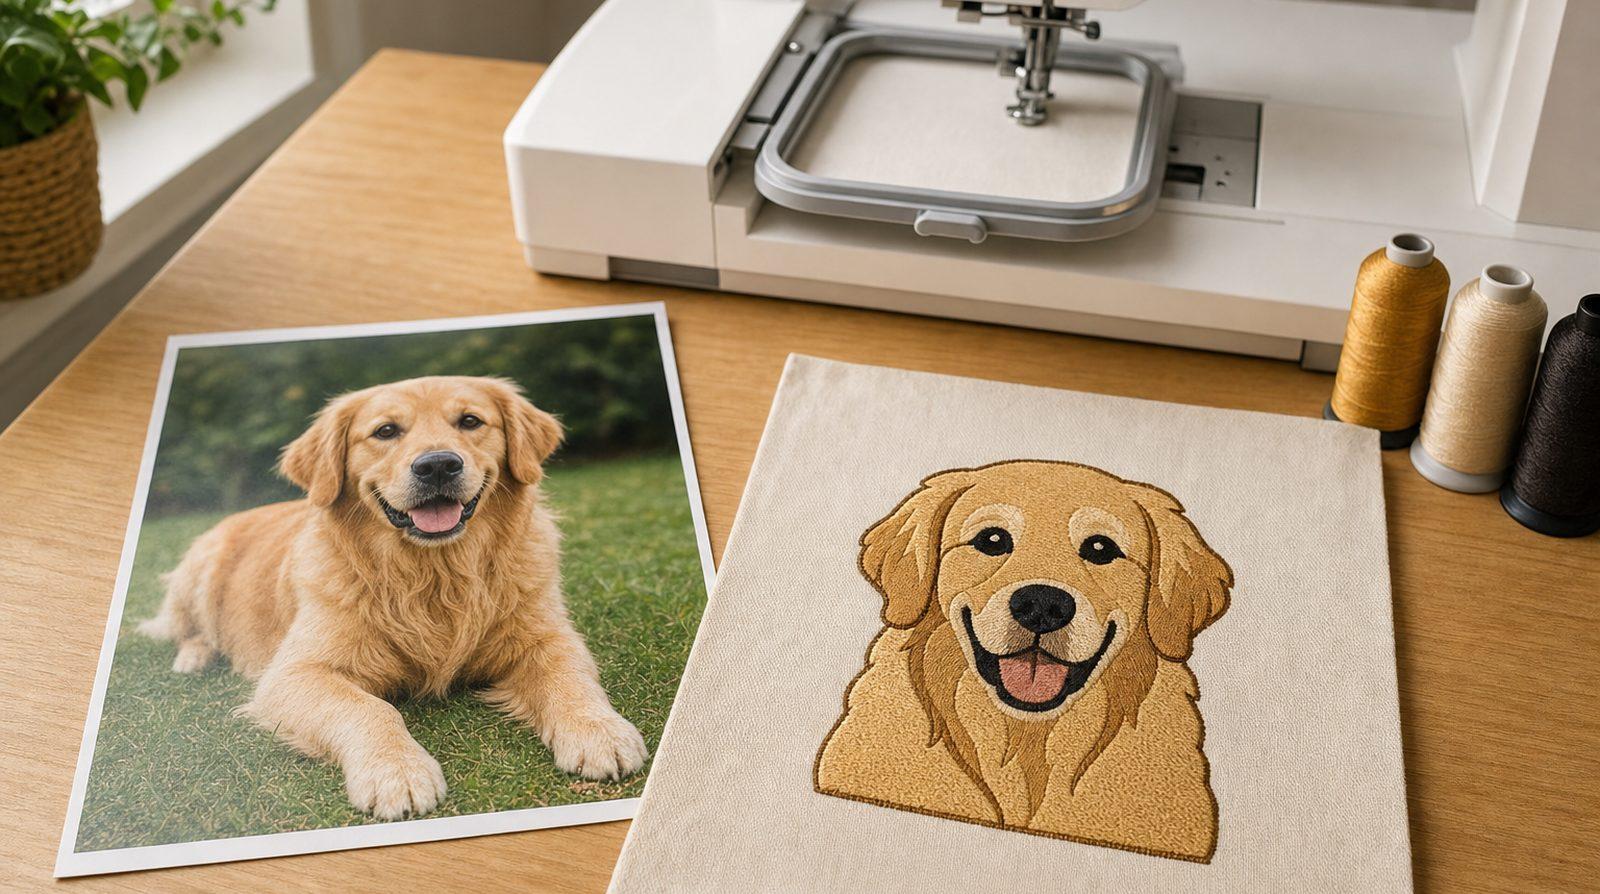
Quick answer: You can turn a photo into embroidery, but not as a photograph. Thread comes in solid colors, so the photo has to be simplified first.
- Start with a sharp, well-lit, front-facing photo on a plain background, cropped tight to the face.
- Simplify it into about 4–8 flat colors with bold shapes. An illustration or cartoon look stitches best.
- Give faces room: about 90–100 mm across for a pet face is a sensible starting point.
- Digitize it for your fabric, check a stitch preview, and test-sew on scrap before the real item.
Photo to embroidery is a popular project: the family dog on a tote bag, a cat on a sweatshirt, a first home on a cushion. It's also easy to be disappointed if you expect the stitched result to look like the photo.
This guide explains why photos don't map straight to thread, how to pick and simplify a picture so it stitches well, what size and fabric to choose, and how to turn a photo into embroidery with StitchFile, limits included.
Photo to embroidery: why a photo can't be stitched as it is
A photo and an embroidery design are built from completely different materials.
A photo is continuous tone. Every pixel can be a slightly different color, so a dog's head may hold thousands of shades of brown. Soft gradients and fine fur texture are what make it look real.
Embroidery is flat color. Each thread is one solid color, and a home machine stops for every change. Every tone in the photo has to be assigned to one of a handful of threads, so smooth shading becomes a few regions with hard edges.
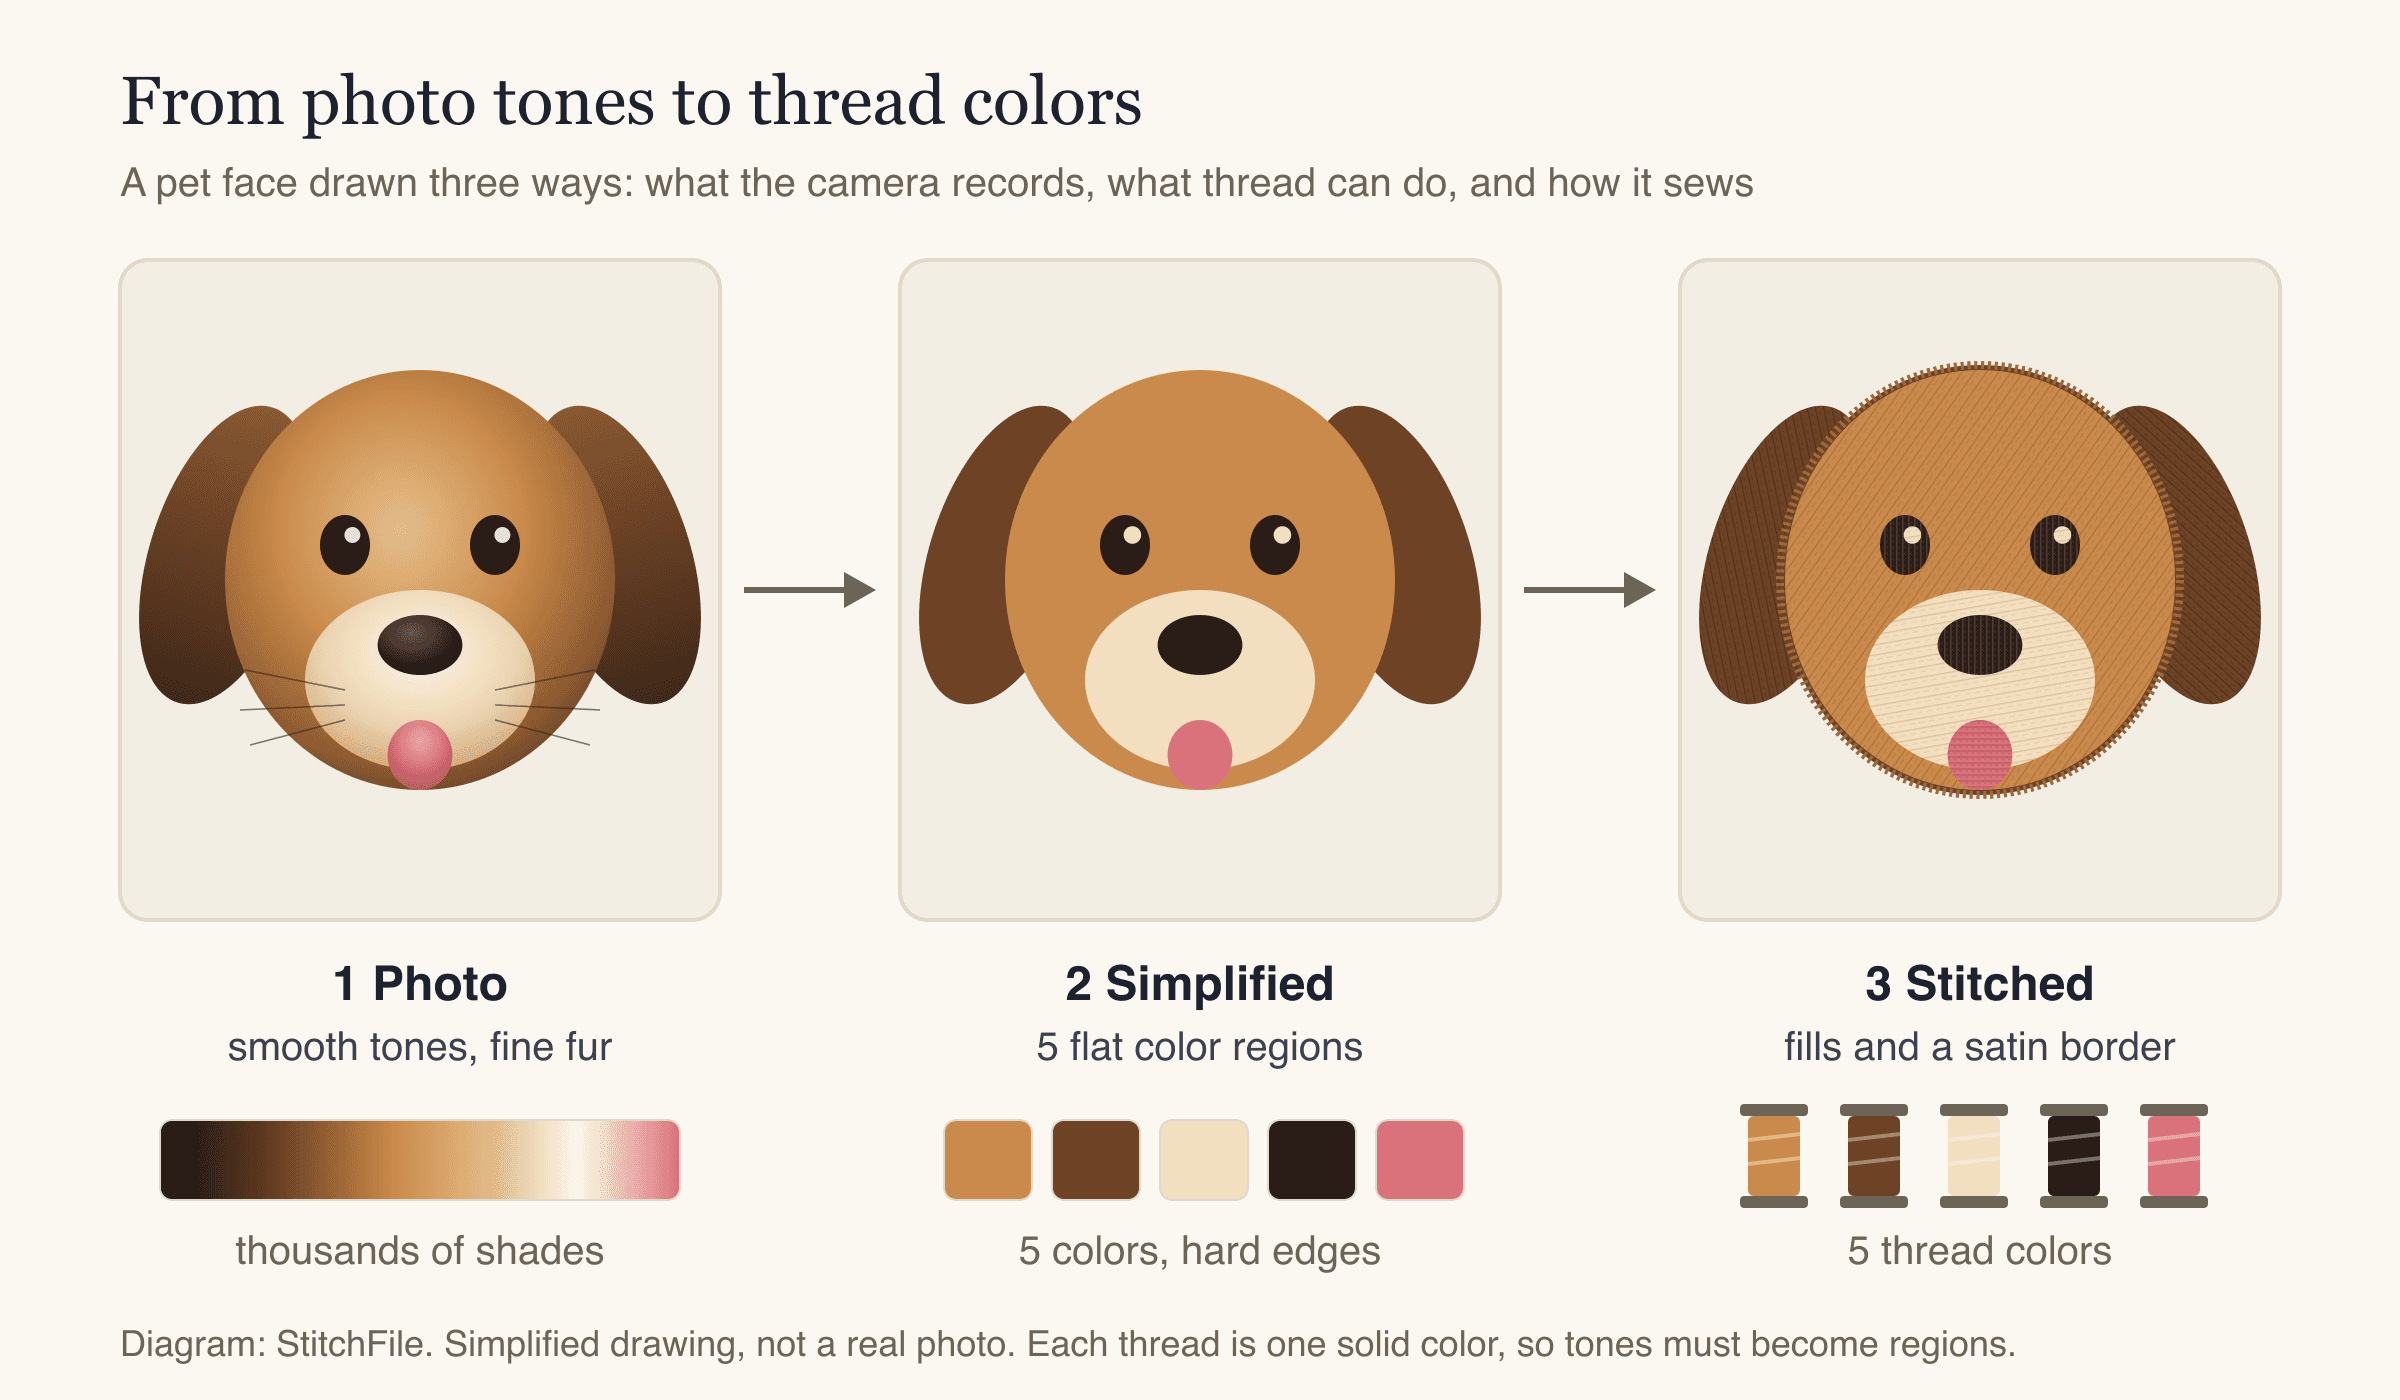
How a photo becomes a stitchable design: thousands of shades become five flat regions, and each region becomes one thread.
Detail is limited by thread width. A satin column (the shiny zigzag stitch used for borders and outlines) needs to be roughly 1 mm wide or more to look clean. Anything thinner, like a single whisker, an eyelash or the glint in an eye, is close to the width of the thread itself. Fine detail either disappears or turns into a thin running-stitch line.
That's why good photo embroidery looks like an illustration of your pet, not a print of the photo. Plan for that look and the results can be charming and very recognizable.
What about photo-realistic embroidery?
You may have seen embroidered portraits that look almost like photographs. That style, sometimes called photo stitch or thread painting, is built by hand by specialist digitizers who layer many open, angled rows of stitching so colors blend. It takes skill, time and many test sews, and it's a different technique from the flat-color approach here.
StitchFile doesn't make that style. It turns a photo into simplified, flat-color art and digitizes that.
Choose the right photo
The source photo decides most of the result. The redraw can only simplify what the photo shows clearly; it can't invent an eye that is hidden in shadow.
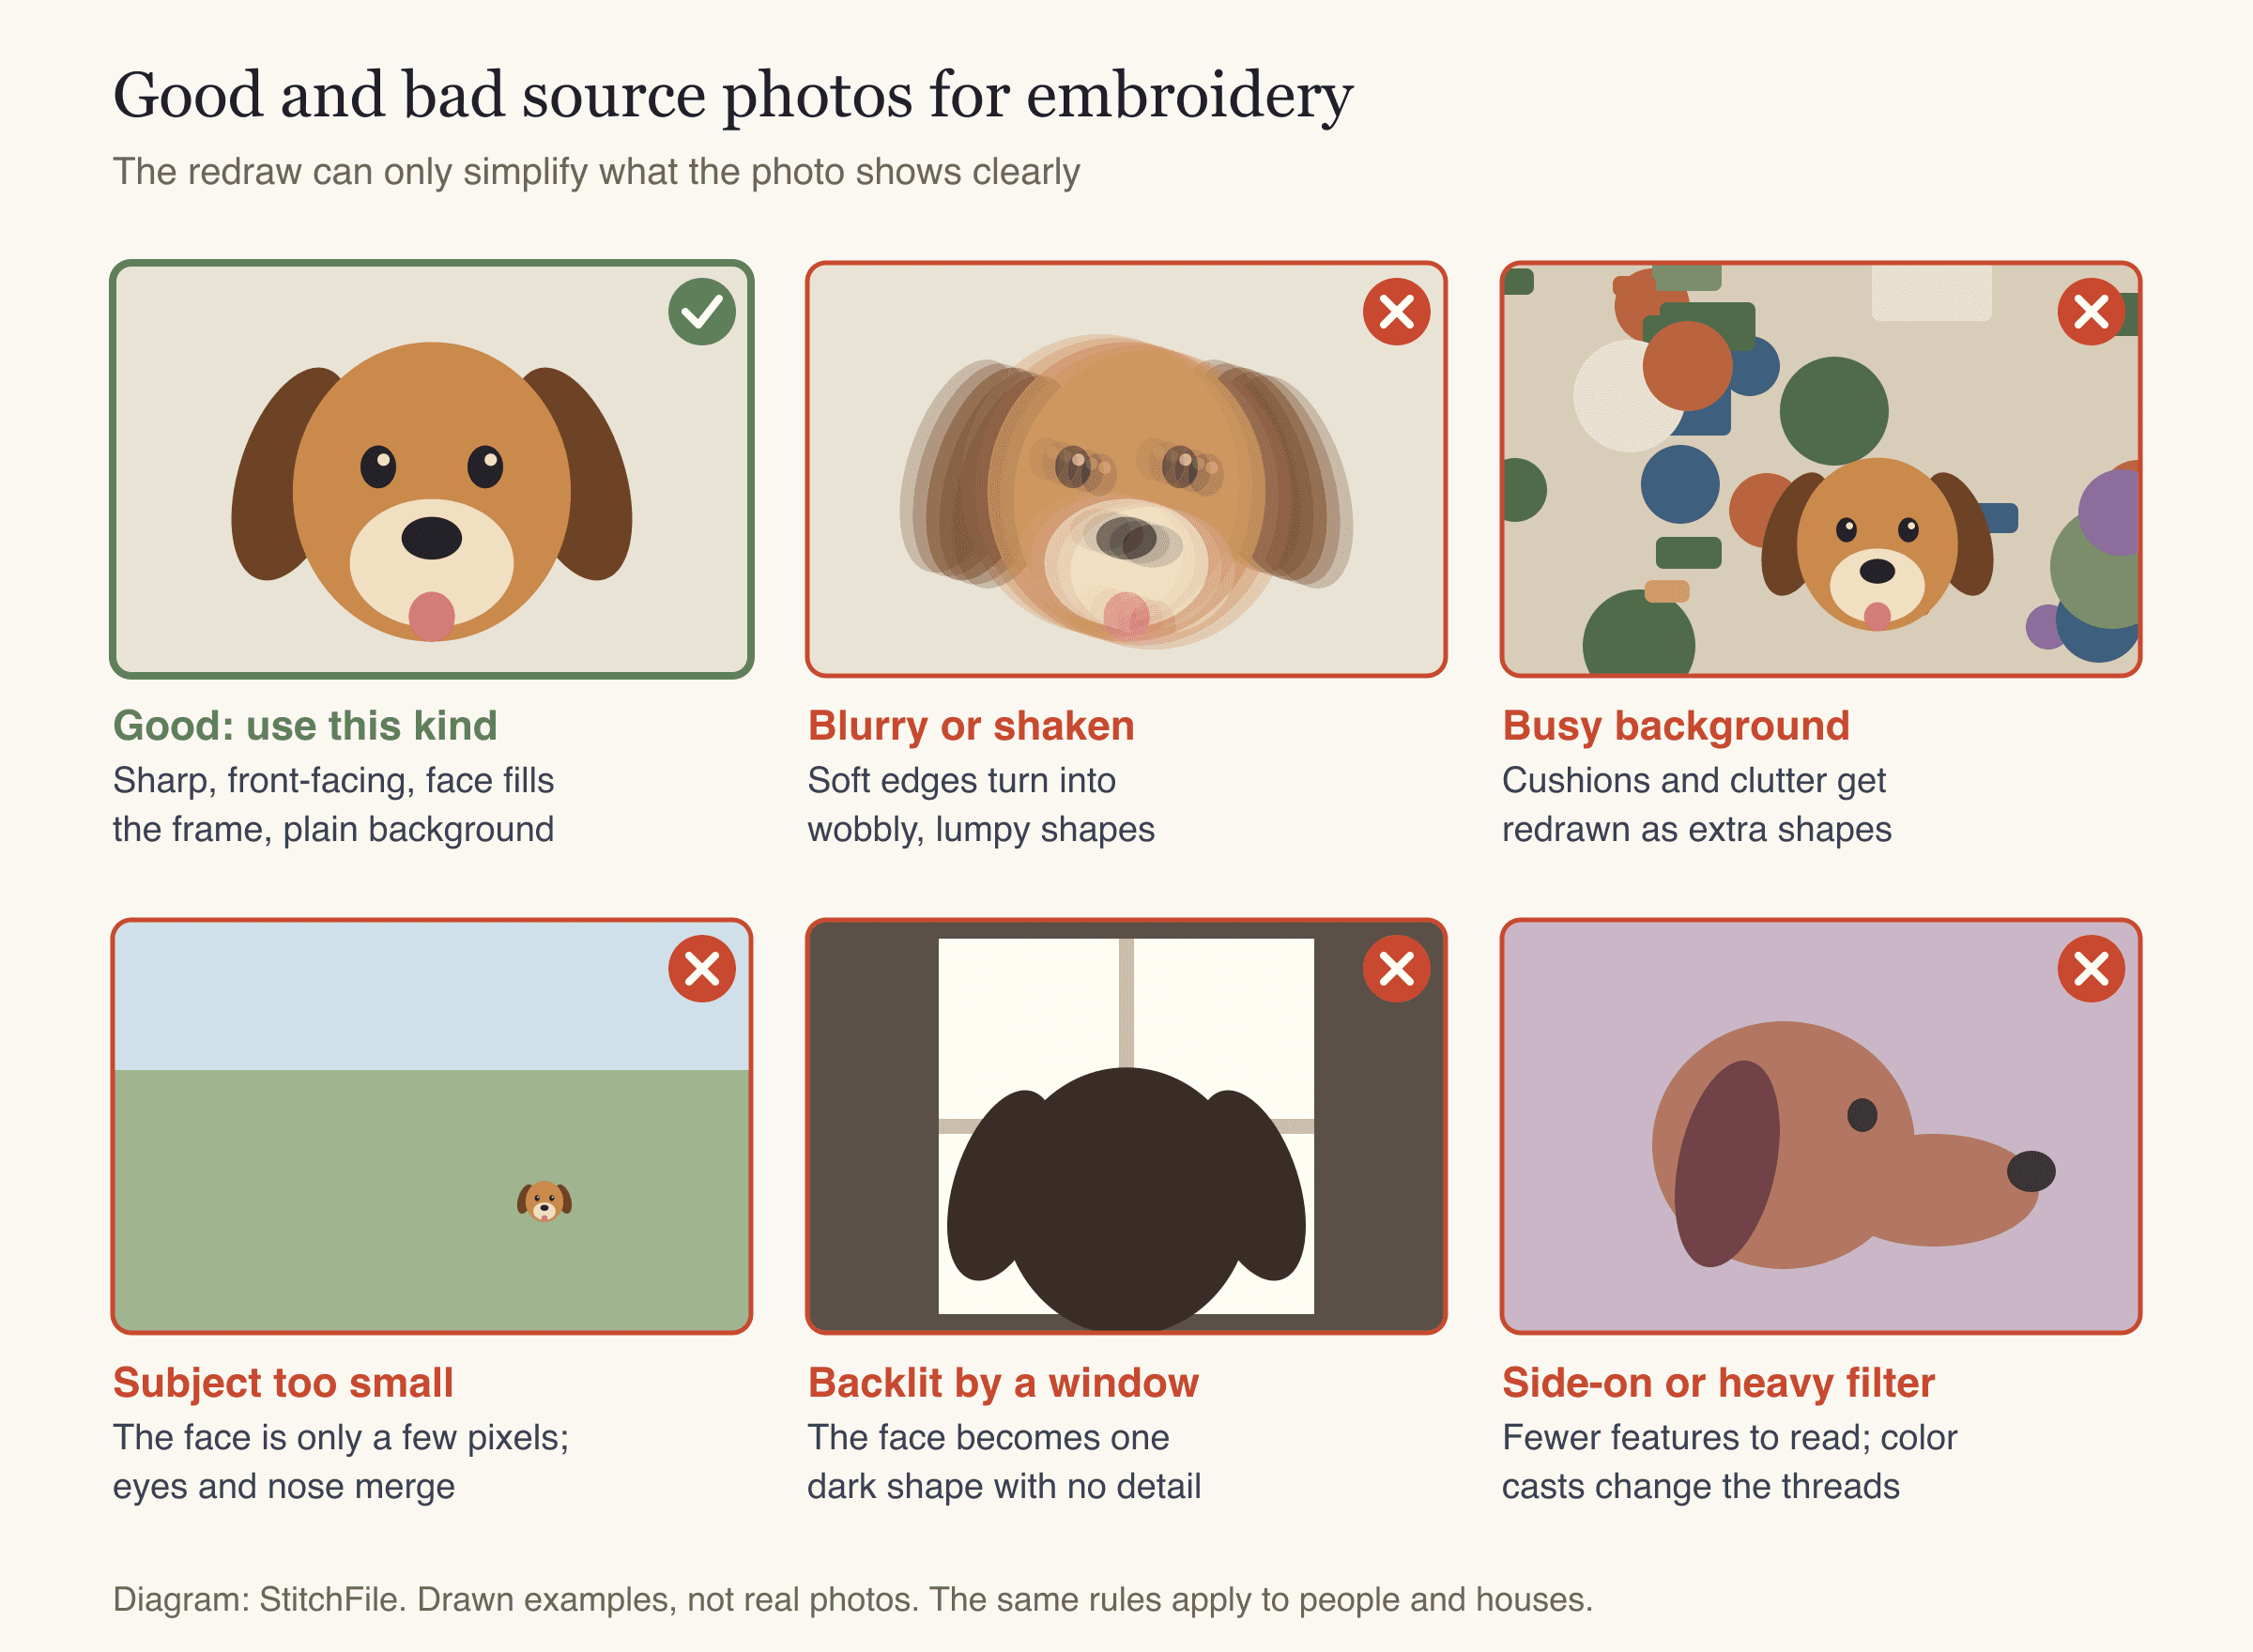
What makes a good source photo for pet embroidery. These are drawings, but the same rules apply to real photos of people and houses.
What to look for:
- Sharp focus on the eyes. Blur turns edges into lumpy shapes. Zoom in on the eyes before you choose.
- Even, soft light. Daylight from the front or side. A pet in front of a bright window becomes one dark shape.
- Plain background. A wall, a lawn or a blanket in one color. Cushions, toys and patterned rugs get redrawn as extra shapes.
- Subject large in the frame. The face should fill most of the picture.
- Front-facing for pets. Both eyes, the nose and the mouth visible. A side profile can work for a silhouette, but most pet portraits read better face-on.
- High contrast. A black dog on a black sofa, or a white cat on a white bed, loses its outline.
- No filters. Color casts, vignettes and beauty filters change the colors the threads are matched to. Use the original, unedited photo.
- The largest version you have. The original, not a screenshot or a copy from a messaging app.
For people, the same rules apply, with one extra: faces are hard. We recognize people from tiny differences in the eyes and mouth, and those are exactly the details that thread simplifies. Head-and-shoulders photos with clear, simple lighting work best. For houses, choose a straight-on photo of the front, taken in flat daylight, without cars or trees covering the doors and windows.
Simplify before you stitch
Whether you simplify by hand or let software do it, these decisions make a photo stitch well.
- Crop tight. Keep the face (or the house front) and cut everything else. For pets, crop just below the chin or collar.
- Drop the background. Most pet portraits look best floating on the fabric. If you want a background, make it one simple shape.
- Pick 4–8 colors. A typical pet needs a main fur color, a darker and a lighter shade, near-black for eyes and nose, and maybe a tongue or collar color.
- Make shapes bold. Merge small patches of fur into larger areas. Turn fine markings into a few clear shapes.
- Exaggerate the features that matter. Eyes, nose and the outline of the ears carry the likeness. Give them a little extra size and contrast.
- Draw thin details bold or leave them out. Whiskers and fur strands need to be about 1 mm or wider at the finished size to sew as a satin line.
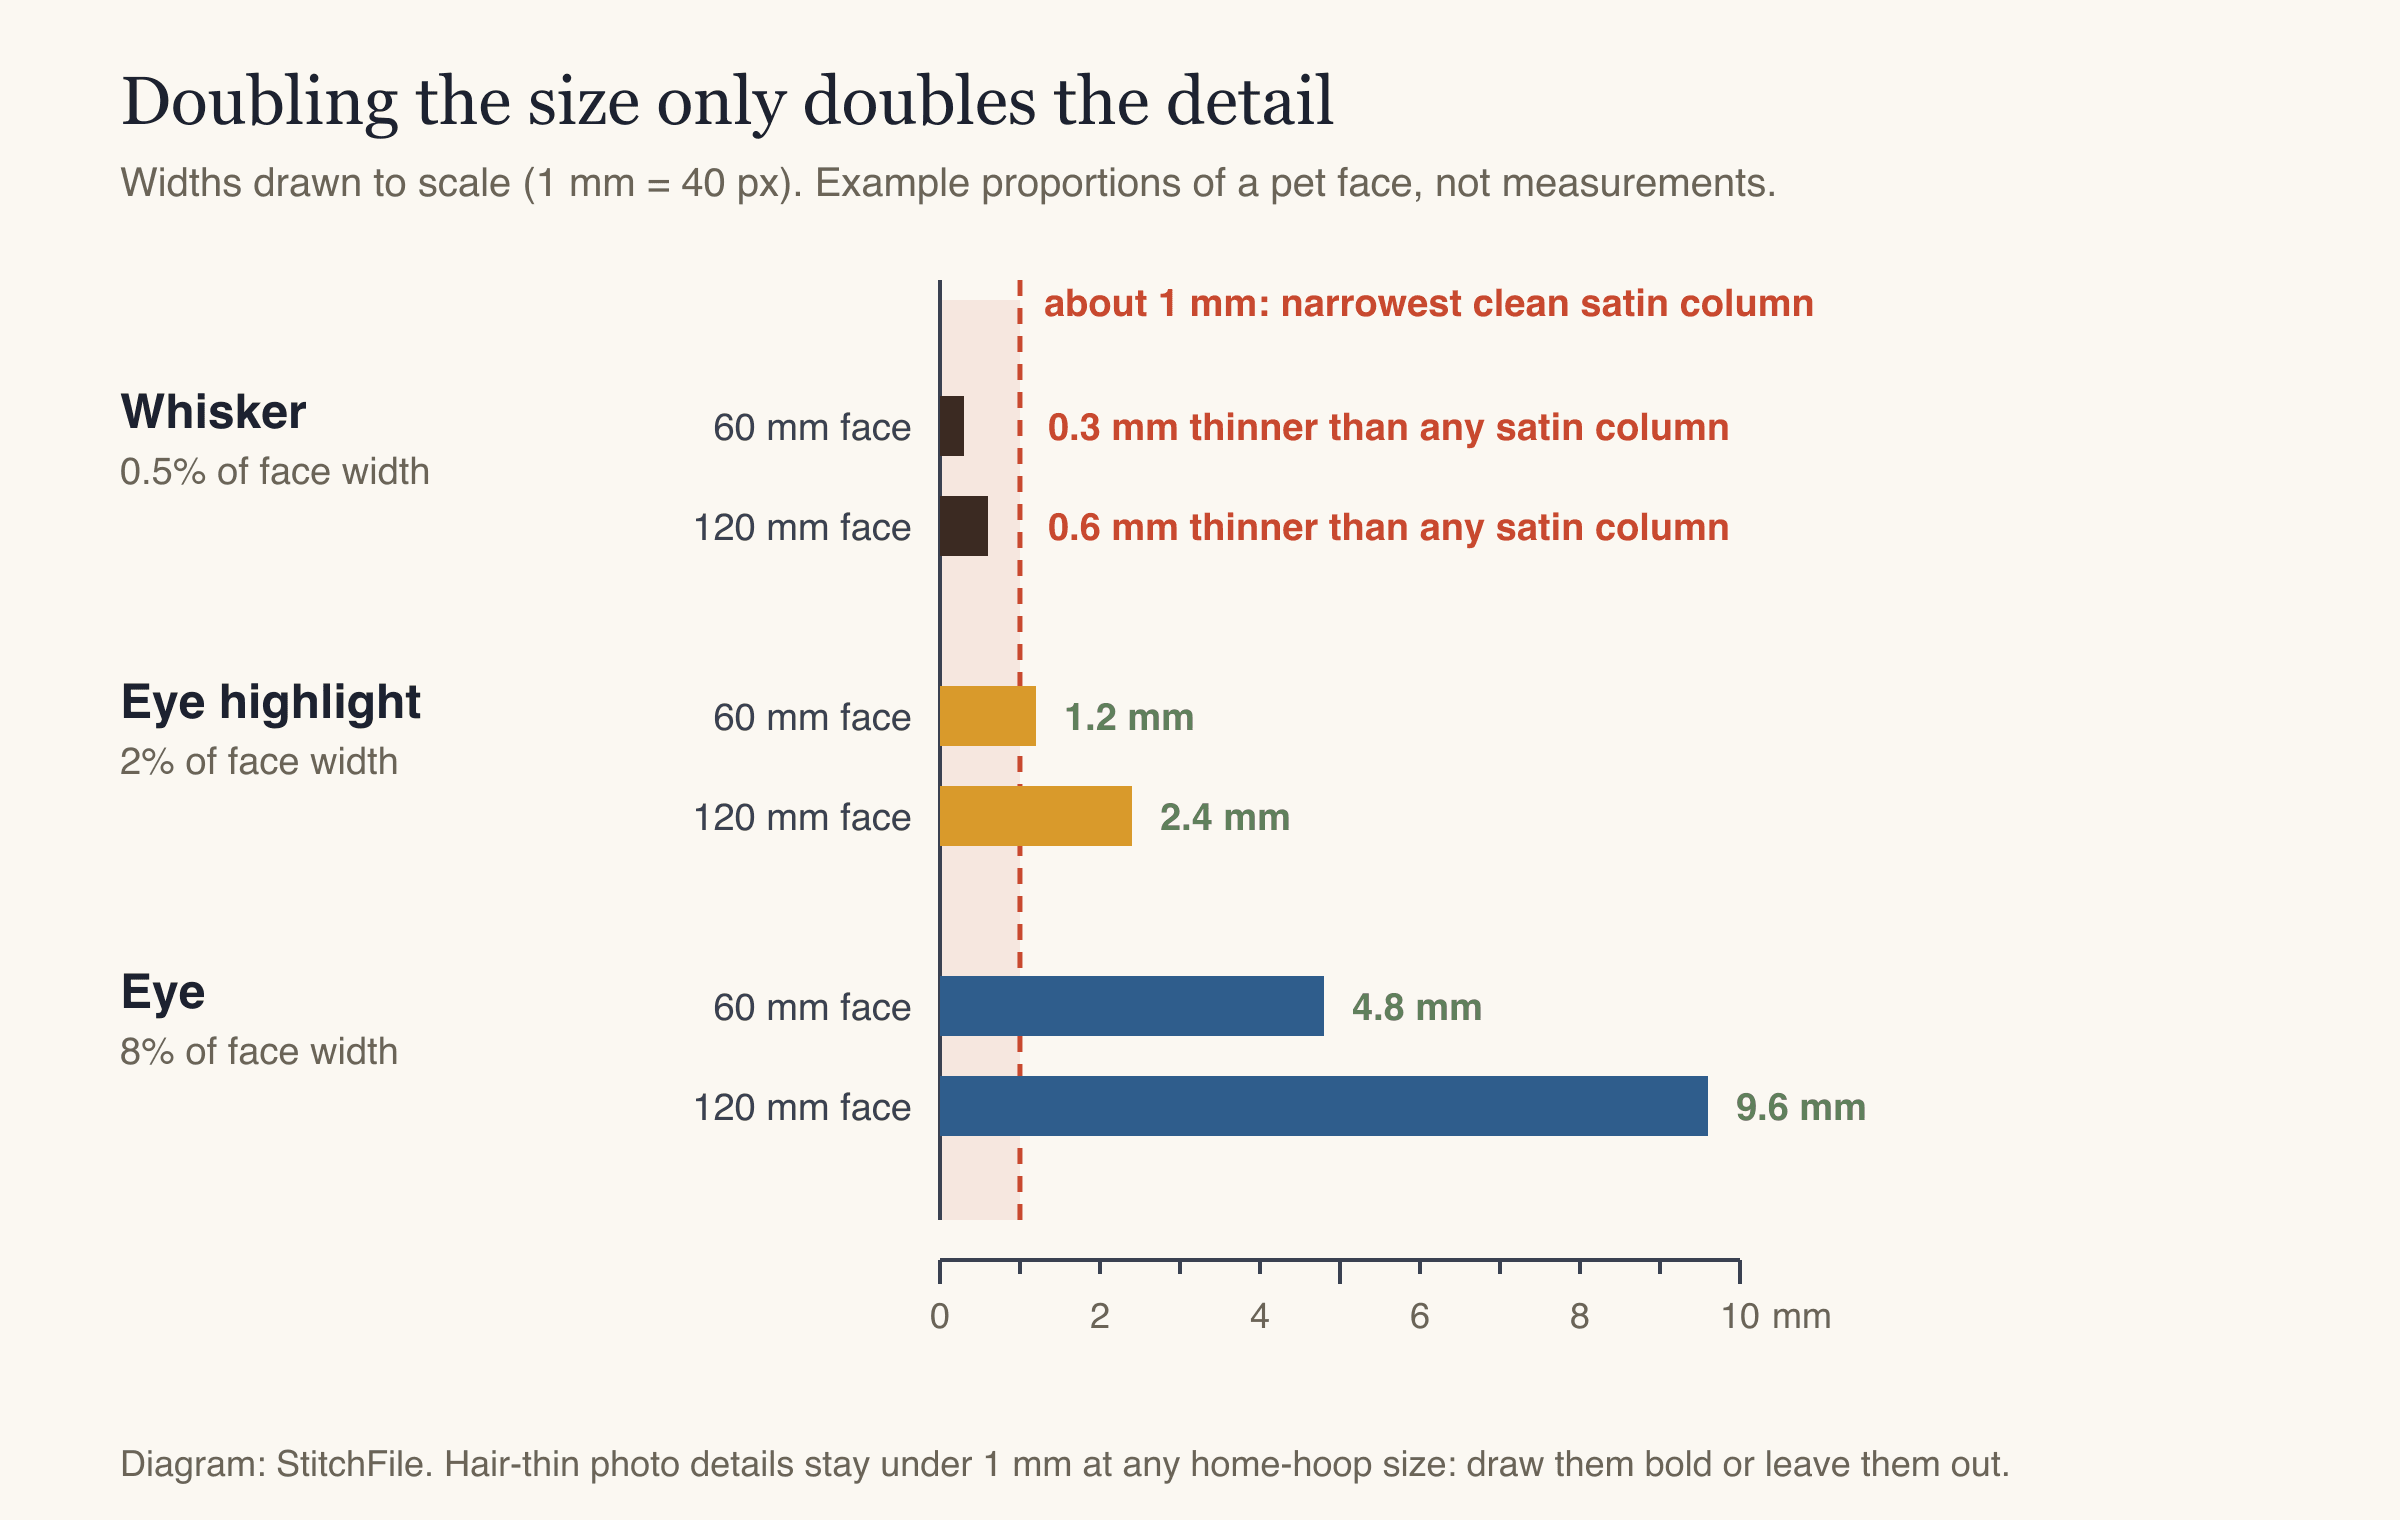
Making the design bigger helps, but it only scales details in proportion. A hair-thin whisker is still too thin at any size a home hoop holds.
Cartoon and illustration styles work best. A flat-color cartoon of the pet is the most reliable route to a clean stitch-out.
A line-art version is another option. A bold outline drawing traced from the photo (lines at least about 1 mm thick at the finished size) sews as outlines only. It's quick to stitch, light on the fabric, and suits T-shirts and tea towels well.
Size matters more for photos than for logos
Faces need room. Eyes, nose and mouth sit close together, so on a small design they merge into one blob.
As a rule of thumb, start at about 90–100 mm (3.5–4 in) across for a pet face. That fits a 4×4 in hoop (about 100×100 mm) and gives each eye enough width to sew as a proper shape. Go smaller only for very simple, cartoon-style designs.
| Subject | Starting size (longest side) | Smallest common hoop |
|---|---|---|
| Pet face, cartoon style | 75–95 mm | 4×4 in (100×100 mm) |
| Pet face, more detail | 100–130 mm | 5×7 in (130×180 mm) |
| Whole pet, sitting | 120–180 mm | 5×7 in (130×180 mm) |
| Person, head and shoulders | 120 mm and up | 5×7 in (130×180 mm) |
| House front | 100–180 mm | 4×4 in or 5×7 in, depending on shape |
These are starting points, not rules. Check your machine's maximum embroidery area before you settle on a size, and see the embroidery hoop sizes guide if you're not sure what yours holds.
Bigger designs sew longer, so don't oversize either. A 100 mm pet face suits a tote bag, a cushion or a sweatshirt front.
Choose a fabric that can carry it
A photo-based design usually has large filled areas: the whole head is stitched, not just outlined. That's a lot of stitches in one place, so fabric and stabilizer matter.
| Item | Fabric setting | Stabilizer | Notes |
|---|---|---|---|
| Tote bag, canvas, cushion cover | Woven | Tear-away, medium | The easiest base for an embroidered pet portrait |
| T-shirt, smooth sweatshirt | T-shirt knit | Cut-away (no-show mesh) | Dense fills feel stiff on thin tees; prefer sweatshirts or a smaller, simpler design. Fluffy fleece: use Towel & fleece |
| Polo shirt | Polo piqué | Cut-away + water-soluble topping | Small, simple pet logos work better than portraits |
| Denim jacket | Denim | Tear-away, heavy | Handles large fills well |
| Blanket, towel, fleece | Towel & fleece | Tear-away + topping | The topping stops stitches sinking into the pile |
Stretchy fabric is the hardest base for big fills: it pulls, puckers and lets gaps open between colors. If it's your first photo design, stitch it on a stable woven tote bag or cushion cover (see embroidered tote bags for hooping tips). Our embroidery stabilizer guide explains each stabilizer type.
How to turn a photo into embroidery with StitchFile
StitchFile digitizes artwork into machine embroidery files, and it accepts photos too. It redraws the photo as simplified, flat-color art and then digitizes that art for the size and fabric you choose. The preview is free, so you can see the result before you pay anything.
- Prepare the photo. Crop it tight and save it as JPG or PNG (up to 10 MB). iPhone HEIC photos aren't accepted; save or export them as JPG first. In the iPhone and Android apps you can pick a photo straight from Photos or the camera.
- Upload it at stitchfile.app/convert. Choose the size (the 4×4 hoop preset is 95 mm, or type any size from 20 to 300 mm), the fabric, and the garment color, so thread choices suit it.
- Let it redraw. The photo is redrawn as flat-color art automatically, then digitized. Images take a little longer than the usual 20 seconds or so.
- Read the preview. You see your design next to a stitch simulation drawn from the real machine file, a close-up of the busiest area, the design on a product at real size, the stitch count, thread colors, sew time and the smallest hoop it fits. Designs made from photos carry a note saying so.
- Try Clean up with AI. This edit redraws the image as bold, flat embroidery art. It needs a free account, takes about a minute, and you can use it twice per design (up to five a day). Your original version stays, so you can compare.
- Refine with the free edits (they need a free account). Fewer colours merges look-alike shades with a slider. Change colours swaps any color for one of 64 Brother threads, useful for matching the real fur color. Remove parts deletes leftover background bits or stray shapes. Background lets you remove the background (the fabric shows) or keep it as a filled patch. Each edit makes a new free preview.
- Buy only if you like it. A single design is $4.99 for personal use and includes PES, DST, JEF, EXP and VP3, plus a thread color key in sewing order with the stabilizer to use. You get free re-sizes for 7 days after buying.
- Test-sew on a scrap of the same fabric with the recommended stabilizer before stitching the real item.
Here's what flat-color pet art looks like when StitchFile digitizes it. This is not from a photo. It's an illustration-style cat face, which is the kind of art a well-simplified pet photo ends up close to:
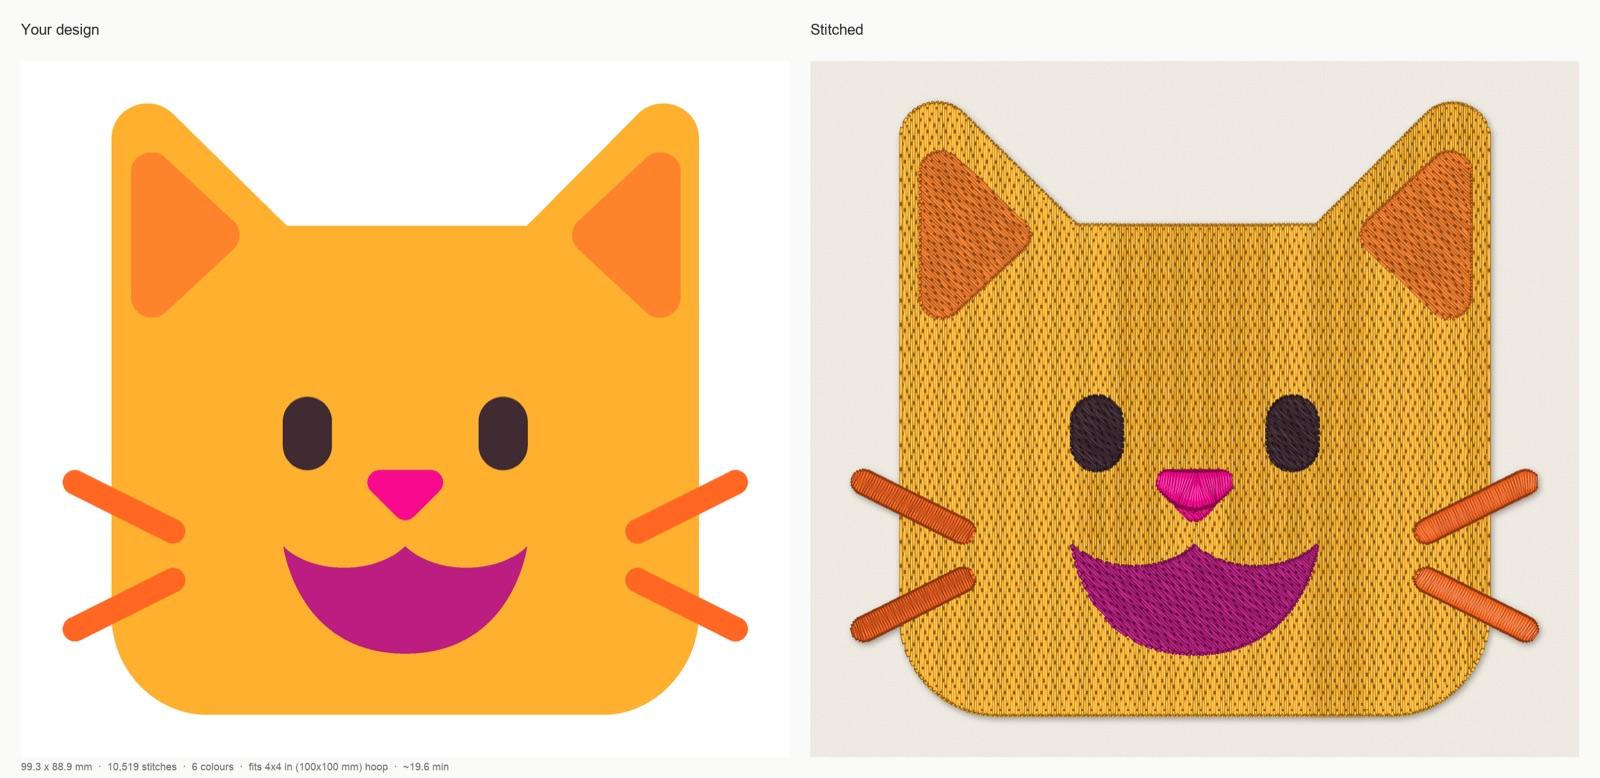
StitchFile stitch preview on the Woven setting at 100 mm: 99.3 × 88.9 mm, 10,519 stitches, 6 colors, 21 trims, fits a 4×4 in (100×100 mm) hoop, about 19.6 minutes at 700 stitches per minute. The artwork is an illustration, not a photo.
Cat face artwork: Microsoft Fluent Emoji, copyright (c) Microsoft Corporation, MIT License. Stitch preview generated by StitchFile from the artwork.
Notice what makes this stitch cleanly. The head is one large fill, the ears are a second fur shade, and the eyes, nose and mouth are bold, separate shapes. The whiskers are drawn as strokes about 3.5 mm wide at this size, so they sew as solid satin columns instead of vanishing. That is the look to aim for when you simplify a pet photo.
The honest limits
- Photos come out like an illustration. Fur texture, soft shading and reflections become flat regions. That's the nature of flat-color embroidery, not a fault in the file.
- Results vary. A sharp, simple photo can come out well. A dark, busy or blurry one usually doesn't, and no edit can fully rescue it.
- No sew-out guarantee for photos. StitchFile's guarantee (a free re-run or refund if a file sews badly) doesn't cover designs made from photos. They're sold as shown in the free preview, so check it closely, especially the close-up.
If the preview doesn't look like your pet, try a different photo before spending time on edits.
For how digitizing decisions like underlay and pull compensation work under the hood, see how to digitize a logo for embroidery.
Rights and permissions
Photos you took yourself are yours to use. A photo taken by someone else, such as a professional pet photographer, a friend or a stock site, belongs to that person, even if your dog is in it. Get their permission before you turn it into embroidery, especially if you plan to sell the result. Artwork, illustrations and cartoons of pets drawn by other artists work the same way.
If you make custom pet embroidery for customers, ask them to send photos they took themselves or have permission to use. Selling what you stitch also needs a commercial plan on StitchFile (Pro or Shop). This isn't legal advice; for anything unclear, ask the owner or a lawyer.
Common mistakes
| Mistake | What happens | Fix |
|---|---|---|
| Expecting a photographic look | Disappointment with a flat result | Plan for an illustration style from the start |
| Dark or backlit photo | The face sews as one dark shape | Retake in soft daylight, facing the light |
| Too many colors | Many thread changes, speckled areas | Reduce to 4–8 colors |
| Design too small | Eyes and nose merge into a blob | Start at about 90–100 mm for a pet face |
| Hair-thin whiskers and fur lines | Lines vanish or sew thin and patchy | Draw them about 1 mm or wider, or leave them out |
| Stretchy T-shirt for a dense portrait | Puckering and gaps between colors | Use a sweatshirt, tote bag or cushion, with the right stabilizer |
| Skipping the test sew | Problems found on the gift itself | Test on scrap of the same fabric first |
More fixes for puckering, gaps and thread breaks are in the machine embroidery troubleshooting guide.
FAQ
Can you turn any photo into embroidery?
You can digitize almost any photo, but not every photo gives a good result. Sharp, well-lit photos with one clear subject on a plain background turn into recognizable designs. Dark, blurry or cluttered photos tend to become muddled shapes, so choose the photo carefully.
Can machine embroidery look exactly like a photo?
Not with flat-color digitizing. Thread is one solid color per area, so a photo becomes an illustration-style design with a few colors. Photo-realistic thread painting exists, but it's specialist hand-digitizing work with many blended layers.
What size should a pet portrait embroidery be?
A pet face of about 90–100 mm (3.5–4 in) across is a good starting point and fits a 4×4 in hoop. Simple cartoon-style designs can go a little smaller. A whole pet or a detailed portrait needs more room, usually a 5×7 in hoop.
What is the best photo for pet embroidery?
A sharp, front-facing photo in soft daylight, with the pet's face filling most of the frame and a plain background. Both eyes and the nose should be clearly visible. Use the original photo from your phone, without filters.
How many colors should a photo embroidery design have?
Four to eight colors suits most pet and portrait designs: a main fur color, a lighter and a darker shade, eyes and nose, and one or two accents. More colors add thread changes and tiny areas without improving the likeness much.
Can I sell custom pet embroidery made from customers' photos?
Yes, as long as the customer took the photo or has permission to use it. Ask them to confirm that before you start. On StitchFile, selling what you make requires a Pro or Shop plan; single designs and 10-packs are for personal use.
Try it with your own photo
Photo to embroidery works best when you plan for flat color: a sharp, simple photo, a tight crop, 4–8 colors, bold shapes and enough size for the face. Expect an illustration of your pet, not a copy of the photo, and test-sew before the real gift.
To see how your photo comes out, upload it to StitchFile and check the free stitch preview. You'll see the colors, stitch count and hoop size before you decide whether to download.