


The short version
- Free
- Upload, automatic digitizing, the stitch preview, stats and product mock-ups, with no account. Edits are free with a free account.
- You pay for
- Downloading the machine files: per design (price shown before you pay), or from $2.90 a design with a 10-pack.
- How long
- About 20 seconds per preview. Each edit makes a new one in about the same time.
- Formats
- PES, DST, JEF, EXP and VP3, all five in every purchase, plus a thread color key and report.
How free embroidery digitizing works here
Digitizing is the step between a picture and a stitch-out. An embroidery machine can't read a PNG; it needs a list of stitches, colors and trims in its own format. StitchFile makes that list automatically, then shows you the result before you spend anything.
- 1
Upload your artwork
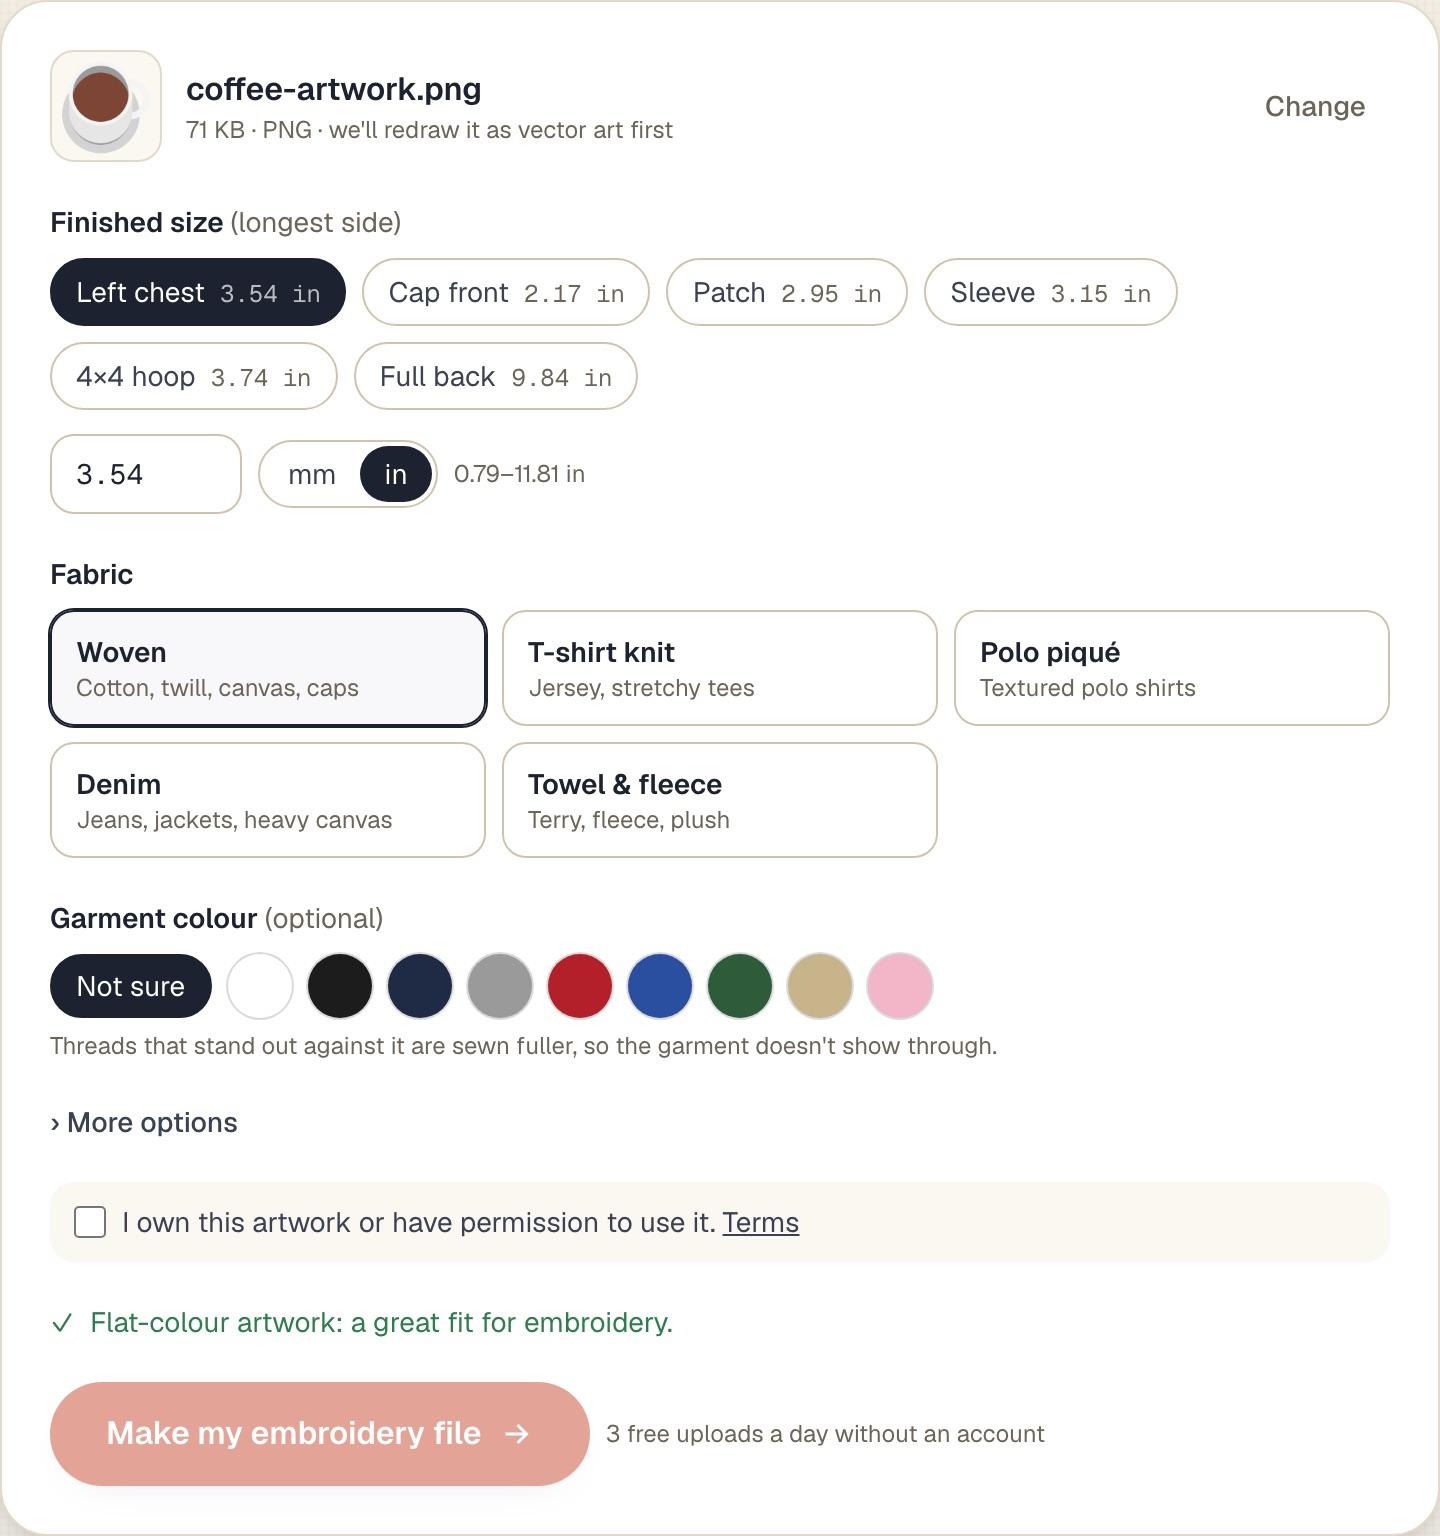
Drop a PNG, JPG or SVG into the box above (images up to 10 MB, SVG up to 5 MB). SVG is ideal; a large, sharp PNG is next best. PNG and JPG images are redrawn as clean vector art automatically, and a plain background is removed and left as fabric.
- 2
Choose the size and fabric
Pick a preset (left chest 90 mm, cap front 55 mm, patch 75 mm, sleeve 80 mm, 4×4 hoop 95 mm, full back 250 mm) or type any size from 20 to 300 mm on the longest side, in mm or inches. Then pick the fabric: woven, T-shirt knit, sweatshirt and hoodie, polo piqué, denim, or towel. The fabric sets stitch density, pull compensation (shapes made slightly wider because thread pulls fabric inward) and the stabilizer we recommend.
- 3
Get your free stitch preview
In about 20 seconds you see your artwork next to a realistic stitch preview drawn stitch by stitch from the real machine file, an animation of it sewing, a close-up of the busiest part, and your design at real size on a T-shirt, woven shirt, cap and jersey. You also get the stitch count, thread colors, trims, sew time and the smallest hoop it fits, plus a plain list of everything we changed for your size.
- 4
Edit it, still free
With a free account you can remove parts, use fewer colors, swap colors for any of 64 Brother threads, switch lettering between satin and fill, choose a fuller fill, or let AI clean up a fuzzy PNG or JPG. Each edit makes a new free preview, and earlier versions stay so you can go back.
- 5
Download only the design you want
Happy with it? Pay for that one design and download PES, DST, JEF, EXP and VP3 together, with a thread color key and report. Not happy? Close the tab. Nothing is charged, and unbought previews are deleted after 30 days.
What you get free vs what you pay for
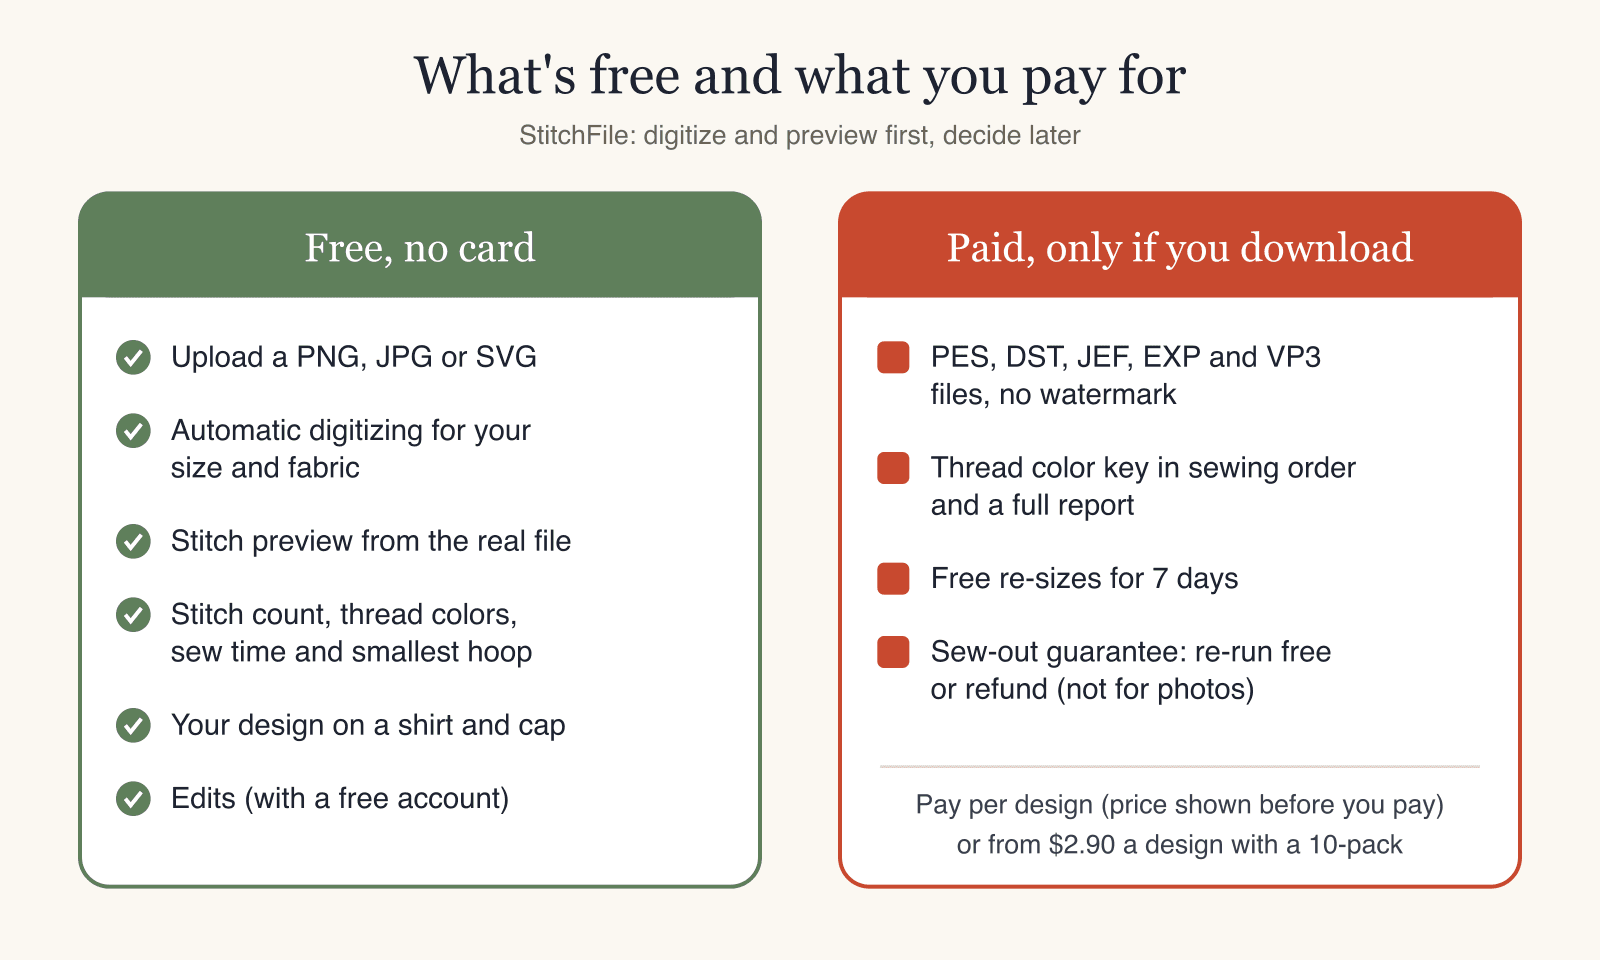
Most of the work happens before you pay. You see the stitched result, how big it is, how long it sews and which hoop it needs, so you only buy a design you already know you want.
| What | Cost |
|---|---|
| Upload a PNG, JPG or SVG (images up to 10 MB, SVG up to 5 MB) | Free, no account |
| Automatic digitizing for the size and fabric you choose | Free, no account |
| Stitch preview drawn from the real machine file, plus a sewing animation and close-up | Free, no account |
| Stitch count, thread colors, trims, sew time and the smallest hoop it fits | Free, no account |
| Your design at real size on a T-shirt, woven shirt, cap and jersey | Free, no account |
| Edits: remove parts, fewer or different colors, lettering style, fuller fill | Free with a free account |
| AI clean-up of a PNG or JPG (5 a day, 2 per design) | Free with a free account |
| Machine files: PES, DST, JEF, EXP and VP3, no watermark | Paid: one purchase, all five |
| Thread color key in sewing order with the stabilizer to use, plus a full report | Included when you buy |
| Other sizes or fabrics for 7 days after buying | Included when you buy |
| Sew-out guarantee: a free re-run or a refund of that design if it sews badly | Included (not for designs made from photos) |
| Commercial use (selling what you make) | Pro or Shop plan |
Prices: pay per design (the price is shown before you pay), or from $2.90 a design with a 10-pack whose credits never expire. Selling what you make needs the Pro plan ($19 a month for 25 designs) or the Shop plan ($49 a month for 100 designs). Prices include any sales tax or VAT. See pricing for the current single-design price in your currency.
Daily limits: 3 free previews a day without an account, 10 a day with a free account, and up to 40 edits a day. Buying a design, a pack or a plan removes the daily preview limit.
Free digitizing options compared
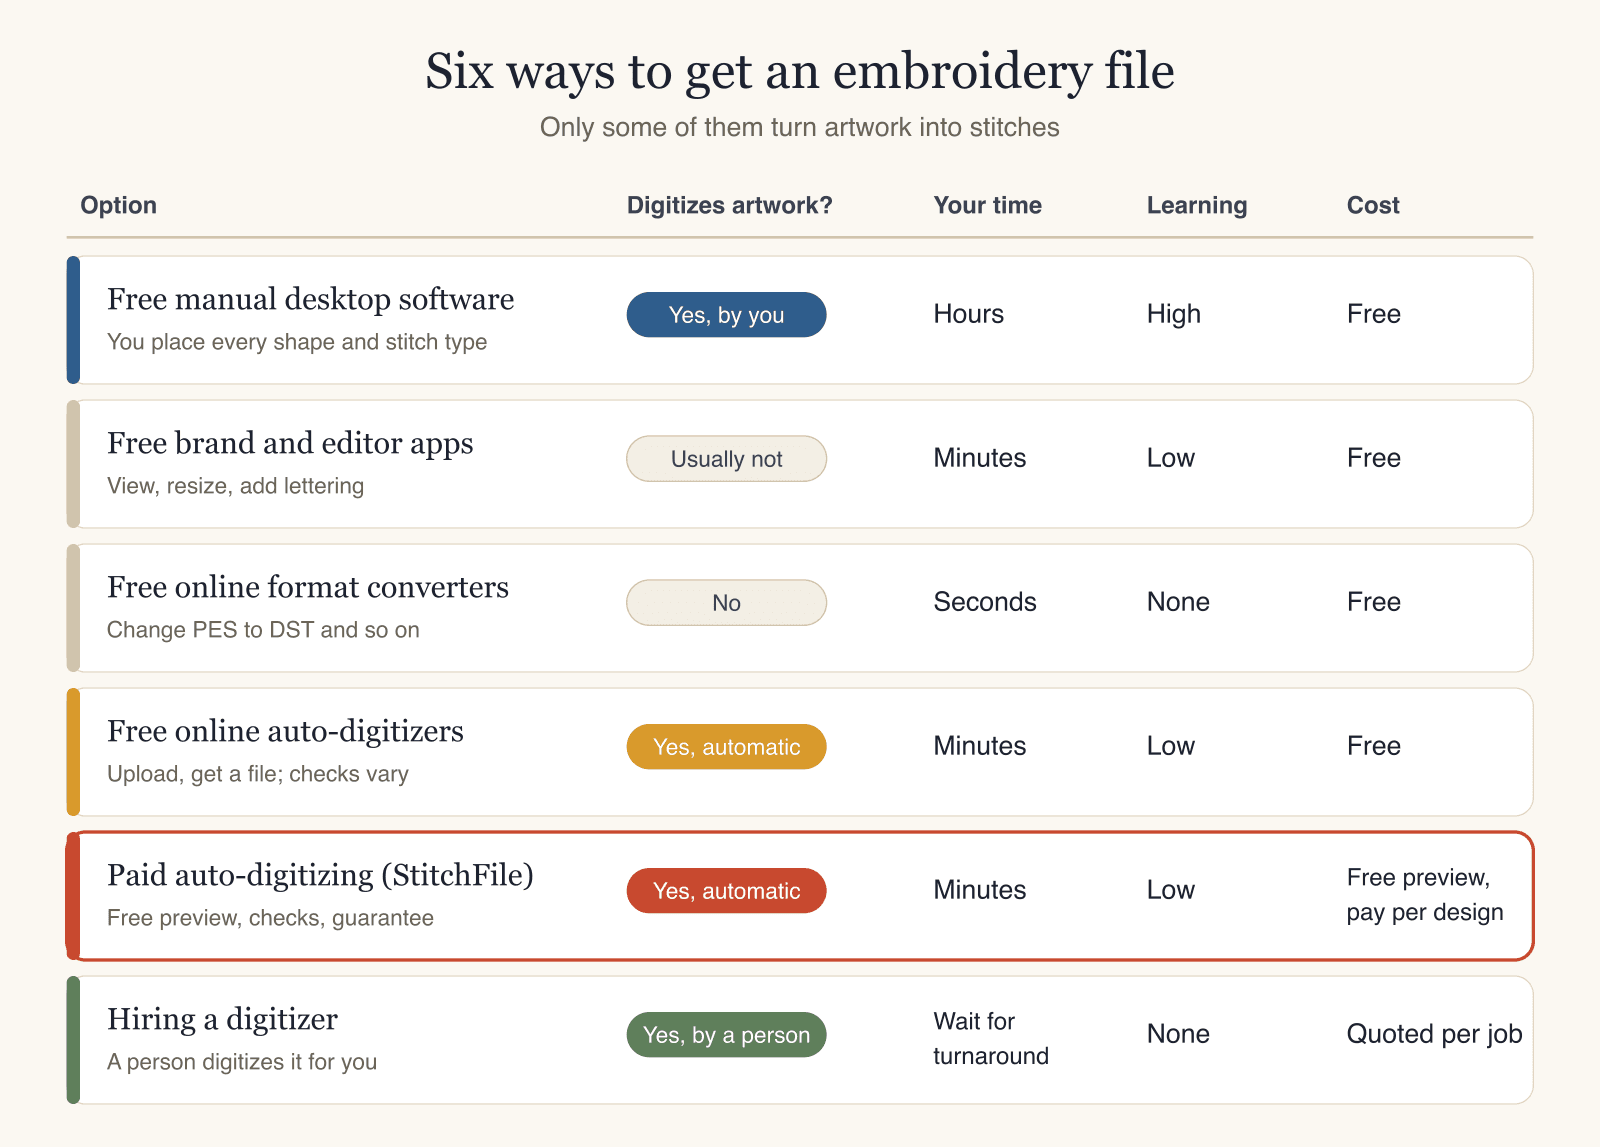
"Free embroidery digitizing" can mean very different things. Some free tools turn artwork into stitches; others only open, resize or re-save files that already exist. Here is how the main kinds of option compare, with the trade-offs that matter: your time, the learning curve, what gets checked before you sew, and what happens if the file doesn't sew well.
| Option | Turns artwork into stitches? | Your time per design | Learning curve | Checks before you sew | Guarantee |
|---|---|---|---|---|---|
| Free manual desktop software | Yes, you do it | The longest: you do every step | High | Whatever you check yourself | None |
| Free brand and editor apps | Usually not (view, resize, letter) | Minutes | Low | On-screen view of an existing file | None |
| Free online format converters | No, they change the file type | Seconds | None | Usually none | None |
| Free online auto-digitizers | Yes, automatically | Minutes | Low | Varies by tool | Rarely |
| StitchFile (paid auto-digitizing) | Yes, automatically | Minutes | Low | Free stitch preview and automatic file checks | Re-run free or refund |
| Hiring a digitizer | Yes, a person does it | Wait for turnaround | None | Ask for a proof or sew-out photo | Depends on the digitizer |
Free manual desktop software
Free, often open-source programs where you trace the artwork and choose every stitch type, density, underlay (the stitches sewn first to hold the fabric down) and sewing order yourself. You get full control and it costs nothing but time. Expect a real learning curve, check it runs on your computer, and plan on a few test stitch-outs while you learn. Good if you want digitizing as a hobby or a skill.
Free brand and editor apps
Free apps from machine makers and software companies that open embroidery files, show them on screen, resize or rotate them, add built-in lettering and save them in your machine's format. They are very useful once you have a design, but most free versions don't turn a logo or picture into stitches. Automatic digitizing, where offered, is usually part of a paid tier.
Free online format converters
Websites that change one embroidery format into another, such as PES to DST. They are quick and free, but they don't digitize artwork. Converting a file also doesn't fix a design that was digitized for the wrong size or fabric. If you search for a "free PES file converter" or "free DST converter" because you have a picture, a format converter is the wrong tool: you need digitizing first.
Free online auto-digitizers
Several free web apps take an image and return a stitch file automatically. They cost nothing and take minutes. What varies a lot is what happens in between: whether they ask for your fabric and finished size, whether you see a realistic preview, whether the file is checked for gaps and overly long stitches, and which formats you get. Test any file on scrap fabric before you sew the real item.
Paid auto-digitizing: StitchFile
The digitizing and preview are free; the download is not. In exchange, every file is tuned for the size and fabric you choose and checked automatically before download (no gaps between colors, no stitch outside its shape, no stitch longer than 7 mm, all five formats read back and compared). You get all five formats in one purchase, free re-sizes for 7 days and a sew-out guarantee: if a file sews badly, send a photo and we re-run it free or refund that design (designs made from photos aren't covered).
Hiring a digitizer
A person digitizes your artwork and sends back the file. This is the right choice for specialty work such as 3D puff, appliqué or photo-real shading. You pay per job, wait for the turnaround, and changes go back and forth by message, so ask for a proof or a photo of a test stitch-out.
Want to know which named programs are actually free, and what each one can do? Our guide to free embroidery software compares them side by side, and embroidery digitizing software covers paid desktop options.
PNG to PES, JPG to PES, PNG to DST: what a free converter really does
A PNG or JPG is a grid of colored pixels. A PES or DST file is a list of needle positions. There is no direct conversion between the two: someone, or some software, has to decide where every stitch goes. That decision is digitizing, and it is what you get free here.
- Convert an image to an embroidery file free: upload the PNG or JPG above; we redraw it as clean vector shapes, digitize it and show the free preview.
- Convert PNG or JPG to PES free: the preview is free, and PES (for Brother and Baby Lock) is one of the five formats in the download. More on the PNG to PES and JPG to PES pages.
- Convert PNG to DST free: same upload; DST is in the same download, with a color key because DST doesn't store thread colors. See PNG to DST.
- Digitize a logo for embroidery online, free: SVG logos are ideal, since the shapes are exact. The logo to embroidery page has logo-specific tips.
Already have a PES and need a DST? Every StitchFile purchase includes all five formats, so you never have to convert afterwards, and there is no quality loss from re-saving one format as another.
What artwork works best for free auto-digitizing
The cleaner the artwork, the better any automatic digitizer does. These tips make the biggest difference:
- Flat colors and clear edges. Logos, badges, patches, mascots, cartoons, icons and lettering stitch best. Soft shadows and gradients become solid thread colors.
- The biggest, cleanest file you have. SVG is ideal (export it from Illustrator, Canva or Affinity). A sharp PNG at least 1000 px across is next best. Screenshots and small web images give soft edges.
- Up to about 12 colors. Designs can use up to 12 thread colors. Look-alike colors are merged automatically, and the Fewer colors edit cuts thread changes further.
- Text big enough to sew. Letters need to be at least about 5 mm tall on woven and denim, 6 mm on T-shirt knit and polo piqué, and 7 mm on towels, sweatshirts and fleece. The preview flags smaller text and tells you a size that would work.
- Plain artwork, no mock-up. Remove mock-up backgrounds, shadows and 3D effects if you can. A plain background is removed automatically; choose to keep it if you want a filled patch.
- Photos: worth a try, with limits. Photos are redrawn as simplified flat-color art, so faces, pets and scenes come out like an illustration. Designs made from photos are not covered by the sew-out guarantee, so check the free preview closely.
Real examples from the free preview
These are real StitchFile previews, each digitized at 90 mm on the longest side for woven fabric. The numbers come from each design's report, the same stats you see on your own preview.
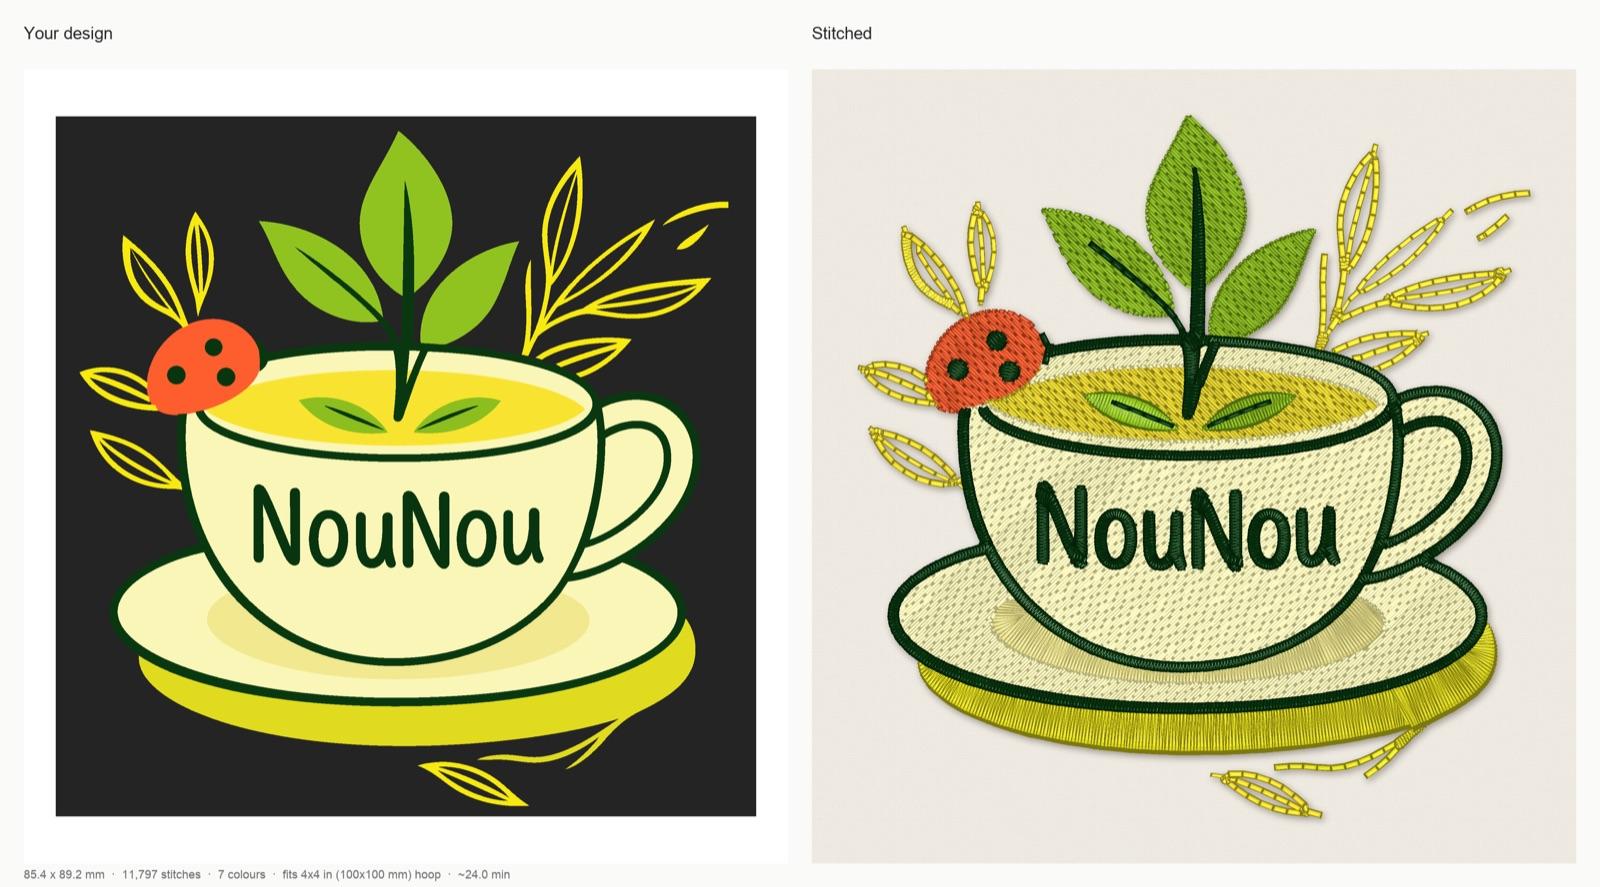
A logo with lettering and a dark background
The dark square behind the cup was a full-canvas background, so it was removed and left as fabric (you can keep it for a filled patch). Three pairs of look-alike greens and yellows were merged because they look the same in thread, and the lettering is sewn as smooth satin.
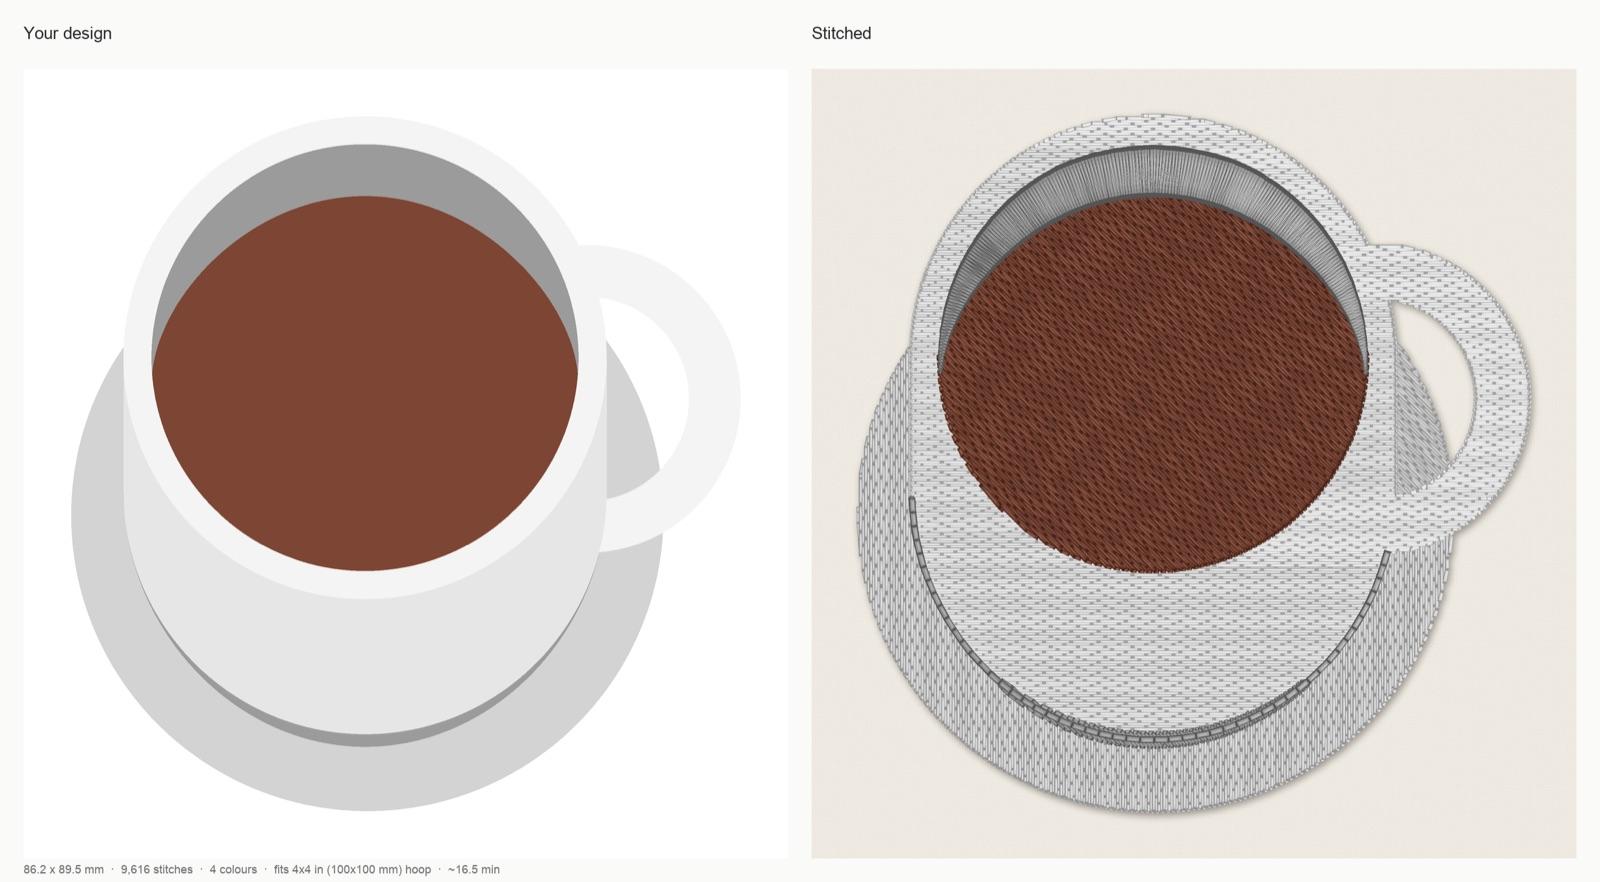
Simple flat-color art
Clean shapes with a few solid colors are the easiest case. Two near-identical light grays became one thread, which saves a color change, and the large areas are sewn as fill over underlay.
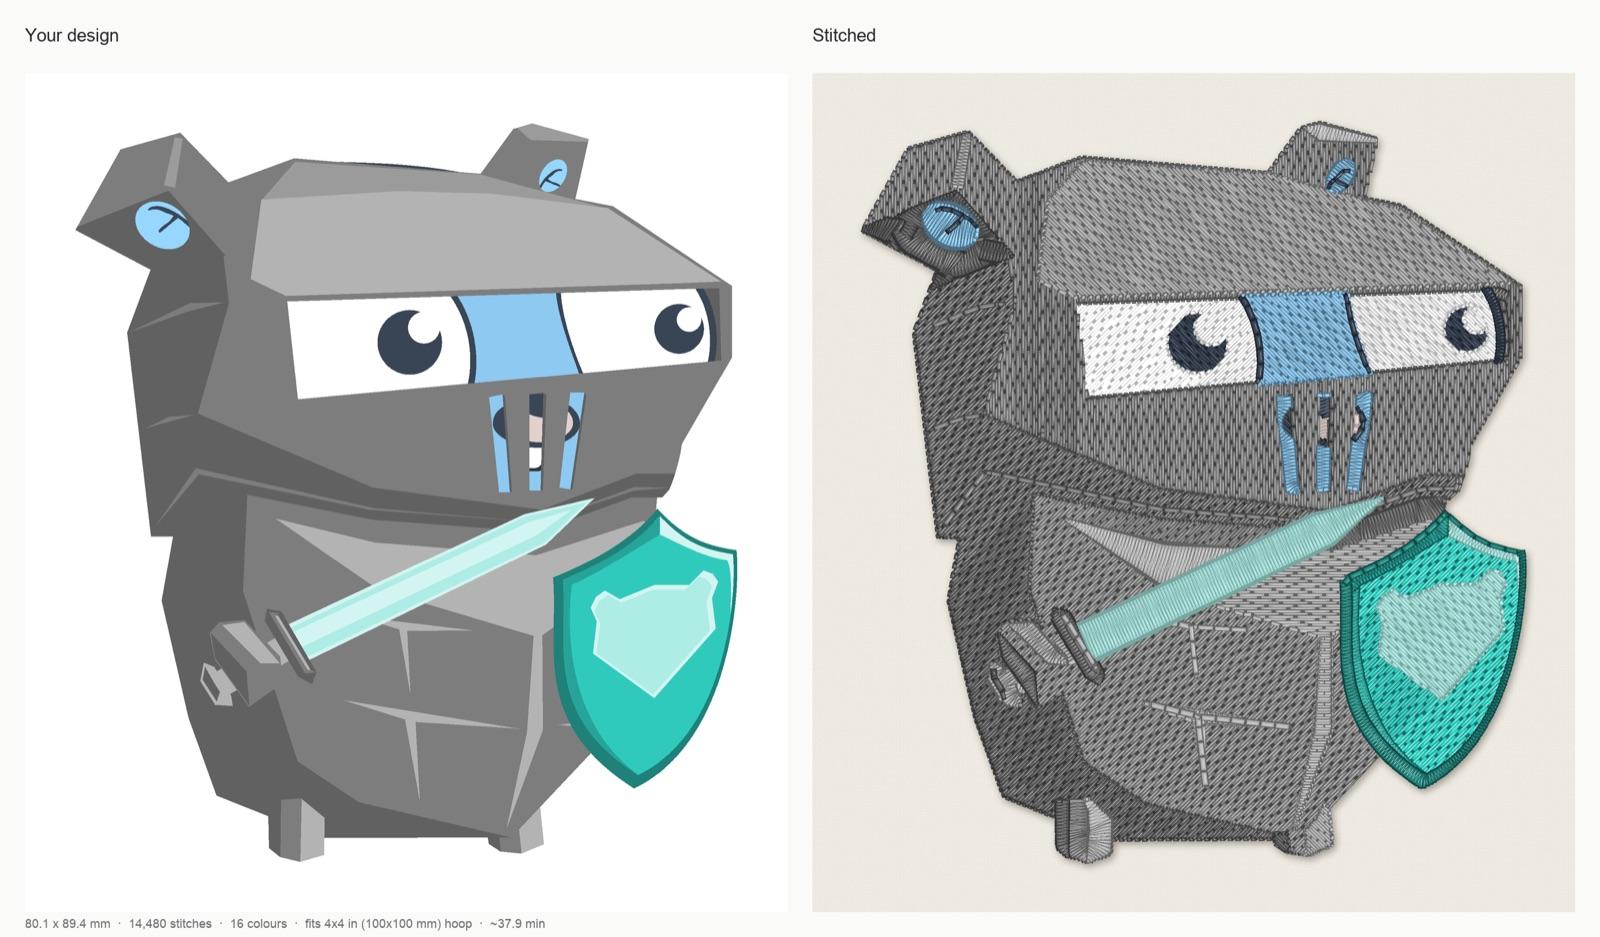
A shaded mascot: possible, but busy
Lots of gray shading means lots of thread. The colors were reduced to the 12-thread limit, but the sewing order still has 16 color stops and 97 trims, so it takes much longer to sew than the coffee cup at the same size. This is where the free Fewer colors edit pays off: check the stats before you buy.
Artwork: teacup logo, our own design. Coffee cup from Microsoft Fluent Emoji, copyright (c) Microsoft Corporation, MIT License. Gopher knight by Egon Elbre, CC0; the Go gopher was designed by Renée French. Stitch previews generated by StitchFile.
Which format does your machine need?
Each machine brand reads its own format. Every purchase includes all five, so you can switch machines or share a design without converting anything.
| Format | Machines | Thread colors |
|---|---|---|
| PES | Brother, Baby Lock | Stores thread colors |
| JEF | Janome (and many Elna machines) | Stores thread colors |
| DST | Tajima and most commercial multi-needle machines | No colors stored: follow the color key |
| EXP | Melco, Bernina | No colors stored: follow the color key |
| VP3 | Husqvarna Viking, Pfaff | Stores thread colors |
Many machines read more than one format; your manual lists them. To load a file, unzip the download, copy just your format's file to the top folder of a USB stick, and pick it on the machine. For the details of each format, read embroidery file formats explained.
Choosing the size and hoop
Size matters more than people expect: the same logo needs different stitches at 55 mm on a cap than at 250 mm on a jacket back. Choose the real finished size before you digitize instead of resizing a stitch file afterwards.
| Placement | Typical size (longest side) | Preset |
|---|---|---|
| Left chest | 75–90 mm (3–3.5 in) | 90 mm |
| Cap front | 50–60 mm (2–2.4 in) | 55 mm |
| Patch | 60–90 mm | 75 mm |
| Sleeve | 60–80 mm | 80 mm |
| Full 4×4 hoop | up to about 95 mm | 95 mm |
| Full back | up to 250 mm (10 in) | 250 mm |
The preview shows the smallest hoop the design fits: 4×4 in (100×100 mm), 5×7 in (130×180 mm), 6×10 in (160×260 mm), 8×8 in (200×200 mm) or 8×12 in (200×300 mm). Check your machine's maximum embroidery area before you buy. Our embroidery hoop sizes guide has a hoop size chart and explains the difference between a hoop's nominal size and its real embroidery field.
Common mistakes with free digitizing
- Tiny text. A tagline that looks fine on screen can be 2 mm tall on a left-chest logo. Make the design bigger, switch the lettering to satin, or remove the small text.
- Too many colors. Every color is a thread change. Shaded art can turn into many color stops; use fewer colors and merge look-alikes.
- The wrong size. Digitizing at one size and scaling the stitch file a lot on the machine changes stitch length and density. Digitize at the size you will sew.
- The wrong fabric setting. A file made for a woven shirt can pucker on a stretchy tee or sink into a towel. Pick the fabric you will actually sew on.
- The wrong format. A machine can't open a format it doesn't read, or a zip file. Unzip first and copy the format for your machine.
- Skipping the preview. The preview shows the stitch count, sew time, hoop and any warnings. Read them before you buy, not after the first stitch-out.
- Skipping the test sew. Always test-sew on scrap fabric with the recommended stabilizer. Most stitch-out problems come from hooping and stabilizer, not the file.
For a deeper walk-through of the digitizing decisions, see how to digitize a logo for embroidery.
Questions about free embroidery digitizing
Is it really free?+
The digitizing and the stitch preview are free, with no account and no card: you see the stitched result, the stats, the thread colors and your design on a T-shirt and cap. Edits are free with a free account. You pay only if you want to download the machine files: pay per design (the price is shown before you pay), or from $2.90 a design with a 10-pack.
Do I need an account?+
Not to preview. You can make 3 previews a day without an account, or 10 a day with a free account. A free account (an email link or Google, no password) is needed to edit a design, try another size or fabric, use AI clean-up, or buy the files.
Which embroidery formats do I get?+
Every purchase includes all five: PES (Brother, Baby Lock), DST (Tajima and most commercial machines), JEF (Janome), EXP (Melco, Bernina) and VP3 (Husqvarna Viking, Pfaff), plus a thread color key in sewing order and a full report.
Can I use the files commercially?+
Single designs and 10-packs are for personal use. Selling what you make needs the Pro plan ($19 a month, 25 designs) or the Shop plan ($49 a month, 100 designs). Either way you must own the artwork or have permission to use it.
What if the design sews badly?+
Send a photo of the stitch-out to support@stitchfile.app and the team will re-run the design free or refund that design. Designs made from photos aren't covered, because they're sold as shown in the free preview. Always test-sew on scrap fabric with the recommended stabilizer first.
Does it work on a Mac, iPhone or Android?+
Yes. The website works in any browser on a Mac or a Windows PC, with nothing to install, and there are StitchFile apps for iPhone and iPad (App Store) and Android (Google Play) that use the same account.
How is this different from a free embroidery file converter?+
A format converter changes one embroidery file into another, for example PES to DST. It can't turn a picture into stitches. StitchFile digitizes your artwork: it picks satin, fill or running stitches for every shape, tunes them for your size and fabric, and writes all five formats, so you never need a converter afterwards.
How long does it take?+
About 20 seconds for most designs (usually 10 to 30 seconds; images take a little longer, and AI clean-up about a minute). Each edit makes a new preview in about the same time.